Avatary Studio: Difference between revisions
No edit summary |
|||
| (3 intermediate revisions by the same user not shown) | |||
| Line 1: | Line 1: | ||
[[File:Avatary Studio Logo.png|thumb|Avatary Studio|255x255px]]Avatary Studio is a new generation of high-precision facial expression post-processing software that can convert facial expression videos shot by any camera into high-quality 3D facial expression animations and supports any 3D facial expression rigging system. The high-precision facial expression animations calculated by Avatary Studio can be exported to mainstream DCC (digital content creation) software such as Maya, 3ds Max, Blender, Unreal, Unity and MotionBuilder. | [[File:Avatary Studio Logo.png|thumb|Avatary Studio|255x255px]]Avatary Studio is a new generation of high-precision facial expression post-processing software that can convert facial expression videos shot by any camera into high-quality 3D facial expression animations and supports any 3D facial expression rigging system. The high-precision facial expression animations calculated by Avatary Studio can be exported to mainstream DCC (digital content creation) software such as Maya, 3ds Max, Blender, Unreal, Unity and MotionBuilder. | ||
<youtube width="960" height="540">TQMOk1ZBlMc</youtube> | |||
| Line 86: | Line 87: | ||
==== Graphic Tutorial ==== | ==== Graphic Tutorial ==== | ||
# Easily import the video material. Select the desired video file in the resource manager and directly drag it to the timeline area of the software. Immediately, a window will pop up. In this window, accurately select the "With-Track" option to start the subsequent specific tracking process. | |||
# After entering the "'''With-Track'''" dedicated window, you will be faced with a variety of point cloud templates. Please make a careful choice. We highly recommend that you give priority to the AI04 or AI06 templates, which have been optimized to provide a more accurate and reliable data foundation for subsequent analysis. | |||
# Locate the '''"A" button''' at the bottom left corner of the software. Click it decisively, and the software will automatically invoke advanced algorithms to attentively analyze the subtle facial features in the video, laying the groundwork for subsequent precise matching. | |||
# Wait for a while. Once the analysis process is successfully completed, you can easily switch to the Avatary Studio interface. Here, detailed and intuitive analysis results are ready for you to view and evaluate, so that you can decide the next operation direction. | |||
# Move your eyes upward. In the top menu bar of the Avatary Studio software, accurately find and click to switch to the '''"Retargeter" mode'''. This mode is a crucial bridge connecting the software with external digital content creation (DCC) tools, unlocking more in-depth editing functions. | |||
# Follow the '''established connection''' specifications to smoothly connect to the DCC software you need. Ensure that the connection is stable and reliable, which is the cornerstone for seamless data interaction and efficient collaboration. | |||
# After successfully connecting to the DCC, focus on the right panel of the software, find and click the '''"Auto Pose" option'''. It is like an intelligent assistant that can quickly generate basic pose data to facilitate subsequent fine adjustments. | |||
# Immediately after that, click the adjacent '''"view more" button''', opening a door to more abundant settings and presenting more possibilities for personalized customization. | |||
# In the newly popped-up '''"solver edit" window''', carefully sort through the grouping options and accurately select the key facial area groups, such as "Brow", "Eye", "Mouth", etc., to enable refined manipulation of different parts. | |||
# After selecting one of the groups, '''quickly switch to the connected DCC software''' interface and use the lasso tool flexibly to accurately select the model controllers corresponding to this group. This step is like building a communication bridge to ensure that commands are accurately conveyed. | |||
# Return to the '''"solver edit"''' window again and click the crucial '''"Update" button'''. At this moment, the software will intelligently capture the controller information you selected in the DCC, achieving data synchronization and laying a solid foundation for subsequent calculations. | |||
# Click the '''"Save" button''' to promptly save the current carefully set data state, preventing accidental loss and ensuring the continuity and stability of the work process. | |||
# Repeat steps 10 to 12, methodically switching to other groups and completing the same refined settings and data synchronization operations one by one to ensure that all key parts of the entire model can be precisely controlled. | |||
# When all group settings are completed, decisively close the "solver edit" window and seamlessly switch to the '''"Manual Pose" mode'''. This mode gives you more freedom for manual manipulation to meet personalized creative needs. | |||
# Move your sight back to the bottom left corner of the software. In the clear grouping option area, flexibly select a specific group according to your creative needs, preparing to focus on the detailed refinement of keyframes. | |||
# Manipulate the timeline as if traveling through the video time corridor to accurately select keyframes. During the process, you can use the conveniently placed '''"+" and "-" buttons''' above the timeline to add or delete keyframes as you wish, achieving the perfect optimization of the frame sequence. | |||
# Switch to the "Manual Pose" mode interface, and you will be pleasantly surprised to find that the carefully selected keyframes have been prominently marked with '''red fonts''', making it convenient for you to quickly locate and operate them. | |||
# Lightly click on one of the red keyframes. Magically, the corresponding DCC software interface will instantly and automatically jump to the corresponding time position, achieving precise synchronization across interfaces and greatly improving operational efficiency. | |||
# At this moment, in the DCC software, give full play to your creativity and skills to finely adjust the model controllers. Carefully compare the facial expression details in the video frame and make the model expression perfectly match it, giving the character vivid vitality. | |||
# After the adjustment is completed, return to the Avatary Studio interface and click the crucial '''"G" button'''. The software will intelligently capture the current controller values, completing the key data collection and injecting soul into subsequent calculations. | |||
# Instantly, you will notice that the keyframe you just operated on has changed from '''red to yellow''' in the "Manual Pose", visually indicating that it has successfully collected data and is waiting for the next calculation instruction. | |||
# The rest of the keyframes follow the same process, giving them precise controller data and unique personalities one by one. | |||
# Click the '''"M" button''', and the software will go full throttle, using complex algorithms to conduct in-depth calculations on all keyframes and controller data, weaving a data association network and laying a solid foundation for the perfect presentation of results. | |||
# After the calculation is completed, the timeline will be transformed gorgeously. The dynamic curves of each controller will be clearly presented, like the beating pulse of data. At the same time, the keyframes participating in the calculation will shine with a '''green light''' in the "Manual Pose", announcing the successful calculation and data readiness. | |||
# Finally, click the "'''Synchronize to DCC" button''' on the timeline. The software will quickly and accurately transmit the calculation results to the DCC software like a courier, ensuring seamless data connection at both ends. | |||
# Wait patiently for the short transmission process to end. Return to the DCC software interface again. At this moment, the stunning effect that perfectly combines video and model data has been fully presented for you to appreciate, evaluate, and further refine in your creation. | |||
=== No-Track === | === No-Track === | ||
| Line 93: | Line 121: | ||
==== Graphic Tutorial ==== | ==== Graphic Tutorial ==== | ||
# Easily import the video material. Select the desired video file in the resource manager and directly drag it to the timeline area of the software. Immediately, a window will pop up. In this window, accurately select the "With-Track" option to start the subsequent specific tracking process. | |||
# Select the "'''No-Track'''" option. | |||
# Establish a crucial connection to seamlessly integrate external creative forces. Follow the established procedures to stably connect the software with the DCC software you need, ensuring a smooth and stable bridge for data interaction and laying a solid foundation for subsequent in-depth collaboration. | |||
# Activate the intelligent pose preset to explore the ideal starting pose. Locate and click the '''"Auto Pose" option''' in the function area on the right side of the software interface. It is like an intelligent stylist that can quickly generate a basic character pose framework based on the video content, facilitating subsequent refined carving. | |||
# Dive deeper into customizing pose details and unlock more editing possibilities. Right next to the "Auto Pose" button, click '''"view more"''', and a door to rich pose settings will slowly open, presenting more options for personalized parameter adjustments and customizations. | |||
# Finely divide the facial control areas and focus on adjusting key parts. In the newly popped-up '''"solver edit" window''', carefully identify and select key facial groups such as "Brow", "Eye", "Mouth", etc., to facilitate precise control of different facial features later. | |||
# Associate DCC controllers to establish a cross-software control link. After selecting a certain facial group, quickly switch to the connected DCC software interface and use the lasso tool flexibly to accurately capture the model controllers corresponding to this group. It's as if an invisible thread is drawn between the two software worlds, enabling precise command transmission. | |||
# Synchronize controller information to achieve real-time data sharing. Return to the "solver edit" window and click the crucial '''"Update" button'''. At this moment, the software will intelligently capture the details of the controllers you selected in the DCC, complete data synchronization, ensure consistent information on both sides, and provide accurate data for subsequent calculations. | |||
# Save the current settings to solidify the phased results. Click the '''"Save" button''' to promptly save the currently carefully adjusted parameters and settings, avoiding data loss due to unexpected situations and ensuring the continuity of the creative process. | |||
# Repeat the key operations to cover all key facial parts. Follow the same pattern, methodically switch to other key facial groups, and repeat steps 6 to 8 to ensure that each important facial area can be precisely matched with the DCC controllers for all-round fine control. | |||
# Switch the working mode to embrace the challenge of manual refinement. When all group settings are completed, decisively close the "solver edit" window and smoothly switch to the "Manual Pose" mode. This mode is like a fine handmade workshop, giving you the ability to meticulously carve every frame of pose details to meet the ultimate personalized creative demands. | |||
# Start the intelligent analysis engine and discover the keyframe treasures with one click. Locate the '''"calculate" button on the software timeline that looks like a magic wand and click it gently.''' The software will immediately mobilize advanced algorithms to attentively analyze the facial features in the video, automatically identify and mark the keyframes, screening out the essence moments for subsequent creation. | |||
# View the keyframe results and lock in the key creative nodes. Wait for a short while until the analysis process is finished. Switch to the '''"manual pose" tab''', and you will find that the software has thoughtfully marked the automatically screened keyframes in '''red font'''. These will be the core points for subsequent creative efforts. | |||
# Select the facial area group to focus on the current creative focus. Move your sight to the group selection area at the bottom left of the software and click on a specific group flexibly according to your creative needs, preparing to conduct in-depth adjustments on the keyframes of this area. | |||
# Jump to the corresponding frame in DCC for precise cross-interface synchronization. Select a prominent red keyframe, and something magical will happen. The associated DCC software interface will automatically jump to the corresponding time position instantly, as if synchronized in time and space, greatly enhancing the operational smoothness and efficiency. | |||
# Fine-tune the DCC controllers to make the expressions match perfectly. At this moment, in the DCC software, fully demonstrate your creativity and skills to delicately adjust the model controllers. Carefully compare the facial expression details in the video frame until the model expression seamlessly matches the video picture, giving the character vivid vitality. | |||
# Capture the controller values to record the key data status. After the adjustment is completed, return to the main interface of Avatary Studio and click the '''"G" button'''. The software will act like a sensitive data collector, quickly capturing the current controller values and locking in the key data points for subsequent complex calculations. | |||
# Mark the keyframe status to witness the successful data collection. In an instant, you will be pleasantly surprised to find that the keyframe you just operated on has changed from '''red to yellow''' in the "manual pose", conspicuously indicating that the data of this frame has been successfully collected and is waiting for the next calculation instruction. | |||
# Process the remaining frames in sequence to ensure a coherent overall effect. Repeat steps 14 to 17 for the remaining keyframes one by one. | |||
# Start the core calculation process and weave a data interaction network. Click the '''"M" button''', and the software will go full throttle, using complex algorithms to conduct in-depth calculations on all keyframes and controller data, like weaving a precise web and building the connection links between various data points, laying a solid foundation for the perfect presentation of results. | |||
# Present the calculation visualization to control the creative dynamic trend. After the calculation is completed, the timeline will be transformed gorgeously. The dynamic curves of each controller will emerge clearly, like the beating data pulses, showing the changing trend of poses over time. At the same time, the keyframes participating in the calculation will change '''to green''' in the "Manual Pose", announcing the successful completion of the calculation and the readiness of the data. | |||
# Push the calculation results to achieve a perfect cross-software delivery. Shift your attention back to the timeline and click the '''"Synchronize to DCC" button'''. The software will turn into a dutiful courier, quickly and accurately transmitting the calculation results to the DCC software, ensuring seamless data docking and the perfect landing of creative achievements. | |||
# Inspect the final results and enjoy the joy of creative harvest. Wait patiently for the short transmission process to come to an end, and then switch to the DCC software interface again. At this time, the stunning effect that combines video and model data has been fully presented, for you to comprehensively appreciate, evaluate, and draw a perfect ending to this wonderful creative journey or start a new round of creative iterations. | |||
=== One-Click === | === One-Click === | ||
| Line 100: | Line 152: | ||
==== Graphic Tutorial ==== | ==== Graphic Tutorial ==== | ||
# Easily start the material import process. Locate the video file you need precisely in the resource manager and then directly drag it to the timeline area of the software. At this moment, a window will pop up immediately. You need to carefully distinguish and select the "One-Click Metahuman" or "One-Click ARKit" option from the options provided in this window, thus setting the direction for subsequent intelligent processing. | |||
# Focus your eyes on the bottom left corner of the software where there is a conspicuous '''"A" button'''. Click it decisively, and the software will immediately mobilize the built-in efficient algorithms to automatically and quickly engage in complex calculation tasks without much manual intervention from you, saving a great deal of operation effort and time. | |||
# While the calculation is underway in the background, you can start preparing for the next crucial operation - '''connecting to the DCC software'''. Follow the established standard procedures strictly to establish a stable connection link between the software and the DCC, which is a key prerequisite for smooth data interchange. | |||
# After the connection is successfully completed and the software finishes the previous complex calculations, shift your attention back to the timeline area and find and click the '''"Synchronize to DCC" button'''. This operation is like opening a data transmission channel with one click, accurately and quickly pushing the carefully calculated results obtained in the previous stage to the connected DCC software, ensuring seamless data connection. | |||
# Finally, just wait patiently for a short while until the data transmission process comes to a successful end. Then you can leisurely switch to the DCC software interface. At this time, the stunning effects presented after the full process of the One-Click function are already in front of you, for you to comprehensively review, evaluate, and conduct subsequent in-depth creation. | |||
== Cloud Batch Solver == | == Cloud Batch Solver == | ||
Latest revision as of 09:04, 17 December 2024

Avatary Studio is a new generation of high-precision facial expression post-processing software that can convert facial expression videos shot by any camera into high-quality 3D facial expression animations and supports any 3D facial expression rigging system. The high-precision facial expression animations calculated by Avatary Studio can be exported to mainstream DCC (digital content creation) software such as Maya, 3ds Max, Blender, Unreal, Unity and MotionBuilder.
DOWNLOAD NOW!!!
Avatary Studio, with its unique ingenuity, spares no effort to safeguard your asset security!
It pioneers an architecture that separates computing nodes from assets, completely eliminating
the hassle of asset migration and firmly protecting every piece of digital asset.
Currently supported DCC versions:
- Maya 2020
- Maya 2022
- Maya 2023
- 3Ds Max 2022
TODO List:
- MotionBuilder
- UE
- Unity
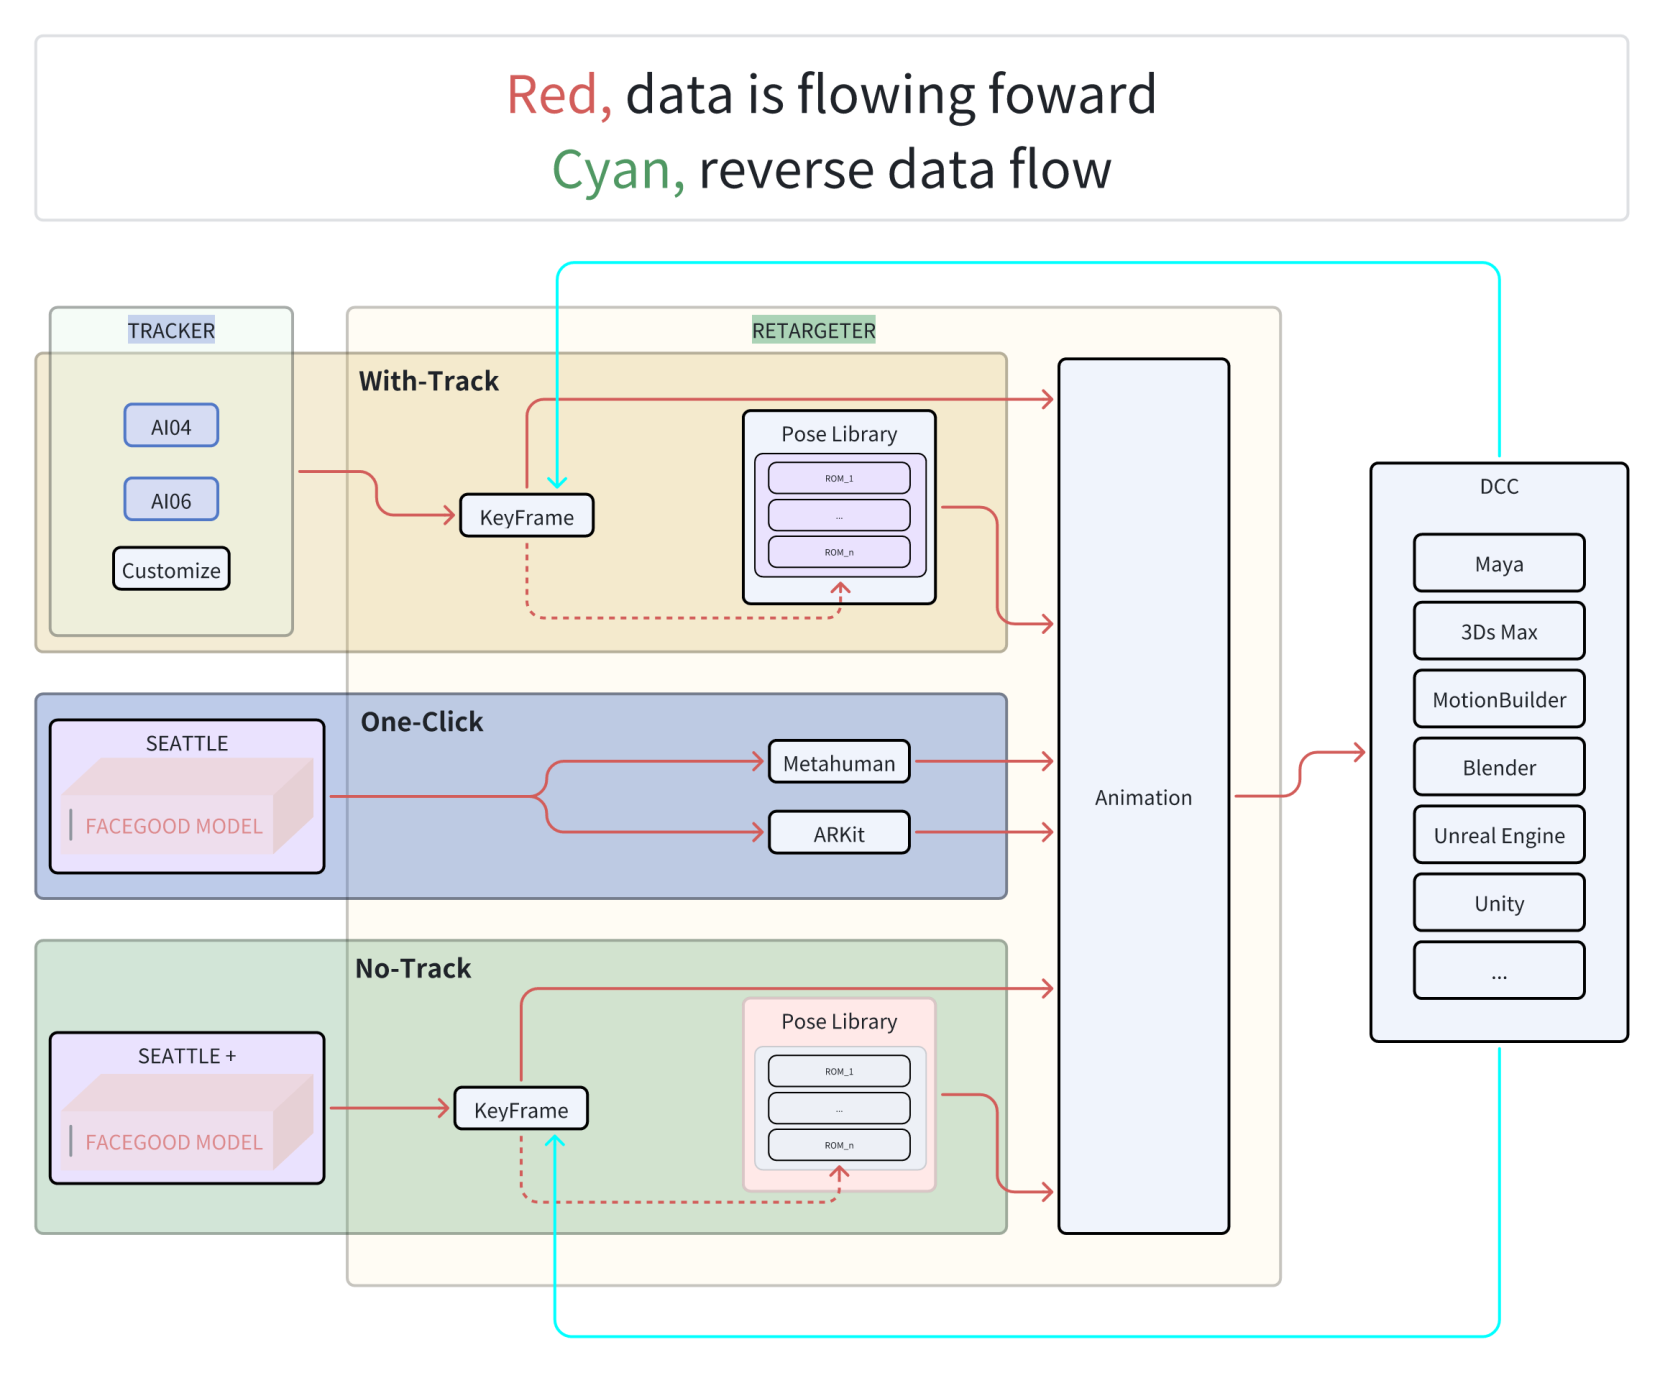
Quick Intro
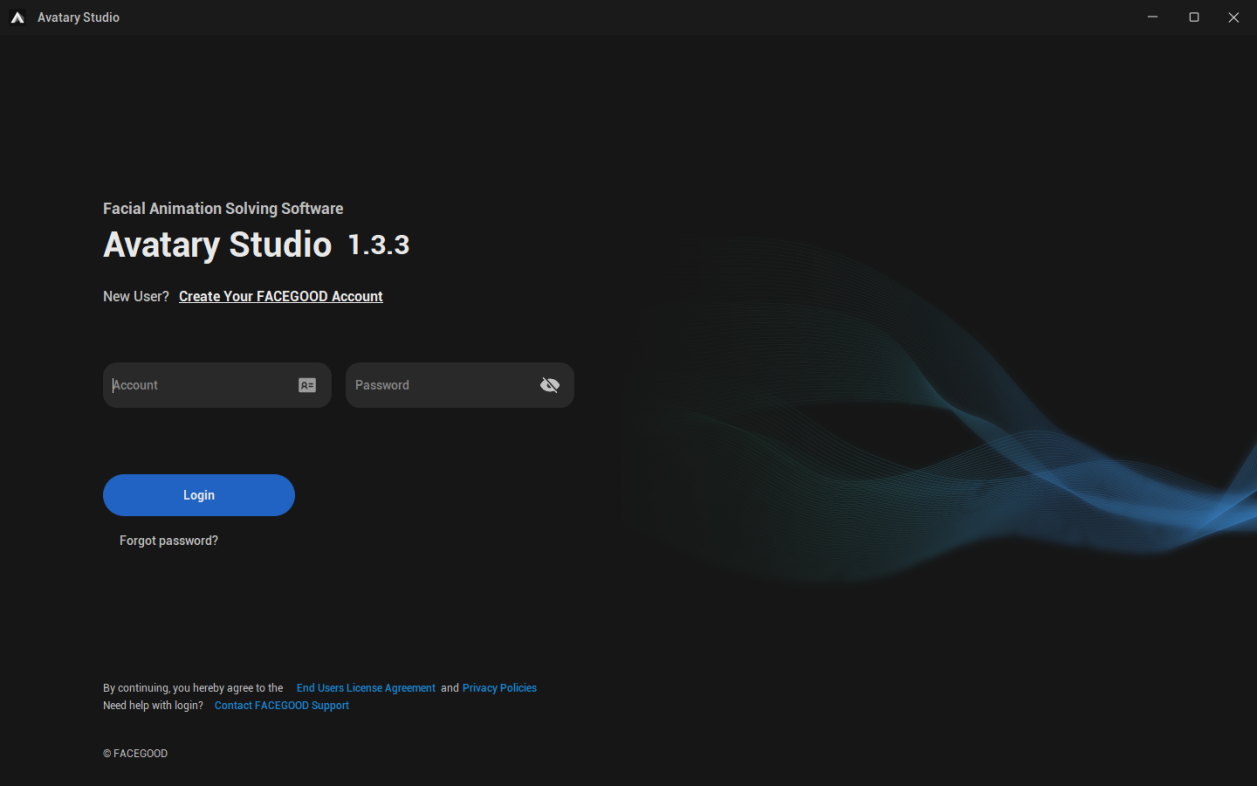
Log in to Avatary Studio
- Open Avatary Studio and enter your account to log in at the login screen
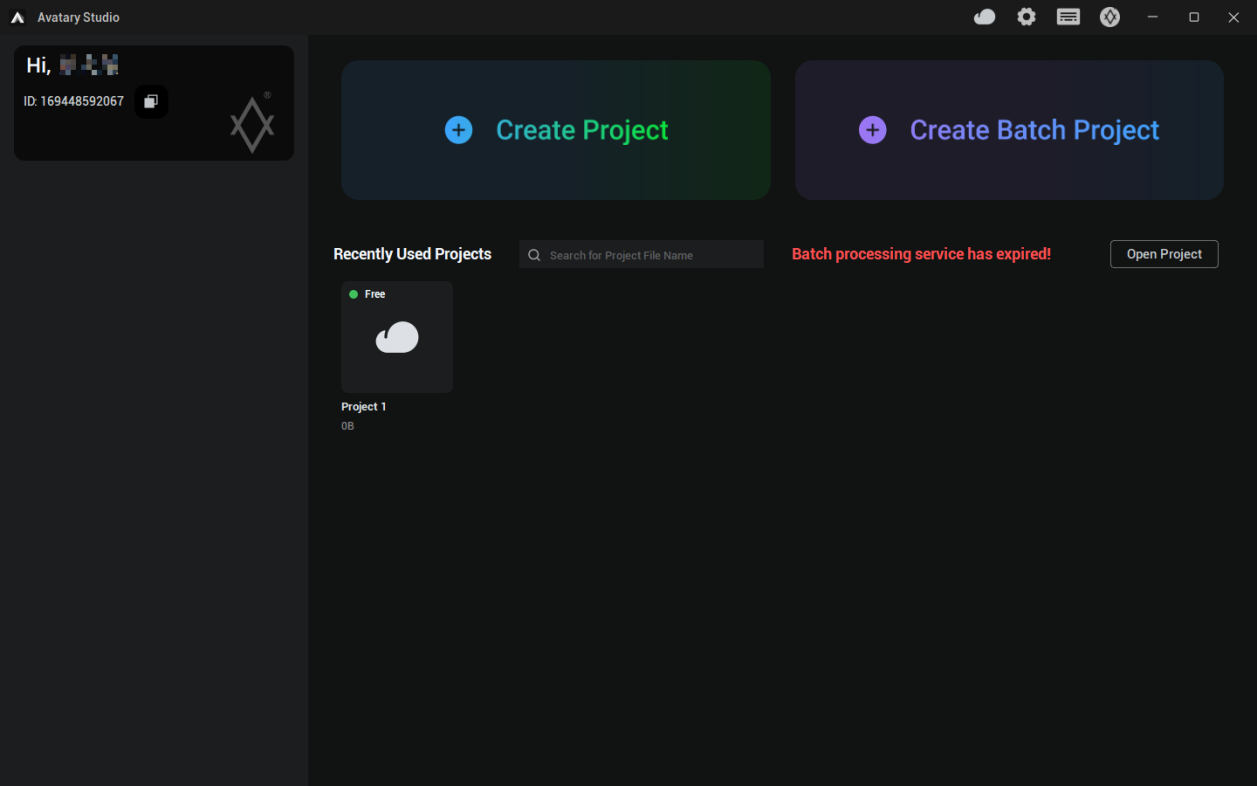
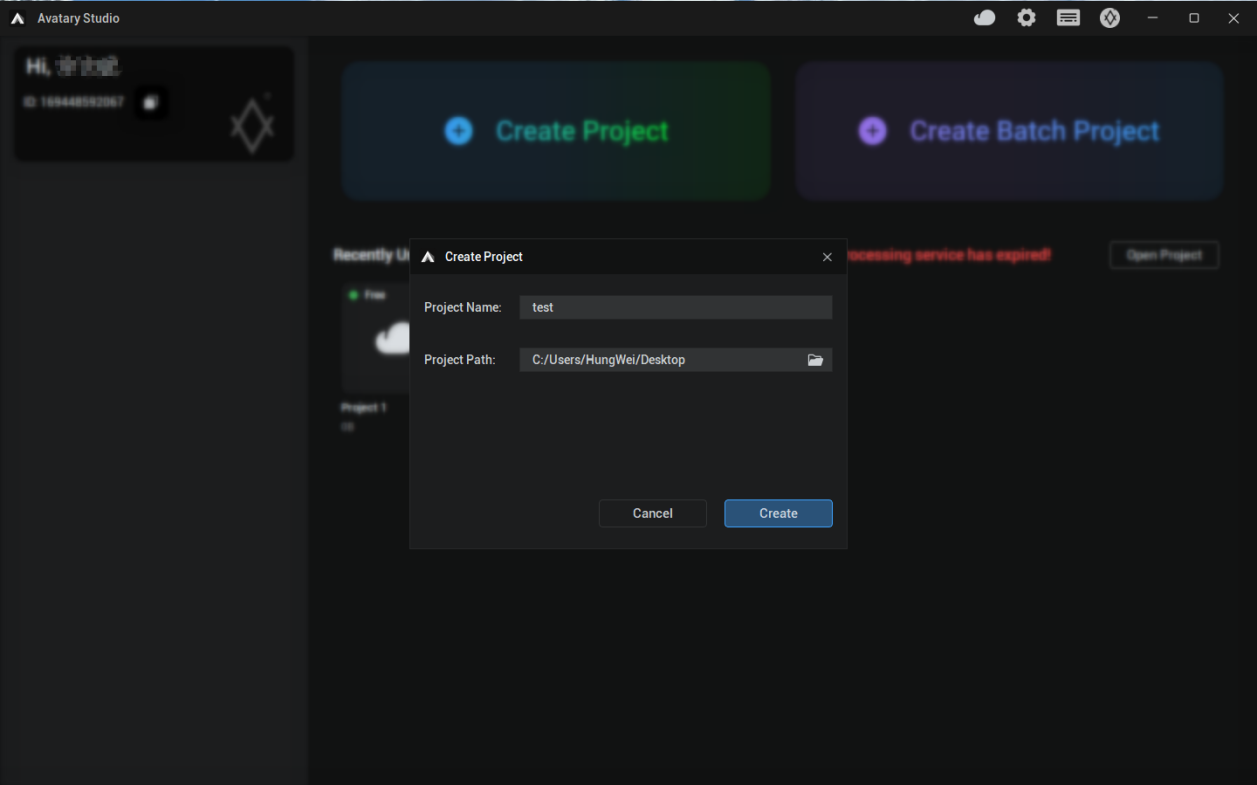
Create new local project
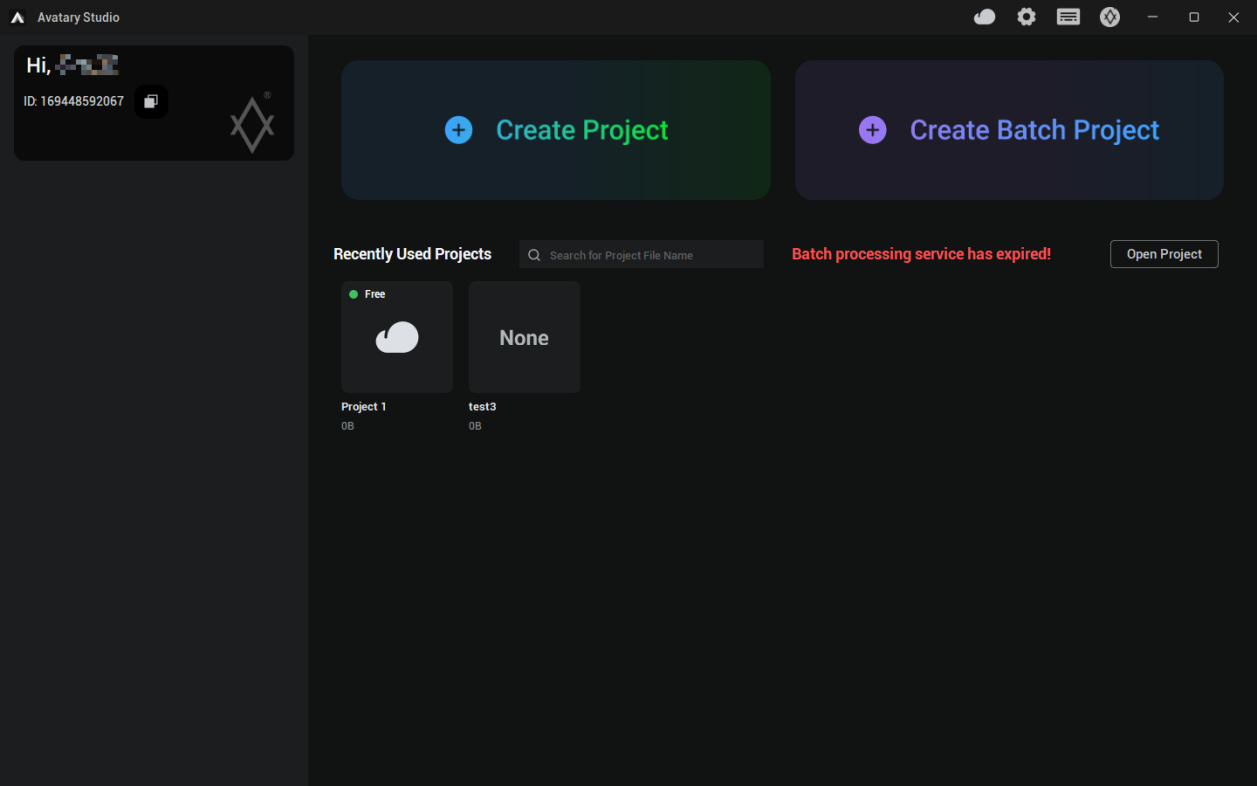
- Locate and click the "Create Project" button to initiate the project creation process. This button is usually prominently placed on the software interface for your easy access.
- In the pop-up dialog box, accurately enter the project path, that is, specify the exact location where you want to store the project files. Then enter a unique project name. Once you've finished inputting, click the "Create" button.
NOTE: At this point, the system will automatically create a dedicated folder named after the project name under the specified project path, which is used to store various data and files related to this project, ensuring orderly management of project resources.
- After the project is successfully created, you can simply switch to the "Recently Used Projects" list area and immediately find the newly created project, allowing you to quickly start subsequent project operations and seamlessly connect to the workflow.
Import video to project
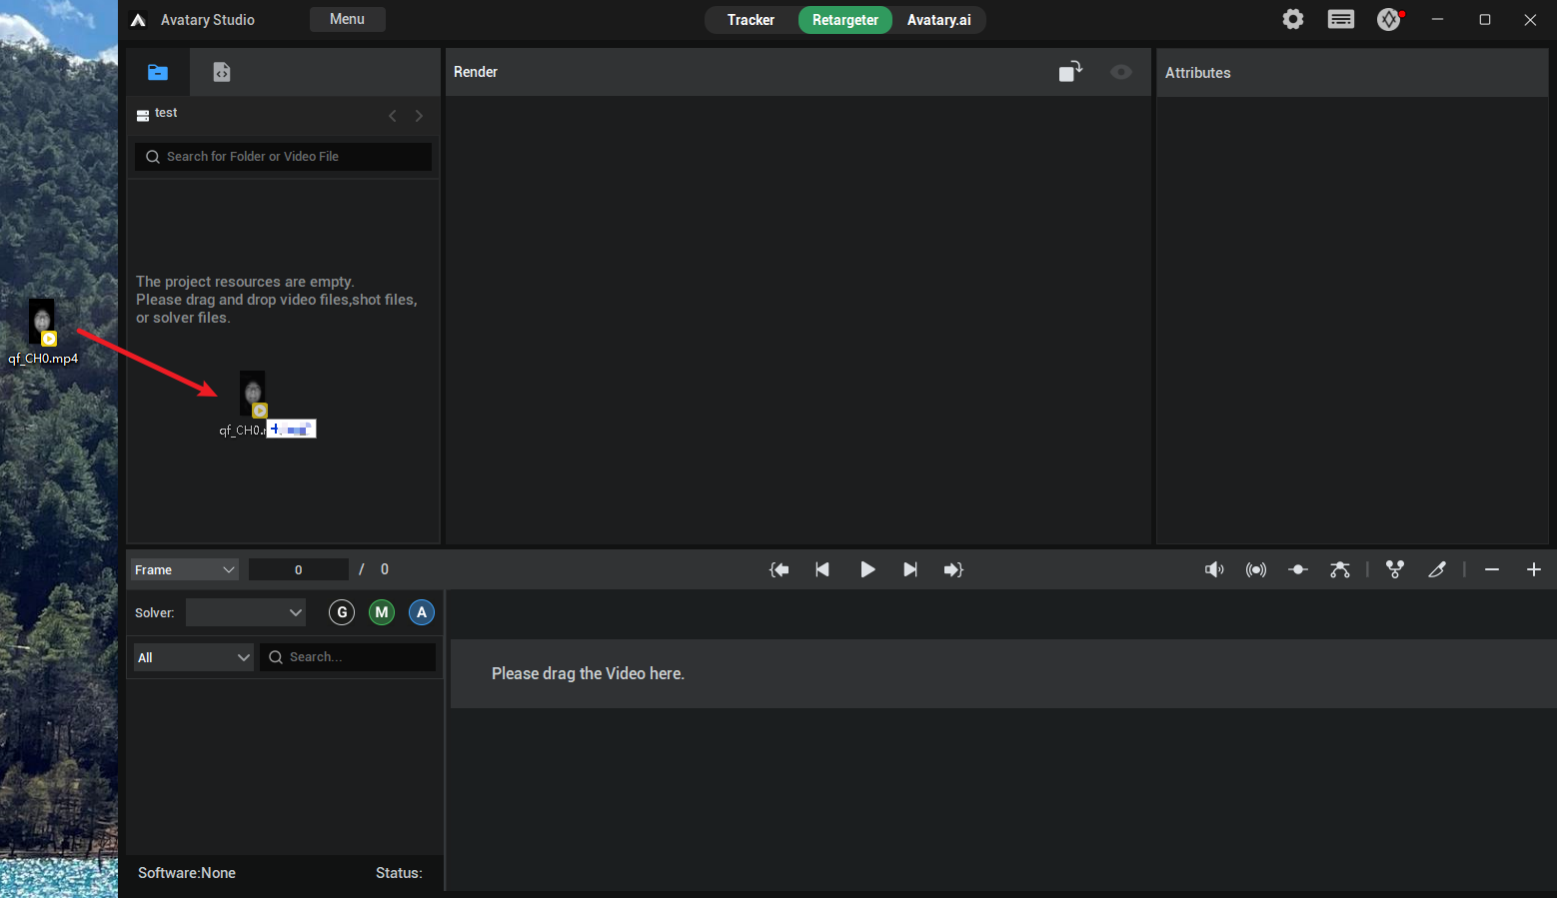
- If you want to import video files, simply drag the video directly into the resource manager.
NOTE: Please note that currently the system only supports video files in .mov and .mp4 formats. If the format of the video you selected does not match, the dragging operation cannot be completed. Please confirm whether the video format is correct in advance.
Connect to DCC
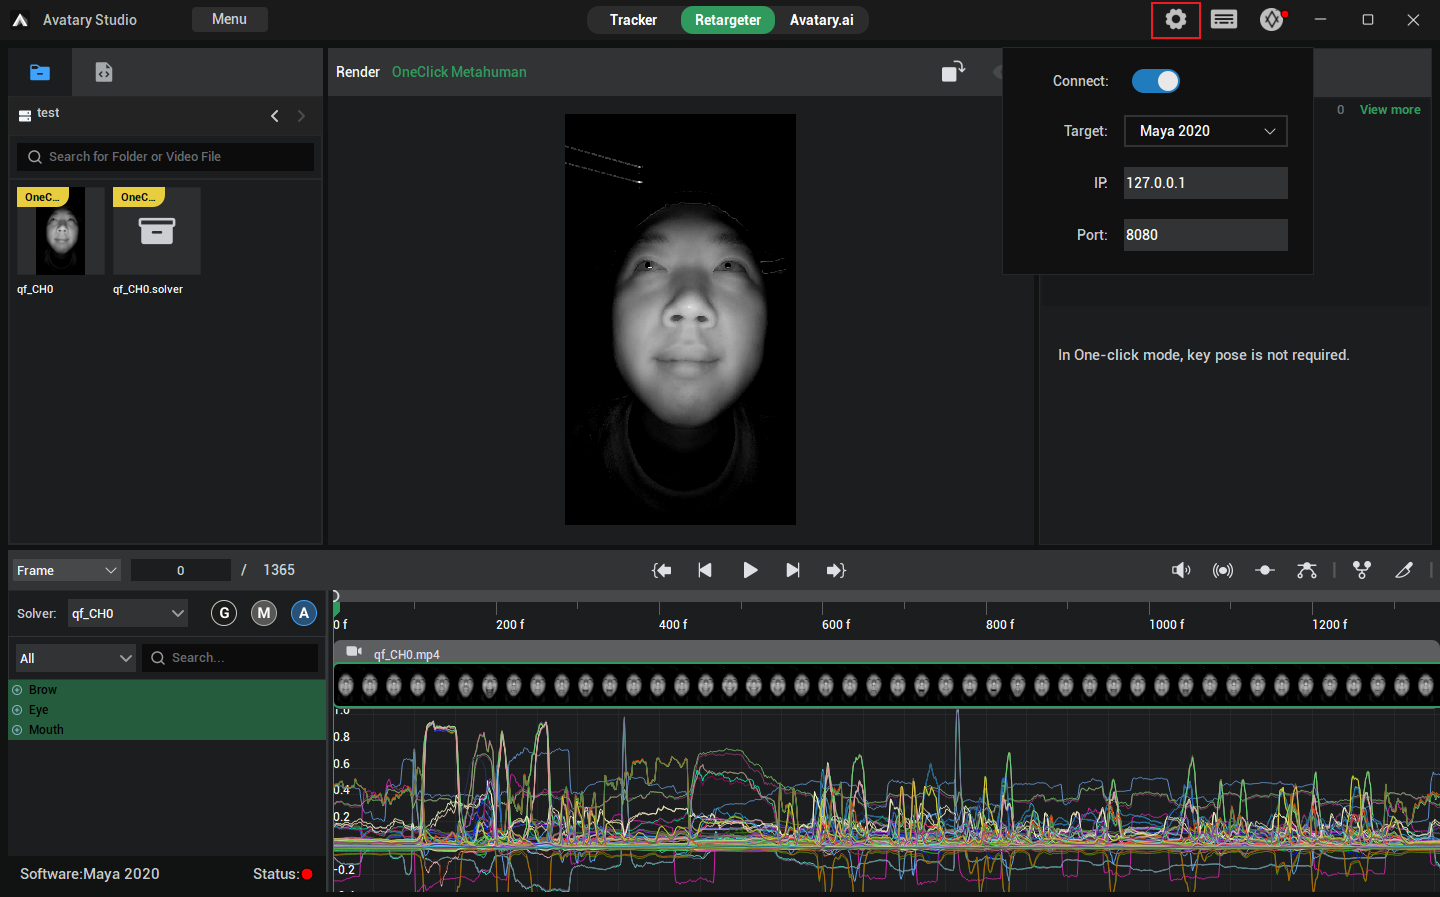
- Embark on the connection journey by first locating the prominent settings button on the Avatary Studio interface, which is in the shape of a gear, and click it gently.
- Subsequently, in the "Target" item column of the pop-up settings menu, carefully select the installed and supported version of the DCC software.
- Then, toggle the "Connect" button to the on state, getting ready for the subsequent docking.
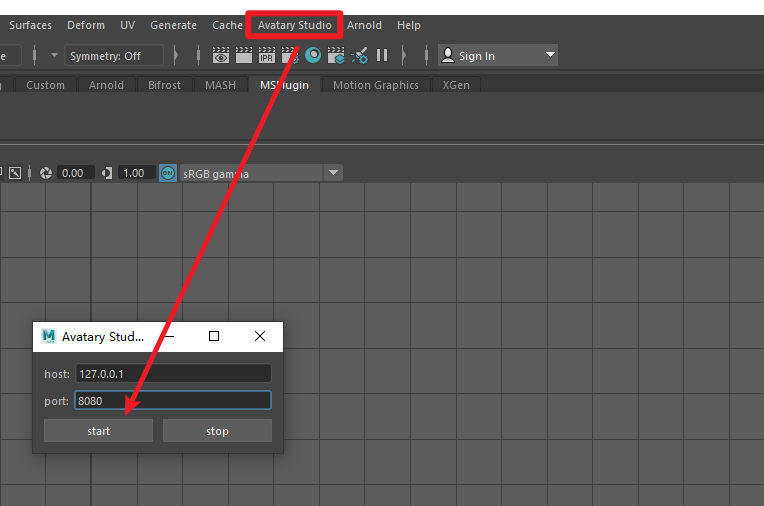
- After completing the first step, open the corresponding DCC software. At this moment, simply shift your gaze to the menu bar area of this software, and you will find the dedicated Avatary Studio plugin listed there. Click to open this plugin and then further locate and click the "start" button to activate the preliminary communication link between the software.
- Wait patiently for a while and closely watch the "Status" indicator light at the bottom left corner of Avatary Studio. Once it changes smoothly from the conspicuous red to the refreshing green, it means that you have successfully established the connection between the two. Congratulations!
Note: During the entire usage process, when you don't need to operate the Avatary Studio plugin within the DCC software, never close it directly. Instead, minimize it to the taskbar. This way, you can ensure the connection remains stable, avoid unnecessary repeated connection operations, and enhance your work efficiency.
Solver Mode
With-Track
Video Tutorial
Graphic Tutorial
- Easily import the video material. Select the desired video file in the resource manager and directly drag it to the timeline area of the software. Immediately, a window will pop up. In this window, accurately select the "With-Track" option to start the subsequent specific tracking process.
- After entering the "With-Track" dedicated window, you will be faced with a variety of point cloud templates. Please make a careful choice. We highly recommend that you give priority to the AI04 or AI06 templates, which have been optimized to provide a more accurate and reliable data foundation for subsequent analysis.
- Locate the "A" button at the bottom left corner of the software. Click it decisively, and the software will automatically invoke advanced algorithms to attentively analyze the subtle facial features in the video, laying the groundwork for subsequent precise matching.
- Wait for a while. Once the analysis process is successfully completed, you can easily switch to the Avatary Studio interface. Here, detailed and intuitive analysis results are ready for you to view and evaluate, so that you can decide the next operation direction.
- Move your eyes upward. In the top menu bar of the Avatary Studio software, accurately find and click to switch to the "Retargeter" mode. This mode is a crucial bridge connecting the software with external digital content creation (DCC) tools, unlocking more in-depth editing functions.
- Follow the established connection specifications to smoothly connect to the DCC software you need. Ensure that the connection is stable and reliable, which is the cornerstone for seamless data interaction and efficient collaboration.
- After successfully connecting to the DCC, focus on the right panel of the software, find and click the "Auto Pose" option. It is like an intelligent assistant that can quickly generate basic pose data to facilitate subsequent fine adjustments.
- Immediately after that, click the adjacent "view more" button, opening a door to more abundant settings and presenting more possibilities for personalized customization.
- In the newly popped-up "solver edit" window, carefully sort through the grouping options and accurately select the key facial area groups, such as "Brow", "Eye", "Mouth", etc., to enable refined manipulation of different parts.
- After selecting one of the groups, quickly switch to the connected DCC software interface and use the lasso tool flexibly to accurately select the model controllers corresponding to this group. This step is like building a communication bridge to ensure that commands are accurately conveyed.
- Return to the "solver edit" window again and click the crucial "Update" button. At this moment, the software will intelligently capture the controller information you selected in the DCC, achieving data synchronization and laying a solid foundation for subsequent calculations.
- Click the "Save" button to promptly save the current carefully set data state, preventing accidental loss and ensuring the continuity and stability of the work process.
- Repeat steps 10 to 12, methodically switching to other groups and completing the same refined settings and data synchronization operations one by one to ensure that all key parts of the entire model can be precisely controlled.
- When all group settings are completed, decisively close the "solver edit" window and seamlessly switch to the "Manual Pose" mode. This mode gives you more freedom for manual manipulation to meet personalized creative needs.
- Move your sight back to the bottom left corner of the software. In the clear grouping option area, flexibly select a specific group according to your creative needs, preparing to focus on the detailed refinement of keyframes.
- Manipulate the timeline as if traveling through the video time corridor to accurately select keyframes. During the process, you can use the conveniently placed "+" and "-" buttons above the timeline to add or delete keyframes as you wish, achieving the perfect optimization of the frame sequence.
- Switch to the "Manual Pose" mode interface, and you will be pleasantly surprised to find that the carefully selected keyframes have been prominently marked with red fonts, making it convenient for you to quickly locate and operate them.
- Lightly click on one of the red keyframes. Magically, the corresponding DCC software interface will instantly and automatically jump to the corresponding time position, achieving precise synchronization across interfaces and greatly improving operational efficiency.
- At this moment, in the DCC software, give full play to your creativity and skills to finely adjust the model controllers. Carefully compare the facial expression details in the video frame and make the model expression perfectly match it, giving the character vivid vitality.
- After the adjustment is completed, return to the Avatary Studio interface and click the crucial "G" button. The software will intelligently capture the current controller values, completing the key data collection and injecting soul into subsequent calculations.
- Instantly, you will notice that the keyframe you just operated on has changed from red to yellow in the "Manual Pose", visually indicating that it has successfully collected data and is waiting for the next calculation instruction.
- The rest of the keyframes follow the same process, giving them precise controller data and unique personalities one by one.
- Click the "M" button, and the software will go full throttle, using complex algorithms to conduct in-depth calculations on all keyframes and controller data, weaving a data association network and laying a solid foundation for the perfect presentation of results.
- After the calculation is completed, the timeline will be transformed gorgeously. The dynamic curves of each controller will be clearly presented, like the beating pulse of data. At the same time, the keyframes participating in the calculation will shine with a green light in the "Manual Pose", announcing the successful calculation and data readiness.
- Finally, click the "Synchronize to DCC" button on the timeline. The software will quickly and accurately transmit the calculation results to the DCC software like a courier, ensuring seamless data connection at both ends.
- Wait patiently for the short transmission process to end. Return to the DCC software interface again. At this moment, the stunning effect that perfectly combines video and model data has been fully presented for you to appreciate, evaluate, and further refine in your creation.
No-Track
Video Tutorial
Graphic Tutorial
- Easily import the video material. Select the desired video file in the resource manager and directly drag it to the timeline area of the software. Immediately, a window will pop up. In this window, accurately select the "With-Track" option to start the subsequent specific tracking process.
- Select the "No-Track" option.
- Establish a crucial connection to seamlessly integrate external creative forces. Follow the established procedures to stably connect the software with the DCC software you need, ensuring a smooth and stable bridge for data interaction and laying a solid foundation for subsequent in-depth collaboration.
- Activate the intelligent pose preset to explore the ideal starting pose. Locate and click the "Auto Pose" option in the function area on the right side of the software interface. It is like an intelligent stylist that can quickly generate a basic character pose framework based on the video content, facilitating subsequent refined carving.
- Dive deeper into customizing pose details and unlock more editing possibilities. Right next to the "Auto Pose" button, click "view more", and a door to rich pose settings will slowly open, presenting more options for personalized parameter adjustments and customizations.
- Finely divide the facial control areas and focus on adjusting key parts. In the newly popped-up "solver edit" window, carefully identify and select key facial groups such as "Brow", "Eye", "Mouth", etc., to facilitate precise control of different facial features later.
- Associate DCC controllers to establish a cross-software control link. After selecting a certain facial group, quickly switch to the connected DCC software interface and use the lasso tool flexibly to accurately capture the model controllers corresponding to this group. It's as if an invisible thread is drawn between the two software worlds, enabling precise command transmission.
- Synchronize controller information to achieve real-time data sharing. Return to the "solver edit" window and click the crucial "Update" button. At this moment, the software will intelligently capture the details of the controllers you selected in the DCC, complete data synchronization, ensure consistent information on both sides, and provide accurate data for subsequent calculations.
- Save the current settings to solidify the phased results. Click the "Save" button to promptly save the currently carefully adjusted parameters and settings, avoiding data loss due to unexpected situations and ensuring the continuity of the creative process.
- Repeat the key operations to cover all key facial parts. Follow the same pattern, methodically switch to other key facial groups, and repeat steps 6 to 8 to ensure that each important facial area can be precisely matched with the DCC controllers for all-round fine control.
- Switch the working mode to embrace the challenge of manual refinement. When all group settings are completed, decisively close the "solver edit" window and smoothly switch to the "Manual Pose" mode. This mode is like a fine handmade workshop, giving you the ability to meticulously carve every frame of pose details to meet the ultimate personalized creative demands.
- Start the intelligent analysis engine and discover the keyframe treasures with one click. Locate the "calculate" button on the software timeline that looks like a magic wand and click it gently. The software will immediately mobilize advanced algorithms to attentively analyze the facial features in the video, automatically identify and mark the keyframes, screening out the essence moments for subsequent creation.
- View the keyframe results and lock in the key creative nodes. Wait for a short while until the analysis process is finished. Switch to the "manual pose" tab, and you will find that the software has thoughtfully marked the automatically screened keyframes in red font. These will be the core points for subsequent creative efforts.
- Select the facial area group to focus on the current creative focus. Move your sight to the group selection area at the bottom left of the software and click on a specific group flexibly according to your creative needs, preparing to conduct in-depth adjustments on the keyframes of this area.
- Jump to the corresponding frame in DCC for precise cross-interface synchronization. Select a prominent red keyframe, and something magical will happen. The associated DCC software interface will automatically jump to the corresponding time position instantly, as if synchronized in time and space, greatly enhancing the operational smoothness and efficiency.
- Fine-tune the DCC controllers to make the expressions match perfectly. At this moment, in the DCC software, fully demonstrate your creativity and skills to delicately adjust the model controllers. Carefully compare the facial expression details in the video frame until the model expression seamlessly matches the video picture, giving the character vivid vitality.
- Capture the controller values to record the key data status. After the adjustment is completed, return to the main interface of Avatary Studio and click the "G" button. The software will act like a sensitive data collector, quickly capturing the current controller values and locking in the key data points for subsequent complex calculations.
- Mark the keyframe status to witness the successful data collection. In an instant, you will be pleasantly surprised to find that the keyframe you just operated on has changed from red to yellow in the "manual pose", conspicuously indicating that the data of this frame has been successfully collected and is waiting for the next calculation instruction.
- Process the remaining frames in sequence to ensure a coherent overall effect. Repeat steps 14 to 17 for the remaining keyframes one by one.
- Start the core calculation process and weave a data interaction network. Click the "M" button, and the software will go full throttle, using complex algorithms to conduct in-depth calculations on all keyframes and controller data, like weaving a precise web and building the connection links between various data points, laying a solid foundation for the perfect presentation of results.
- Present the calculation visualization to control the creative dynamic trend. After the calculation is completed, the timeline will be transformed gorgeously. The dynamic curves of each controller will emerge clearly, like the beating data pulses, showing the changing trend of poses over time. At the same time, the keyframes participating in the calculation will change to green in the "Manual Pose", announcing the successful completion of the calculation and the readiness of the data.
- Push the calculation results to achieve a perfect cross-software delivery. Shift your attention back to the timeline and click the "Synchronize to DCC" button. The software will turn into a dutiful courier, quickly and accurately transmitting the calculation results to the DCC software, ensuring seamless data docking and the perfect landing of creative achievements.
- Inspect the final results and enjoy the joy of creative harvest. Wait patiently for the short transmission process to come to an end, and then switch to the DCC software interface again. At this time, the stunning effect that combines video and model data has been fully presented, for you to comprehensively appreciate, evaluate, and draw a perfect ending to this wonderful creative journey or start a new round of creative iterations.
One-Click
Video Tutorial
Graphic Tutorial
- Easily start the material import process. Locate the video file you need precisely in the resource manager and then directly drag it to the timeline area of the software. At this moment, a window will pop up immediately. You need to carefully distinguish and select the "One-Click Metahuman" or "One-Click ARKit" option from the options provided in this window, thus setting the direction for subsequent intelligent processing.
- Focus your eyes on the bottom left corner of the software where there is a conspicuous "A" button. Click it decisively, and the software will immediately mobilize the built-in efficient algorithms to automatically and quickly engage in complex calculation tasks without much manual intervention from you, saving a great deal of operation effort and time.
- While the calculation is underway in the background, you can start preparing for the next crucial operation - connecting to the DCC software. Follow the established standard procedures strictly to establish a stable connection link between the software and the DCC, which is a key prerequisite for smooth data interchange.
- After the connection is successfully completed and the software finishes the previous complex calculations, shift your attention back to the timeline area and find and click the "Synchronize to DCC" button. This operation is like opening a data transmission channel with one click, accurately and quickly pushing the carefully calculated results obtained in the previous stage to the connected DCC software, ensuring seamless data connection.
- Finally, just wait patiently for a short while until the data transmission process comes to a successful end. Then you can leisurely switch to the DCC software interface. At this time, the stunning effects presented after the full process of the One-Click function are already in front of you, for you to comprehensively review, evaluate, and conduct subsequent in-depth creation.
Cloud Batch Solver
Video Tutorial
FAQ
The software cannot be opened.
Install the vc_redist.x64.exe program in the installation directory of Avatary Studio.
The calculation cannot be carried out in Avatary Studio, or the software crashes during the calculation process.
Please install CUDA 11.8.
The Avatary Studio plugins cannot be found in the DCC.
Please check whether the installation directory of DCC in the registry is correct.
That is, go to the following location in the registry: HKEY_LOCAL_MACHINE\SOFTWARE\Autodesk\VaultQualified and check the installation directory of the corresponding version of DCC.

How to open the registry?
- Press the "Win + R" key combination. This shortcut will open the "Run" dialog box.
- In the "Run" dialog box, type "regedit" (which is the command for the Registry Editor), and then click the "OK" button or press the Enter key. After that, the Registry Editor will be opened. Its interface is similar to that of the File Explorer. On the left side is the tree structure of registry keys, and on the right side are the specific key values of the selected registry key.