中文: Avatary Studio: Difference between revisions
(Created page with "thumb|Avatary Studio|255x255pxAvatary Studio is a new generation of high-precision facial expression post-processing software that can convert facial expression videos shot by any camera into high-quality 3D facial expression animations and supports any 3D facial expression rigging system. The high-precision facial expression animations calculated by Avatary Studio can be exported to mainstream DCC (digital content creation) software such...") |
No edit summary |
||
| (3 intermediate revisions by the same user not shown) | |||
| Line 1: | Line 1: | ||
[[File:Avatary Studio Logo.png|thumb|Avatary Studio|255x255px]]Avatary Studio | [[File:Avatary Studio Logo.png|thumb|Avatary Studio|255x255px]]Avatary Studio 是新一代高精度面部表情后期处理软件,它能够将由任意相机拍摄的面部表情视频转换为高质量的 3D 面部表情动画,并且支持任何 3D 面部表情绑定系统。由 Avatary Studio 计算生成的高精度面部表情动画可以导出到诸如 Maya、3ds Max、等主流数字内容创作(DCC)软件中。 | ||
'''[https://www.facegood.ca/download-detail?id=10&type=win 现在快去下载]!!!''' | |||
'''<big>Avatary Studio 凭借其独特的巧思,不遗余力地保障您的资产安全!</big>''' | |||
'''[ | '''<big>它开创了一种将计算节点与资产相分离的架构,彻底消除了资产迁移的麻烦,有力地保护着每一项数字资产。</big>'''[[File:Avatary_Studio_Asset_Security.png|center|frameless|1258x1258px]] | ||
当前支持的数字内容创作(DCC)软件版本: | |||
* Maya 2020 | * Maya 2020 | ||
| Line 26: | Line 19: | ||
* Maya 2023 | * Maya 2023 | ||
* | * 3ds Max 2022 | ||
待办事项列表: | |||
* MotionBuilder | * MotionBuilder | ||
| Line 39: | Line 32: | ||
* | == 快速介绍 == | ||
'''Avatary Studio 新功能:内置曲线编辑器 | |||
''' | |||
<bilibili width="1280" height="720" alignment="center">BV1iLZ1YkEUm</bilibili> | |||
=== 登录 Avatary Studio === | |||
* 打开 Avatary Studio,在登录界面输入您的账号进行登录。 | |||
[[File:Avatary Studio Log in Page.png|center|frameless|1257x1257px]] | [[File:Avatary Studio Log in Page.png|center|frameless|1257x1257px]] | ||
=== | === 创建新的本地项目 === | ||
* | * 找到并点击 "'''Create Project'''" 按钮,以启动项目创建过程。 | ||
* | * 在弹出的对话框中,准确输入 '''project path''', 也就是指定你想要存储项目文件的确切位置。 然后输入一个独一无二的项目名称。 输入完成后,点击 "'''Create'''" 按钮。 | ||
''' | '''注意:''' <u>此时,系统会在指定的项目路径下自动创建一个以项目名称命名的专用文件夹,该文件夹用于存储与该项目相关的各种数据和文件,以确保项目资源得到有序管理。</u> | ||
* | * 项目成功创建后,您只需切换到 "'''Recently Used Projects'''" 列表区域,就能立即找到新创建的项目,这样您就可以快速开始后续的项目操作,并顺利衔接工作流程。 | ||
[[File:Avatary Studio Create Project.png|center|1257x1257px|thumb| | [[File:Avatary Studio Create Project.png|center|1257x1257px|thumb|点击 "'''Create Project'''" 按钮]] | ||
[[File:Avatary Studio Create Project2.png|center|1257x1257px|thumb| | [[File:Avatary Studio Create Project2.png|center|1257x1257px|thumb|输入 '''project path.''']] | ||
[[File:Avatary Studio Create Project3.png|center|1257x1257px|thumb|Recently Used Projects.]] | [[File:Avatary Studio Create Project3.png|center|1257x1257px|thumb|Recently Used Projects.]] | ||
=== | === 将视频导入项目 === | ||
* | * 如果你想导入视频文件,只需直接将视频拖放到资源管理器中即可。 | ||
''' | '''注意:''' <u>仅支持 '''.mov''' and '''.mp4''' 格式的视频文件。</u> 如果您选择的视频格式不匹配,则无法完成拖拽操作。请提前确认视频格式是否正确。 | ||
[[File:Avatary Studio Import Video.png|center|frameless|1557x1557px]] | [[File:Avatary Studio Import Video.png|center|frameless|1557x1557px]] | ||
=== | === 与 DCC 连接 === | ||
* | * 开始连接操作,首先在 Avatary Studio 界面上找到 '''settings''' 按钮,它的形状像一个齿轮,然后轻轻点击它。 | ||
* | * 随后,在弹出的设置菜单的 “目标” 项目栏中,'''选择已安装且受支持 DCC 版本'''. | ||
* | * 然后,将 '''Connect''' 按钮切换到开启状态,为接下来的对接做好准备。 | ||
* | * 打开相应的 DCC 软件。时,只需将目光移至该软件的菜单栏区域,你就会发现那里列有 Avatary Studio 插件。 点击打开这个插件,然后进一步找到并点击 "'''start'''" 按钮,激活软件之间的初步通信连接。 | ||
* | * 耐心等待片刻,并密切留意 Avatary Studio 左下角的 "'''Status'''" 指示灯。 一旦它从红色顺利变为绿色,就意味着你已成功建立了二者之间的连接。恭喜! | ||
''' | '''注意:''' 在整个使用过程中,当你无需在 DCC 中操作 Avatary Studio 插件,切勿直接关闭它。相反,应将其最小化至任务栏。这样一来,你可以确保连接保持稳定,避免不必要的重复连接操作,并提高工作效率。 | ||
[[File:Avatary_Studio_Open_Connect_DCC.png|center|frameless|1440x1440px]] | [[File:Avatary_Studio_Open_Connect_DCC.png|center|frameless|1440x1440px]] | ||
[[File:Avatary Studio Maya Start Connect Server.png|center|frameless|1557x1557px]] | [[File:Avatary Studio Maya Start Connect Server.png|center|frameless|1557x1557px]] | ||
== | == 求解器模式 == | ||
=== With-Track === | === With-Track === | ||
==== | ==== 视频教程 ==== | ||
<youtube width="1280" height="720">4Xo0XPA7EU0</youtube> | <youtube width="1280" height="720">4Xo0XPA7EU0</youtube> | ||
| Line 118: | Line 117: | ||
=== No-Track === | === No-Track === | ||
==== | ==== 视频教程 ==== | ||
<youtube width="1280" height="720">JNLEwS_B3sY</youtube> | <youtube width="1280" height="720">JNLEwS_B3sY</youtube> | ||
| Line 149: | Line 148: | ||
=== One-Click === | === One-Click === | ||
==== | ==== 视频教程 ==== | ||
<youtube width="1280" height="720">xDiXeuUcvZ0</youtube> | <youtube width="1280" height="720">xDiXeuUcvZ0</youtube> | ||
| Line 161: | Line 160: | ||
== Cloud Batch Solver == | == Cloud Batch Solver == | ||
==== | |||
==== 视频教程 ==== | |||
<youtube width="1280" height="720">HGlDu3qqT6g</youtube> | <youtube width="1280" height="720">HGlDu3qqT6g</youtube> | ||
== FAQ == | == FAQ == | ||
===== | ===== Avatary Studio 无法打开 ===== | ||
在 Avatary Studio 的安装目录中安装 vc_redist.x64.exe 程序。 | |||
===== | ===== Avatary Studio 中无法进行计算,或者软件在计算过程中崩溃 ===== | ||
下载并安装 [https://developer.nvidia.com/cuda-11-8-0-download-archive?target_os=Windows&target_arch=x86_64&target_version=10&target_type=exe_local '''CUDA 11.8'''.] | |||
===== | ===== 在 DCC 中找不到 Avatary Studio 插件 ===== | ||
请检查注册表中 DCC 软件的安装目录是否正确。 | |||
前往注册表中的以下位置: '''HKEY_LOCAL_MACHINE\SOFTWARE\Autodesk\VaultQualified,''' 然后检查相应版本 DCC 软件的安装目录 | |||
[[File:Avatary Studio Regedit.png|center|frameless|1146x1146px]] | [[File:Avatary Studio Regedit.png|center|frameless|1146x1146px]] | ||
如何打开注册表? | |||
# | # 按下 “Win + R” 组合键。这个快捷键将打开 “运行” 对话框。 | ||
# | # 在 “运行” 对话框中,输入 “regedit”(这是注册表编辑器的命令),然后点击 “确定” 按钮或按下回车键。之后,注册表编辑器将会打开。它的界面类似于文件资源管理器。左侧是注册表项的树状结构,右侧是所选注册表项的具体键值。 | ||
Latest revision as of 03:33, 7 April 2025

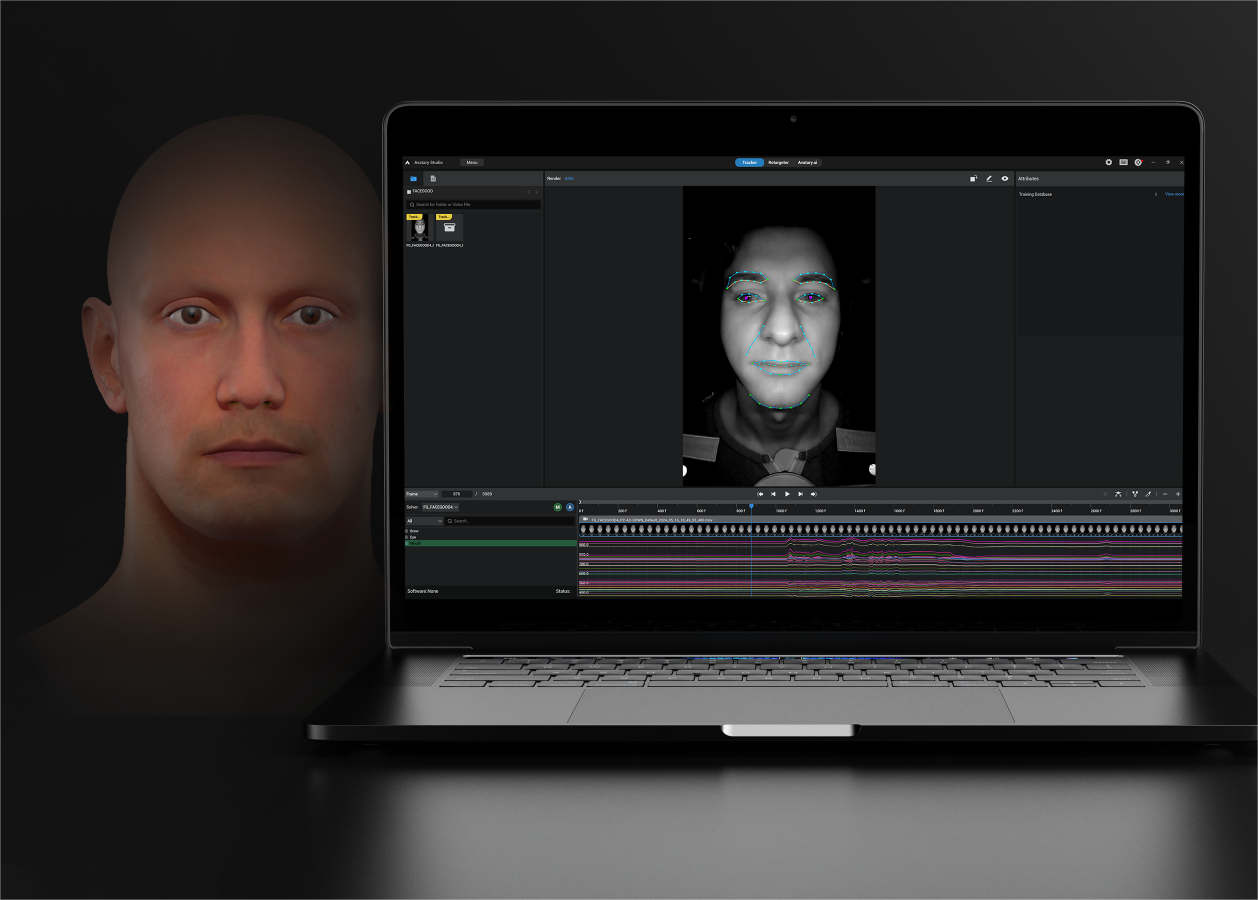
Avatary Studio 是新一代高精度面部表情后期处理软件,它能够将由任意相机拍摄的面部表情视频转换为高质量的 3D 面部表情动画,并且支持任何 3D 面部表情绑定系统。由 Avatary Studio 计算生成的高精度面部表情动画可以导出到诸如 Maya、3ds Max、等主流数字内容创作(DCC)软件中。
现在快去下载!!!
Avatary Studio 凭借其独特的巧思,不遗余力地保障您的资产安全!
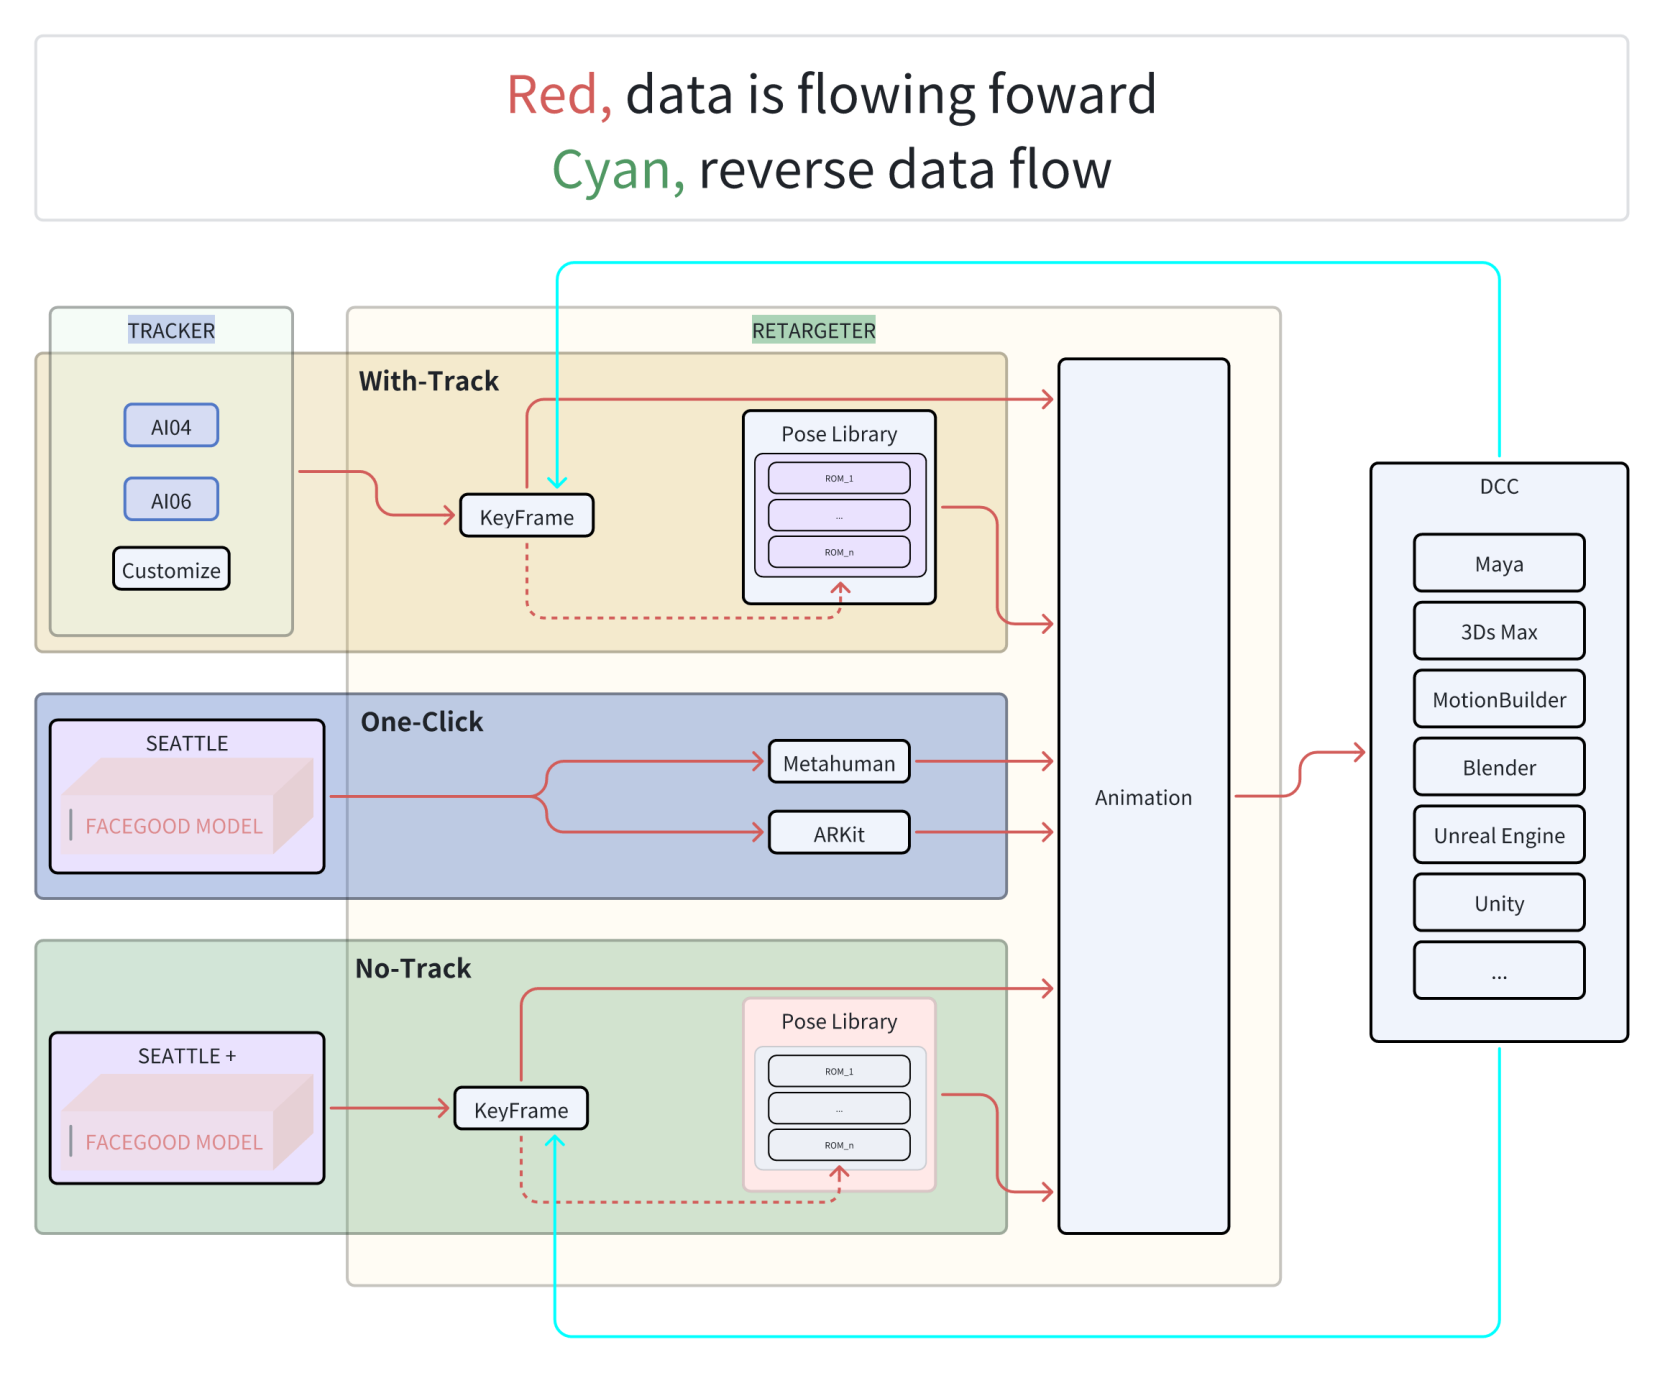
它开创了一种将计算节点与资产相分离的架构,彻底消除了资产迁移的麻烦,有力地保护着每一项数字资产。
当前支持的数字内容创作(DCC)软件版本:
- Maya 2020
- Maya 2022
- Maya 2023
- 3ds Max 2022
待办事项列表:
- MotionBuilder
- UE
- Unity
快速介绍
Avatary Studio 新功能:内置曲线编辑器
登录 Avatary Studio
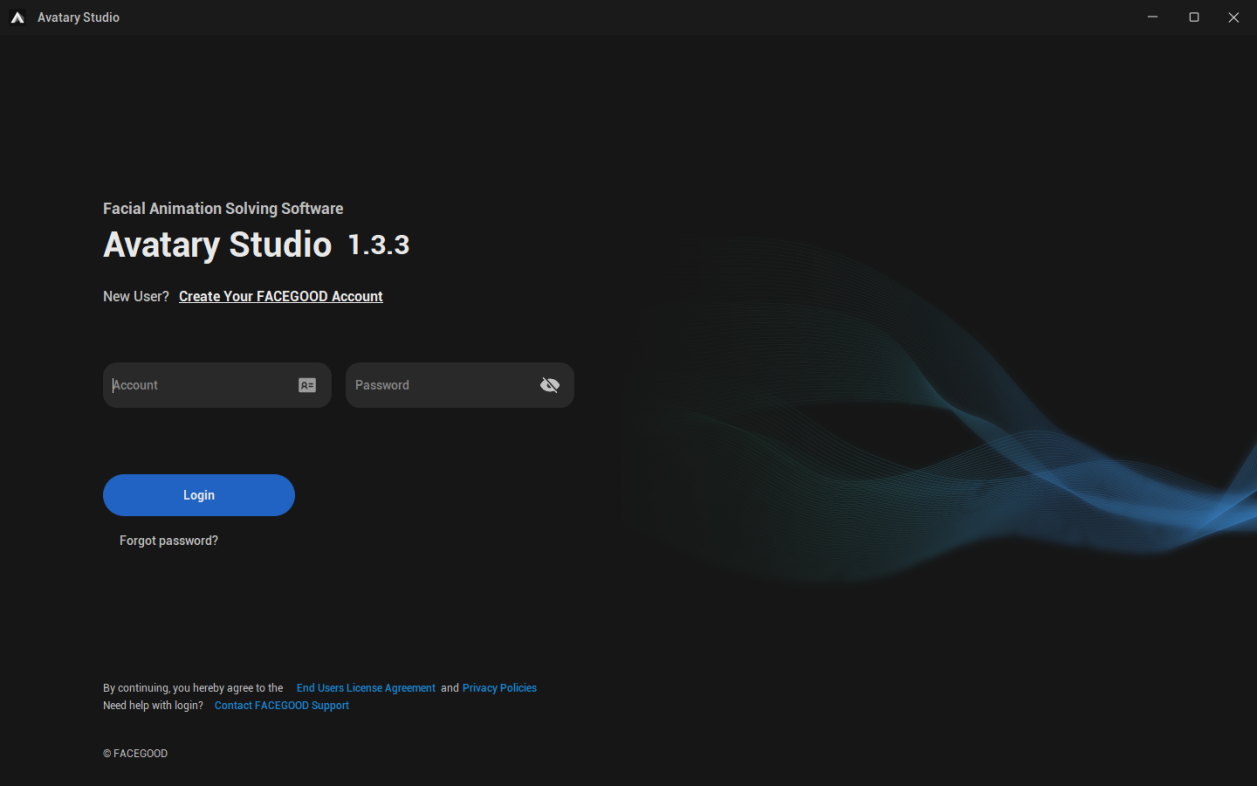
- 打开 Avatary Studio,在登录界面输入您的账号进行登录。
创建新的本地项目
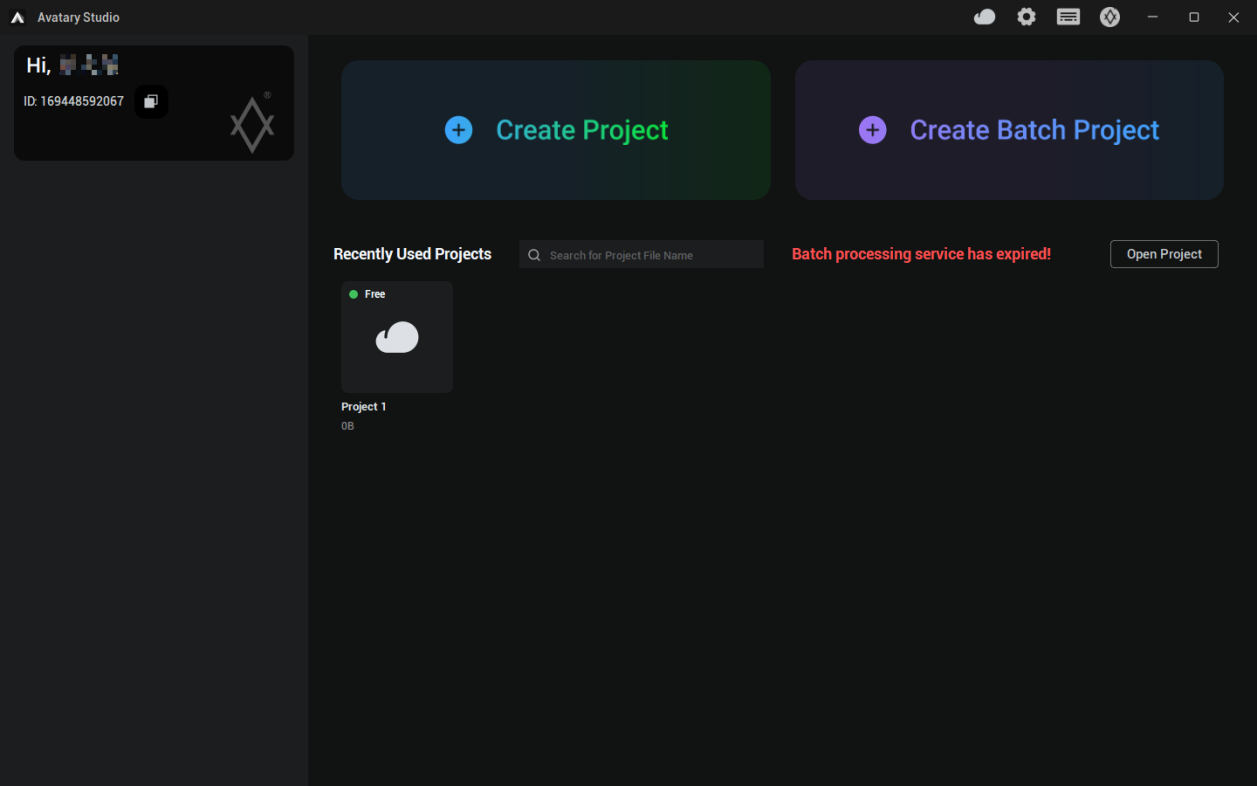
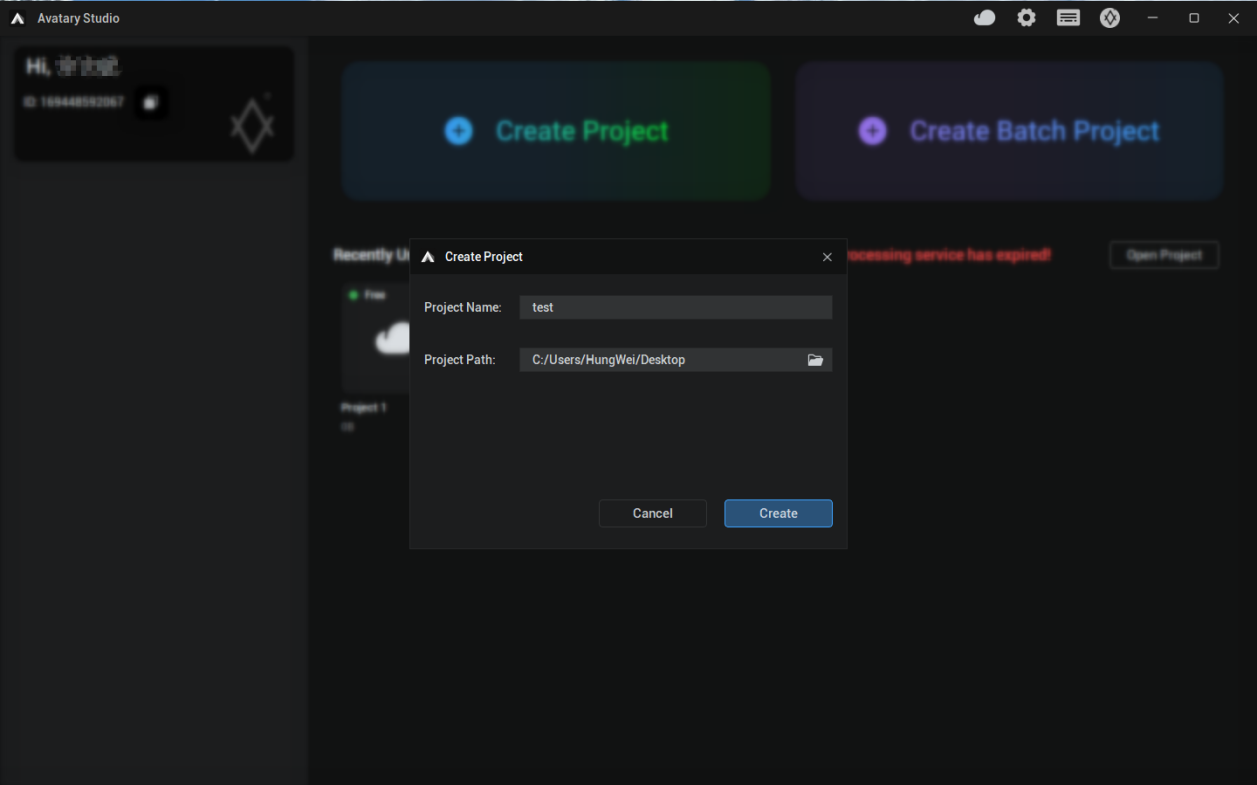
- 找到并点击 "Create Project" 按钮,以启动项目创建过程。
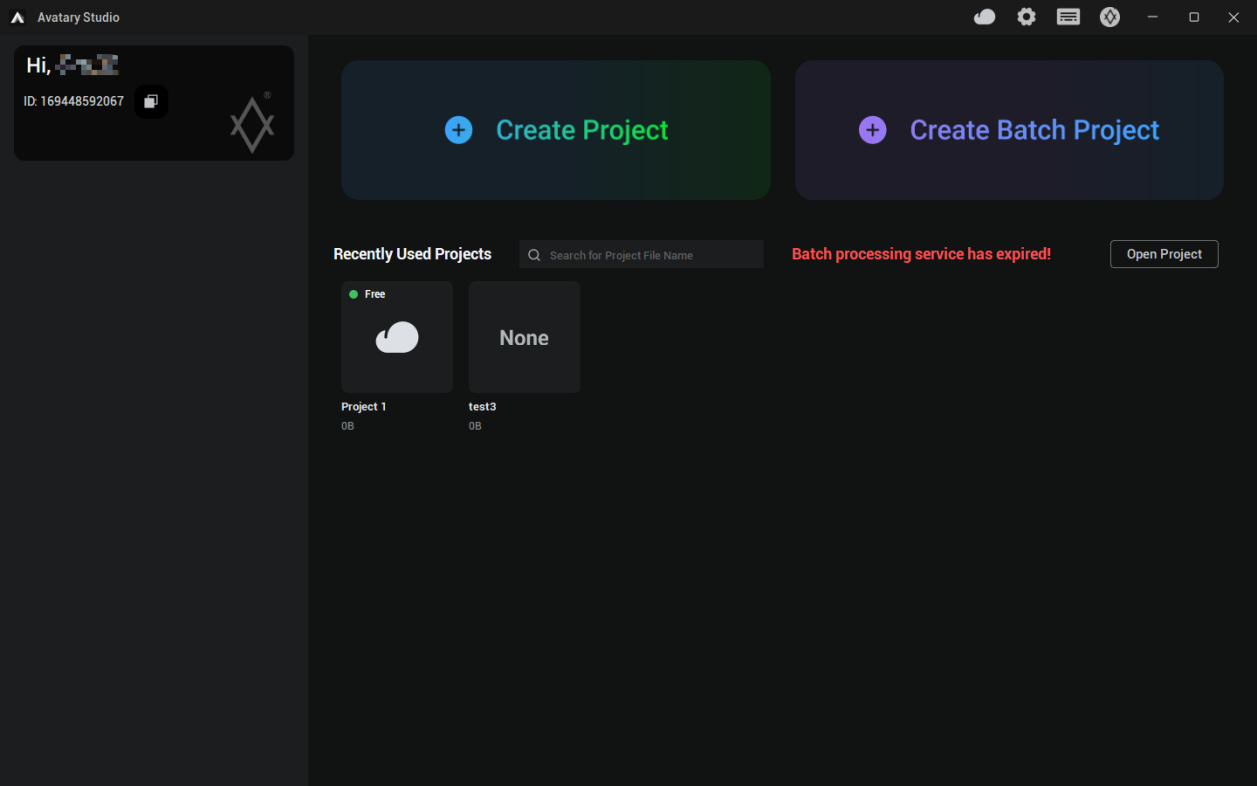
- 在弹出的对话框中,准确输入 project path, 也就是指定你想要存储项目文件的确切位置。 然后输入一个独一无二的项目名称。 输入完成后,点击 "Create" 按钮。
注意: 此时,系统会在指定的项目路径下自动创建一个以项目名称命名的专用文件夹,该文件夹用于存储与该项目相关的各种数据和文件,以确保项目资源得到有序管理。
- 项目成功创建后,您只需切换到 "Recently Used Projects" 列表区域,就能立即找到新创建的项目,这样您就可以快速开始后续的项目操作,并顺利衔接工作流程。
将视频导入项目
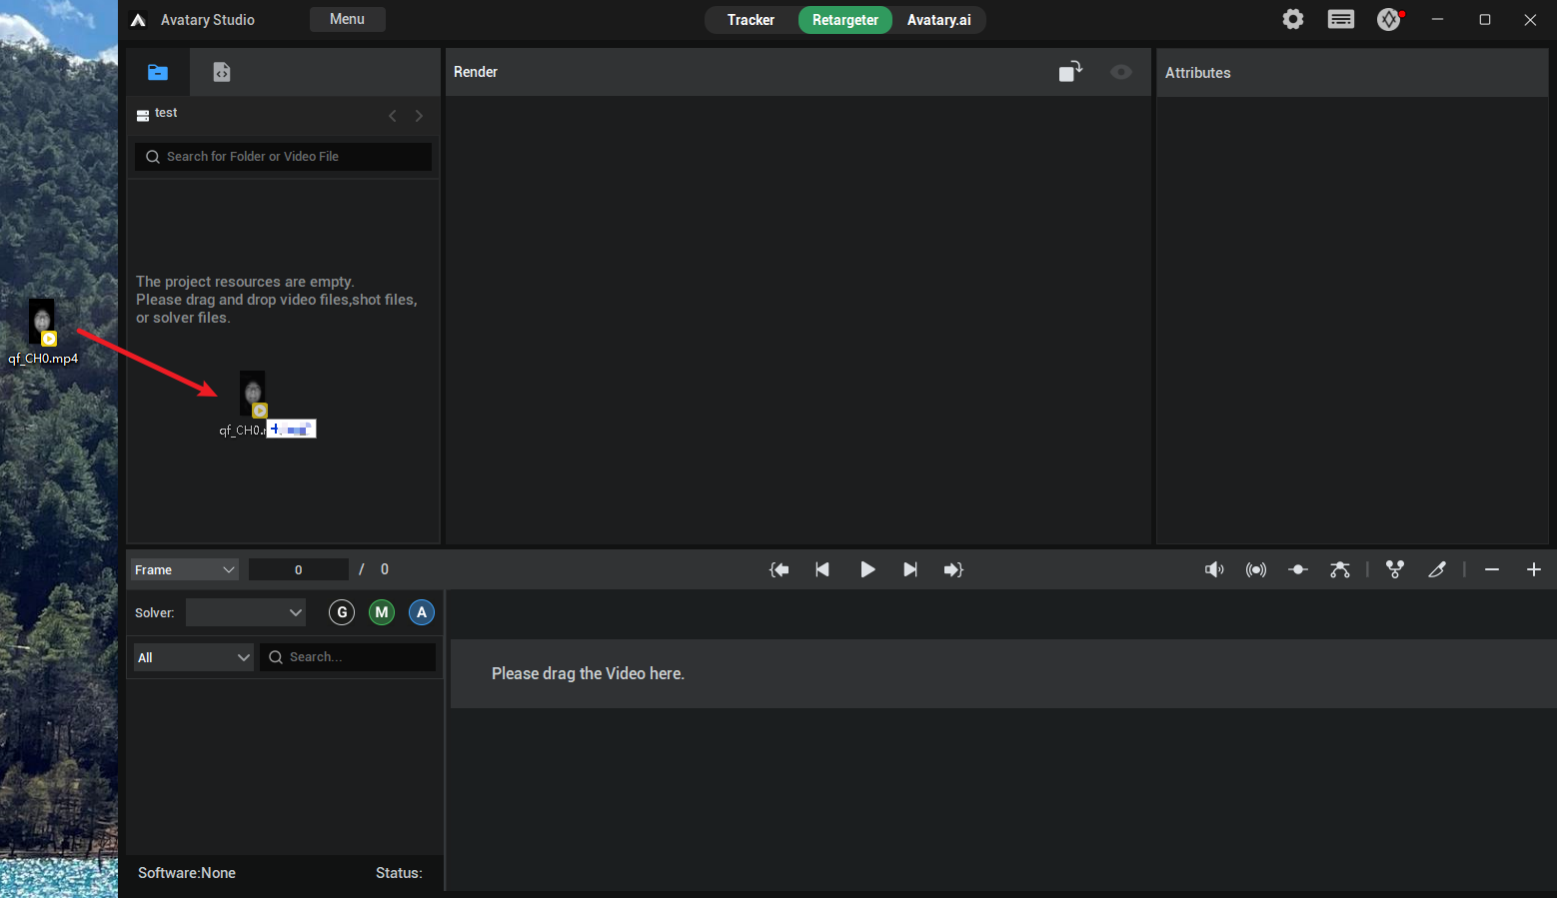
- 如果你想导入视频文件,只需直接将视频拖放到资源管理器中即可。
注意: 仅支持 .mov and .mp4 格式的视频文件。 如果您选择的视频格式不匹配,则无法完成拖拽操作。请提前确认视频格式是否正确。
与 DCC 连接
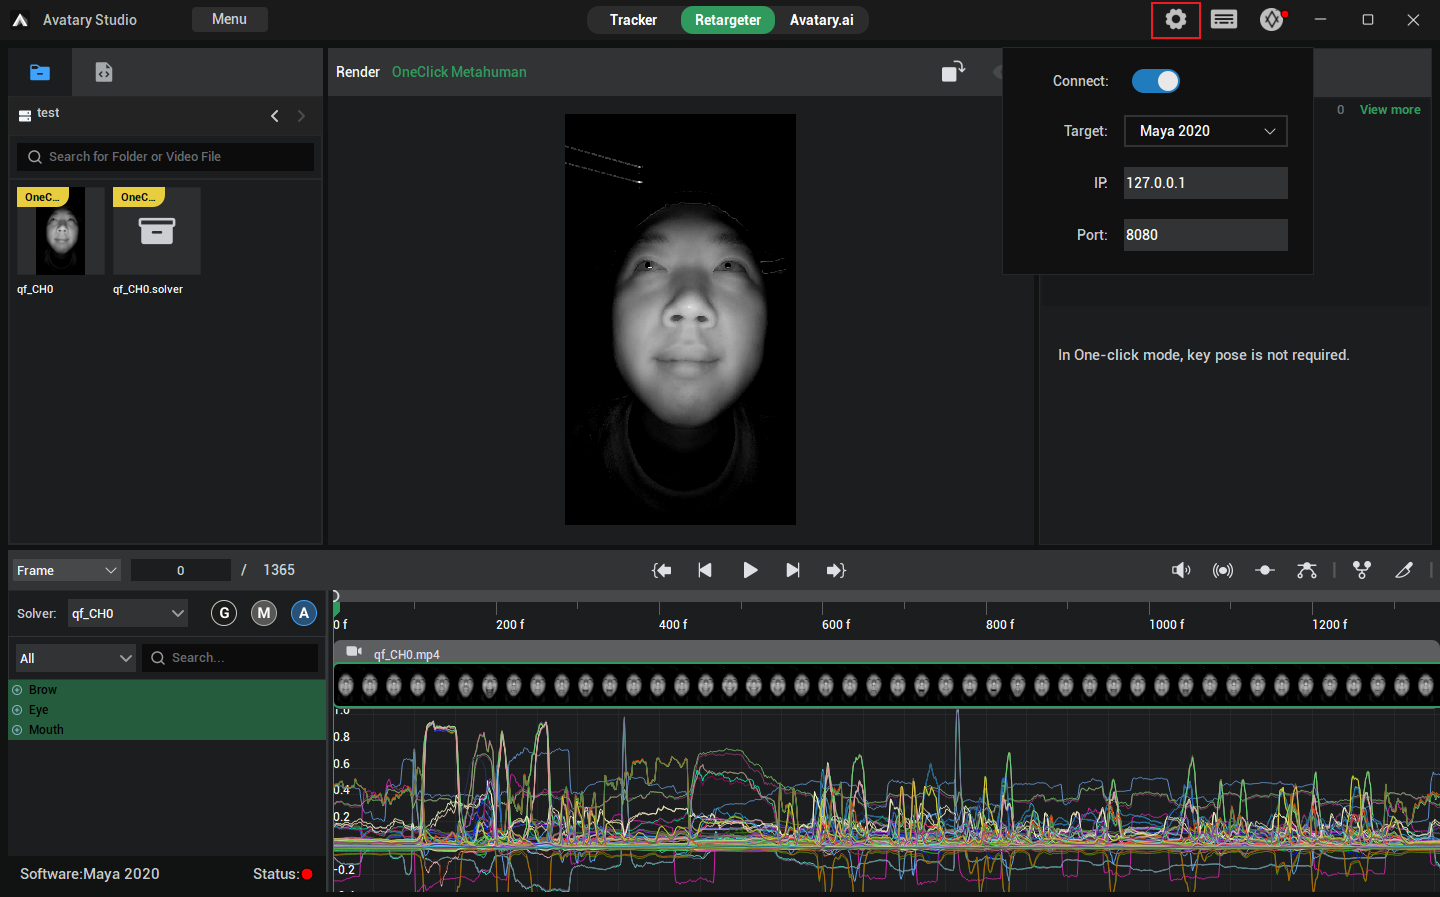
- 开始连接操作,首先在 Avatary Studio 界面上找到 settings 按钮,它的形状像一个齿轮,然后轻轻点击它。
- 随后,在弹出的设置菜单的 “目标” 项目栏中,选择已安装且受支持 DCC 版本.
- 然后,将 Connect 按钮切换到开启状态,为接下来的对接做好准备。
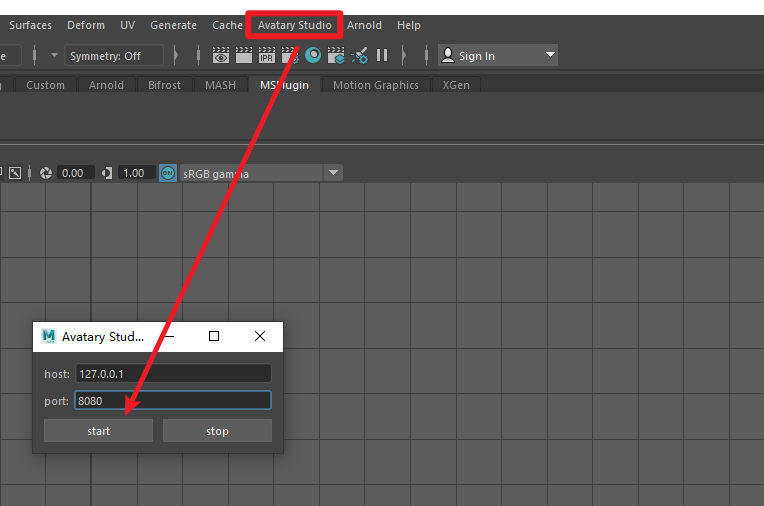
- 打开相应的 DCC 软件。时,只需将目光移至该软件的菜单栏区域,你就会发现那里列有 Avatary Studio 插件。 点击打开这个插件,然后进一步找到并点击 "start" 按钮,激活软件之间的初步通信连接。
- 耐心等待片刻,并密切留意 Avatary Studio 左下角的 "Status" 指示灯。 一旦它从红色顺利变为绿色,就意味着你已成功建立了二者之间的连接。恭喜!
注意: 在整个使用过程中,当你无需在 DCC 中操作 Avatary Studio 插件,切勿直接关闭它。相反,应将其最小化至任务栏。这样一来,你可以确保连接保持稳定,避免不必要的重复连接操作,并提高工作效率。
求解器模式
With-Track
视频教程
Graphic Tutorial
- Easily import the video material. Select the desired video file in the resource manager and directly drag it to the timeline area of the software. Immediately, a window will pop up. In this window, accurately select the "With-Track" option to start the subsequent specific tracking process.
- After entering the "With-Track" dedicated window, you will be faced with a variety of point cloud templates. Please make a careful choice. We highly recommend that you give priority to the AI04 or AI06 templates, which have been optimized to provide a more accurate and reliable data foundation for subsequent analysis.
- Locate the "A" button at the bottom left corner of the software. Click it decisively, and the software will automatically invoke advanced algorithms to attentively analyze the subtle facial features in the video, laying the groundwork for subsequent precise matching.
- Wait for a while. Once the analysis process is successfully completed, you can easily switch to the Avatary Studio interface. Here, detailed and intuitive analysis results are ready for you to view and evaluate, so that you can decide the next operation direction.
- Move your eyes upward. In the top menu bar of the Avatary Studio software, accurately find and click to switch to the "Retargeter" mode. This mode is a crucial bridge connecting the software with external digital content creation (DCC) tools, unlocking more in-depth editing functions.
- Follow the established connection specifications to smoothly connect to the DCC software you need. Ensure that the connection is stable and reliable, which is the cornerstone for seamless data interaction and efficient collaboration.
- After successfully connecting to the DCC, focus on the right panel of the software, find and click the "Auto Pose" option. It is like an intelligent assistant that can quickly generate basic pose data to facilitate subsequent fine adjustments.
- Immediately after that, click the adjacent "view more" button, opening a door to more abundant settings and presenting more possibilities for personalized customization.
- In the newly popped-up "solver edit" window, carefully sort through the grouping options and accurately select the key facial area groups, such as "Brow", "Eye", "Mouth", etc., to enable refined manipulation of different parts.
- After selecting one of the groups, quickly switch to the connected DCC software interface and use the lasso tool flexibly to accurately select the model controllers corresponding to this group. This step is like building a communication bridge to ensure that commands are accurately conveyed.
- Return to the "solver edit" window again and click the crucial "Update" button. At this moment, the software will intelligently capture the controller information you selected in the DCC, achieving data synchronization and laying a solid foundation for subsequent calculations.
- Click the "Save" button to promptly save the current carefully set data state, preventing accidental loss and ensuring the continuity and stability of the work process.
- Repeat steps 10 to 12, methodically switching to other groups and completing the same refined settings and data synchronization operations one by one to ensure that all key parts of the entire model can be precisely controlled.
- When all group settings are completed, decisively close the "solver edit" window and seamlessly switch to the "Manual Pose" mode. This mode gives you more freedom for manual manipulation to meet personalized creative needs.
- Move your sight back to the bottom left corner of the software. In the clear grouping option area, flexibly select a specific group according to your creative needs, preparing to focus on the detailed refinement of keyframes.
- Manipulate the timeline as if traveling through the video time corridor to accurately select keyframes. During the process, you can use the conveniently placed "+" and "-" buttons above the timeline to add or delete keyframes as you wish, achieving the perfect optimization of the frame sequence.
- Switch to the "Manual Pose" mode interface, and you will be pleasantly surprised to find that the carefully selected keyframes have been prominently marked with red fonts, making it convenient for you to quickly locate and operate them.
- Lightly click on one of the red keyframes. Magically, the corresponding DCC software interface will instantly and automatically jump to the corresponding time position, achieving precise synchronization across interfaces and greatly improving operational efficiency.
- At this moment, in the DCC software, give full play to your creativity and skills to finely adjust the model controllers. Carefully compare the facial expression details in the video frame and make the model expression perfectly match it, giving the character vivid vitality.
- After the adjustment is completed, return to the Avatary Studio interface and click the crucial "G" button. The software will intelligently capture the current controller values, completing the key data collection and injecting soul into subsequent calculations.
- Instantly, you will notice that the keyframe you just operated on has changed from red to yellow in the "Manual Pose", visually indicating that it has successfully collected data and is waiting for the next calculation instruction.
- The rest of the keyframes follow the same process, giving them precise controller data and unique personalities one by one.
- Click the "M" button, and the software will go full throttle, using complex algorithms to conduct in-depth calculations on all keyframes and controller data, weaving a data association network and laying a solid foundation for the perfect presentation of results.
- After the calculation is completed, the timeline will be transformed gorgeously. The dynamic curves of each controller will be clearly presented, like the beating pulse of data. At the same time, the keyframes participating in the calculation will shine with a green light in the "Manual Pose", announcing the successful calculation and data readiness.
- Finally, click the "Synchronize to DCC" button on the timeline. The software will quickly and accurately transmit the calculation results to the DCC software like a courier, ensuring seamless data connection at both ends.
- Wait patiently for the short transmission process to end. Return to the DCC software interface again. At this moment, the stunning effect that perfectly combines video and model data has been fully presented for you to appreciate, evaluate, and further refine in your creation.
No-Track
视频教程
Graphic Tutorial
- Easily import the video material. Select the desired video file in the resource manager and directly drag it to the timeline area of the software. Immediately, a window will pop up. In this window, accurately select the "With-Track" option to start the subsequent specific tracking process.
- Select the "No-Track" option.
- Establish a crucial connection to seamlessly integrate external creative forces. Follow the established procedures to stably connect the software with the DCC software you need, ensuring a smooth and stable bridge for data interaction and laying a solid foundation for subsequent in-depth collaboration.
- Activate the intelligent pose preset to explore the ideal starting pose. Locate and click the "Auto Pose" option in the function area on the right side of the software interface. It is like an intelligent stylist that can quickly generate a basic character pose framework based on the video content, facilitating subsequent refined carving.
- Dive deeper into customizing pose details and unlock more editing possibilities. Right next to the "Auto Pose" button, click "view more", and a door to rich pose settings will slowly open, presenting more options for personalized parameter adjustments and customizations.
- Finely divide the facial control areas and focus on adjusting key parts. In the newly popped-up "solver edit" window, carefully identify and select key facial groups such as "Brow", "Eye", "Mouth", etc., to facilitate precise control of different facial features later.
- Associate DCC controllers to establish a cross-software control link. After selecting a certain facial group, quickly switch to the connected DCC software interface and use the lasso tool flexibly to accurately capture the model controllers corresponding to this group. It's as if an invisible thread is drawn between the two software worlds, enabling precise command transmission.
- Synchronize controller information to achieve real-time data sharing. Return to the "solver edit" window and click the crucial "Update" button. At this moment, the software will intelligently capture the details of the controllers you selected in the DCC, complete data synchronization, ensure consistent information on both sides, and provide accurate data for subsequent calculations.
- Save the current settings to solidify the phased results. Click the "Save" button to promptly save the currently carefully adjusted parameters and settings, avoiding data loss due to unexpected situations and ensuring the continuity of the creative process.
- Repeat the key operations to cover all key facial parts. Follow the same pattern, methodically switch to other key facial groups, and repeat steps 6 to 8 to ensure that each important facial area can be precisely matched with the DCC controllers for all-round fine control.
- Switch the working mode to embrace the challenge of manual refinement. When all group settings are completed, decisively close the "solver edit" window and smoothly switch to the "Manual Pose" mode. This mode is like a fine handmade workshop, giving you the ability to meticulously carve every frame of pose details to meet the ultimate personalized creative demands.
- Start the intelligent analysis engine and discover the keyframe treasures with one click. Locate the "calculate" button on the software timeline that looks like a magic wand and click it gently. The software will immediately mobilize advanced algorithms to attentively analyze the facial features in the video, automatically identify and mark the keyframes, screening out the essence moments for subsequent creation.
- View the keyframe results and lock in the key creative nodes. Wait for a short while until the analysis process is finished. Switch to the "manual pose" tab, and you will find that the software has thoughtfully marked the automatically screened keyframes in red font. These will be the core points for subsequent creative efforts.
- Select the facial area group to focus on the current creative focus. Move your sight to the group selection area at the bottom left of the software and click on a specific group flexibly according to your creative needs, preparing to conduct in-depth adjustments on the keyframes of this area.
- Jump to the corresponding frame in DCC for precise cross-interface synchronization. Select a prominent red keyframe, and something magical will happen. The associated DCC software interface will automatically jump to the corresponding time position instantly, as if synchronized in time and space, greatly enhancing the operational smoothness and efficiency.
- Fine-tune the DCC controllers to make the expressions match perfectly. At this moment, in the DCC software, fully demonstrate your creativity and skills to delicately adjust the model controllers. Carefully compare the facial expression details in the video frame until the model expression seamlessly matches the video picture, giving the character vivid vitality.
- Capture the controller values to record the key data status. After the adjustment is completed, return to the main interface of Avatary Studio and click the "G" button. The software will act like a sensitive data collector, quickly capturing the current controller values and locking in the key data points for subsequent complex calculations.
- Mark the keyframe status to witness the successful data collection. In an instant, you will be pleasantly surprised to find that the keyframe you just operated on has changed from red to yellow in the "manual pose", conspicuously indicating that the data of this frame has been successfully collected and is waiting for the next calculation instruction.
- Process the remaining frames in sequence to ensure a coherent overall effect. Repeat steps 14 to 17 for the remaining keyframes one by one.
- Start the core calculation process and weave a data interaction network. Click the "M" button, and the software will go full throttle, using complex algorithms to conduct in-depth calculations on all keyframes and controller data, like weaving a precise web and building the connection links between various data points, laying a solid foundation for the perfect presentation of results.
- Present the calculation visualization to control the creative dynamic trend. After the calculation is completed, the timeline will be transformed gorgeously. The dynamic curves of each controller will emerge clearly, like the beating data pulses, showing the changing trend of poses over time. At the same time, the keyframes participating in the calculation will change to green in the "Manual Pose", announcing the successful completion of the calculation and the readiness of the data.
- Push the calculation results to achieve a perfect cross-software delivery. Shift your attention back to the timeline and click the "Synchronize to DCC" button. The software will turn into a dutiful courier, quickly and accurately transmitting the calculation results to the DCC software, ensuring seamless data docking and the perfect landing of creative achievements.
- Inspect the final results and enjoy the joy of creative harvest. Wait patiently for the short transmission process to come to an end, and then switch to the DCC software interface again. At this time, the stunning effect that combines video and model data has been fully presented, for you to comprehensively appreciate, evaluate, and draw a perfect ending to this wonderful creative journey or start a new round of creative iterations.
One-Click
视频教程
Graphic Tutorial
- Easily start the material import process. Locate the video file you need precisely in the resource manager and then directly drag it to the timeline area of the software. At this moment, a window will pop up immediately. You need to carefully distinguish and select the "One-Click Metahuman" or "One-Click ARKit" option from the options provided in this window, thus setting the direction for subsequent intelligent processing.
- Focus your eyes on the bottom left corner of the software where there is a conspicuous "A" button. Click it decisively, and the software will immediately mobilize the built-in efficient algorithms to automatically and quickly engage in complex calculation tasks without much manual intervention from you, saving a great deal of operation effort and time.
- While the calculation is underway in the background, you can start preparing for the next crucial operation - connecting to the DCC software. Follow the established standard procedures strictly to establish a stable connection link between the software and the DCC, which is a key prerequisite for smooth data interchange.
- After the connection is successfully completed and the software finishes the previous complex calculations, shift your attention back to the timeline area and find and click the "Synchronize to DCC" button. This operation is like opening a data transmission channel with one click, accurately and quickly pushing the carefully calculated results obtained in the previous stage to the connected DCC software, ensuring seamless data connection.
- Finally, just wait patiently for a short while until the data transmission process comes to a successful end. Then you can leisurely switch to the DCC software interface. At this time, the stunning effects presented after the full process of the One-Click function are already in front of you, for you to comprehensively review, evaluate, and conduct subsequent in-depth creation.
Cloud Batch Solver
视频教程
FAQ
Avatary Studio 无法打开
在 Avatary Studio 的安装目录中安装 vc_redist.x64.exe 程序。
Avatary Studio 中无法进行计算,或者软件在计算过程中崩溃
下载并安装 CUDA 11.8.
在 DCC 中找不到 Avatary Studio 插件
请检查注册表中 DCC 软件的安装目录是否正确。
前往注册表中的以下位置: HKEY_LOCAL_MACHINE\SOFTWARE\Autodesk\VaultQualified, 然后检查相应版本 DCC 软件的安装目录

如何打开注册表?
- 按下 “Win + R” 组合键。这个快捷键将打开 “运行” 对话框。
- 在 “运行” 对话框中,输入 “regedit”(这是注册表编辑器的命令),然后点击 “确定” 按钮或按下回车键。之后,注册表编辑器将会打开。它的界面类似于文件资源管理器。左侧是注册表项的树状结构,右侧是所选注册表项的具体键值。