中文:Capture Studio: Difference between revisions
(Created page with "中文:Capture Studio Capture Studio is a next-generation high-precision facial capture software launched by FACEGOOD, primarily targeting enterprise-level, large-scale, multi-actor facial capture scenarios, providing motion capture teams with 24/7 uninterrupted, stable, wireless, multi-channel, real-time, recording, and motion capture-triggered facial capture capabilities.thumb|Capture Studio|300x300pxPaired with the FACEGOOD Stereo...") |
|||
| (4 intermediate revisions by the same user not shown) | |||
| Line 1: | Line 1: | ||
Capture Studio | Capture Studio FACEGOOD 推出的一款高精度面部捕捉软件,主要面向企业级、大规模、多演员的面部捕捉场景,为动作捕捉团队提供全天候不间断、稳定、无线、多通道、实时的录制以及由动作捕捉触发的面部捕捉功能。 | ||
[[File:Capture studio logo.png|thumb|Capture Studio|300x300px]]与 FACEGOOD P2 双目硬件系统搭配使用,该硬件系统采用了 SmartUnit 边缘计算架构,将计算与控制分离,使得 Capture Studio 软件能够安装在任何运行 Windows 系统的台式电脑上,大幅降低了软件的安装门槛。与此同时,基于 SmartUnit 架构,P2 硬件系统与上一代 P1 系统相比,零部件数量减少了 50%,使其更易于维护和使用。P2 的 SmartUnit 边缘计算架构为动作捕捉团队提供了充足的计算能力,支持无限数量的演员同步进行捕捉。 Capture Studio 的实时面部捕捉能力十分出色,其内置了 SeattleAI ,支持对任何种族和年龄群体的演员进行实时面部捕捉,可直接驱动虚拟人的 660 个混合形状和 820 个骨骼点绑定,精度是 ARKit 的 20 倍。此外,动作捕捉团队还可以针对自己的绑定系统进行人工智能训练,以最终实现更高的精度。 | |||
'''[https://www.facegood.ca/download-detail?id=5&type=win 快来下载吧] !!!''' | |||
'''<big>享受多人同时录制和实时不间断的互动,解锁全新的多人协同创作体验!!</big>''' | |||
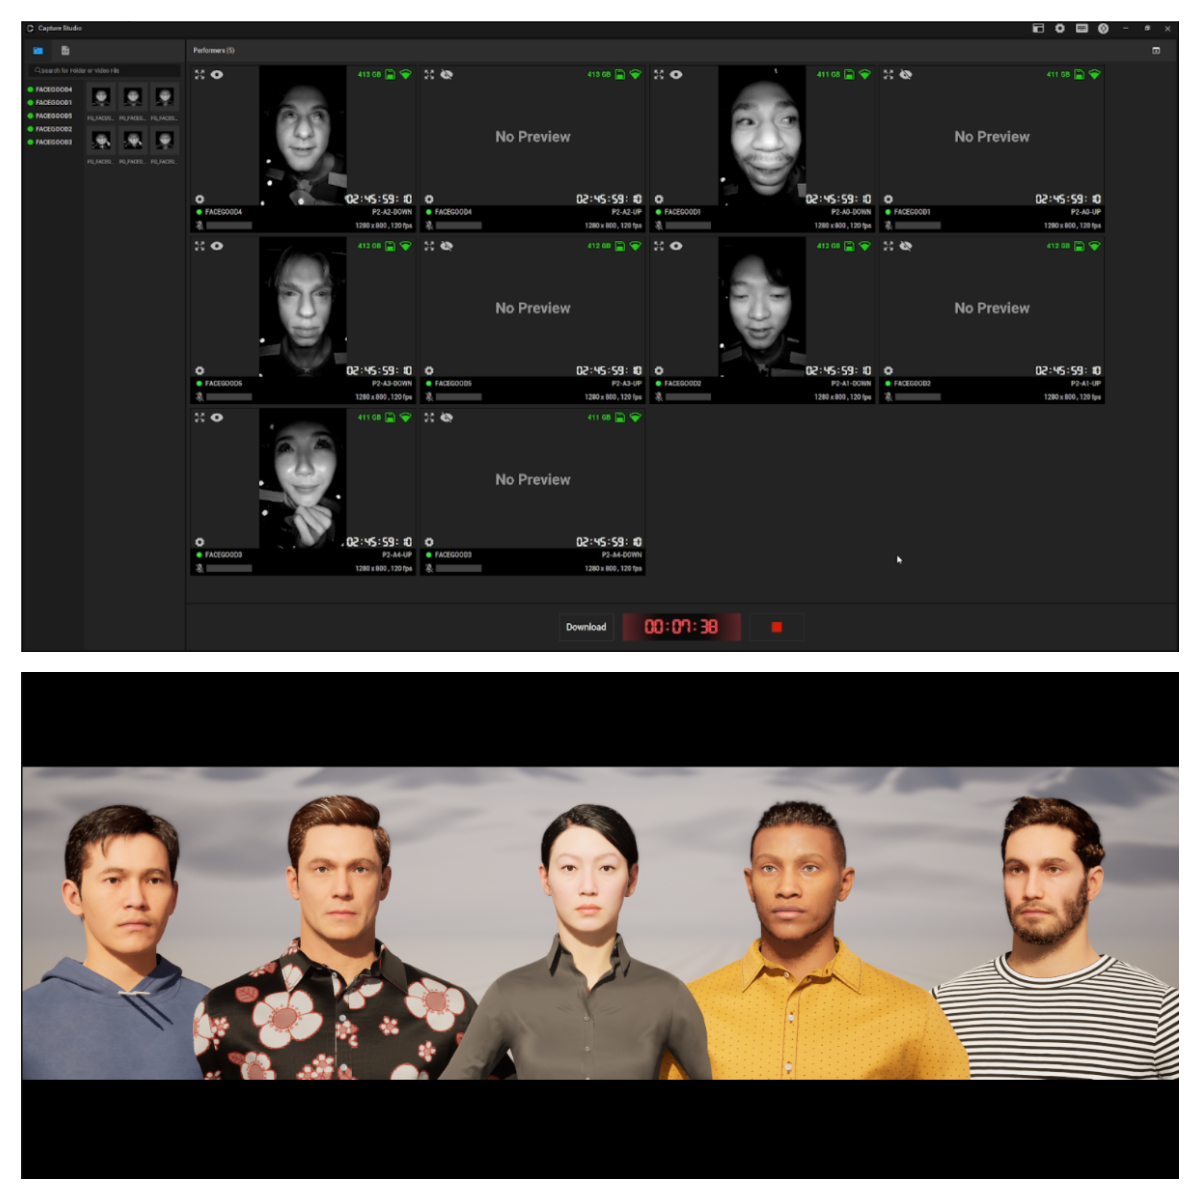
'''<big>多人同时</big>'''进行实时录制和直播。 | |||
* | * 支持时间码 | ||
* 动捕触发 | |||
[[File:Capture Studio Recoding and Realtime.png|frameless|1200x1200px]] | [[File:Capture Studio Recoding and Realtime.png|frameless|1200x1200px]] | ||
| Line 19: | Line 20: | ||
'''① Capture Studio | '''注意:''' | ||
'''① Capture Studio 仅支持 FACEGOOD P2 双目硬件系统。其他 HMC 设备无法使用 Capture Studio 进行控制。''' | |||
② | ② P2 的相机是 920 纳米的红外相机,它可以屏蔽室内的光源。然而,室外的红外光源可能会干扰相机的运行,在逆光条件下有可能导致过曝的情况。 | ||
[[File:Capture Stuido Topology.png|center|frameless|1404x1404px]] | [[File:Capture Stuido Topology.png|center|frameless|1404x1404px]] | ||
== | == 快速介绍 == | ||
==== | ==== 登录 Capture Studio ==== | ||
* | * 打开Capture Studio 在登录界面输入您的账户凭据进行登录。 | ||
[[File:Log In Page.png|center|thumb|1458x1458px|Open Capture Studio and enter your account credentials to log in at the login screen.]] | [[File:Log In Page.png|center|thumb|1458x1458px|Open Capture Studio and enter your account credentials to log in at the login screen.]] | ||
===== | ==== 搜索 SmartUnit 并加入 ==== | ||
当你第一次使用 SmartUnit 时,你需要按照以下步骤操作,以便让 Capture Studio 发现它。 | |||
===== 准备 ===== | |||
# | # 显示器 | ||
# | # 键盘和鼠标 | ||
===== | ===== 连接与启动 ===== | ||
# | # 连接显示器 | ||
#* | #* 找到包装中提供的 HDMI 线缆,将 SmartUnit 连接到显示器上。 | ||
# | # 连接键盘和鼠标,然后开启设备电源。 | ||
# | # 登录系统 | ||
#* | #* 输入密码 “facegood”(小写)以进入主界面。 | ||
[[File:Log In SmartUnit.png|center|1920x1920px|frameless]] | [[File:Log In SmartUnit.png|center|1920x1920px|frameless]] | ||
===== | ===== 连接 WIFI ===== | ||
* | * 选择网络 | ||
** | ** 点击右上角的按钮,然后选择 "Wi-Fi Not Connected". | ||
[[File:Select WIFI.png|center|frameless|1883x1883px]] | [[File:Select WIFI.png|center|frameless|1883x1883px]] | ||
* | * 连接WIFI | ||
** | ** 在出现的 Wi-Fi 列表中,选择与你的 Windows 主机处于同一局域网的 Wi-Fi 网络。 | ||
[[File:Select WIFI Table.png|center|frameless|1883x1883px]] | [[File:Select WIFI Table.png|center|frameless|1883x1883px]] | ||
===== | ===== 在 Windows 系统上使用 Capture Studio ===== | ||
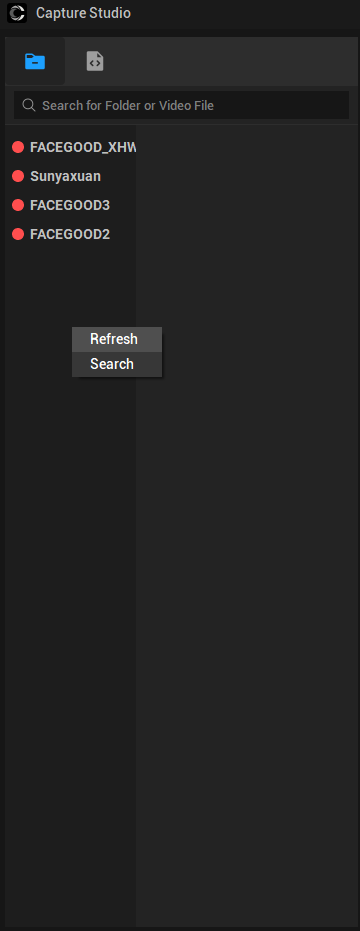
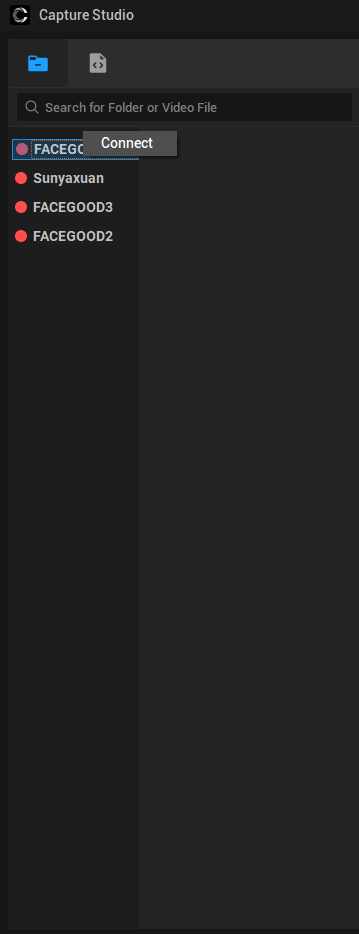
# | # 手动右键刷新 SmartUnit。 | ||
# | # 在 Windows 系统上打开 Capture Studio ,它应该会检测到 SmartUnit。 | ||
<gallery mode="nolines" widths="900" heights="934"> | <gallery mode="nolines" widths="900" heights="934"> | ||
File:Search SmartUnit.png|alt= | File:Search SmartUnit.png|alt= | ||
File:Connect SmartUnit.png|alt= | File:Connect SmartUnit.png|alt= | ||
</gallery> | </gallery> | ||
* | * 如果 SmartUnit 未被检测到的故障排除方法 | ||
** | ** 按照以下步骤来诊断问题。 | ||
===== | ===== 找到 SmartUnit 的 IP 地址 ===== | ||
====== | ====== 方法 1: 通过设置 ====== | ||
* | * 打开设置 | ||
** | ** 点击屏幕右上角的 "Setting" | ||
[[File:Select Setting.png|center|frameless|1883x1883px]] | [[File:Select Setting.png|center|frameless|1883x1883px]] | ||
* | * 找到 WIFI 的 IP 地址 | ||
** | ** 在左侧,找到 “Wi-Fi” 选项,然后点击右侧 “Connected” 旁边的齿轮图标。 | ||
** | ** 在弹出的窗口中,“IPv4 Address” 就是该 WIFI 的 IP 地址。 | ||
[[File:WIFI Table.png|center|frameless|1920x1920px]] | [[File:WIFI Table.png|center|frameless|1920x1920px]] | ||
[[File:WIFI Info.png|center|frameless|1920x1920px]] | [[File:WIFI Info.png|center|frameless|1920x1920px]] | ||
| Line 117: | Line 119: | ||
By following these steps, you should be able to successfully connect and use the SmartUnit. If you encounter any issues, please contact technical support. | By following these steps, you should be able to successfully connect and use the SmartUnit. If you encounter any issues, please contact technical support. | ||
==== | ==== 调整相机参数 ==== | ||
* | * 点击显示区域中的 “眼睛按钮” 以显示摄像头的实时画面。 | ||
[[File:Capture Stuido Mointor.png|center|frameless|1458x1458px]] | [[File:Capture Stuido Mointor.png|center|frameless|1458x1458px]] | ||
* | * 点击屏幕左下角的 “设置按钮” 来调整录制信息。 | ||
[[File:Camera Setting.png|center|frameless|1248x1248px]] | [[File:Camera Setting.png|center|frameless|1248x1248px]] | ||
==== | ==== 调整头盔的佩戴方式 ==== | ||
* | * 佩戴头盔时,请取下眼镜,并确保头发没有遮住眉毛。如果屏幕画面模糊,检查是否有污垢遮挡了镜片。对于 P2 头盔,可通过转动镜片方向来调整焦距。 | ||
* | * 调整标准 | ||
*# | *# 确保演员的面部特征清晰且没有遮挡。 | ||
*# | *# 将鼻子的中心与TOP摄像头的中心对齐。 | ||
*# | *# 保持清晰的对焦,避免出现过度曝光或曝光不足的情况。 | ||
==== | ==== 录制和下载 ==== | ||
* | * 开始 / 停止录制(录制的内容将保存在 SmartUnit 中)。[[File:Record Bar.png|center|frameless|1081x1081px]] | ||
* | * 下载界面将显示来自已连接 SmartUnit 的所有视频文件。 | ||
* | * 设置好下载位置后,点击 “下载”。 | ||
[[File:Download List.png|center|frameless|1292x1292px]] | [[File:Download List.png|center|frameless|1292x1292px]] | ||
==== | ==== 实时驱动 ==== | ||
===== | ===== 在 Capture Studio 中查看 ===== | ||
要配置实时捕捉设置,请点击屏幕左下角的 “设置” 按钮。你需要选择 Avatary.AI 的类型(Metahuman \ ARKit )。 [[File:Select AVATARY.AI.solver.png|center|frameless|1248x1248px]] | |||
最后,点击 “Start” 按钮。 | |||
[[File:Start Realtime Capture.png|center|frameless|1248x1248px]]回到主页面,打开标题栏中的 "expression tuning" 子页面。在这里,你将能够看到捕捉工作室中内置模型的实时驱动效果。 | |||
'''NOTICE:''' | '''NOTICE:''' 为降低功耗并延长电池续航时间。点击“Start”后,仅当画面中有'''<u>人脸</u>'''时才会开始计算。[[File:Expression Tuning.png|center|frameless|1847x1847px]] | ||
这些步骤将帮助你轻松设置实时捕捉参数,并在捕捉过程中调整表情,从而获得更精确、更逼真的效果。 | |||
===== | ===== 在 UE 中查看 ===== | ||
请使用 '''UE5.3 或更高版本''',相关内容请参考[[UnrealEngine|'''此处''']]的 UE 教程。 | |||
== Calibrate Headset == | == Calibrate Headset == | ||
| Line 284: | Line 287: | ||
== FAQ == | == FAQ == | ||
=== | === 常见问题 === | ||
===== Capture Studio 支持使用普通网络摄像头进行录制或者支持其他设备吗? ===== | |||
Capture Studio 仅支持 FACEGOOD P2 系统。 | |||
===== Capture Studio 输出的视频格式有哪些? ===== | |||
录制的视频以 MOV 格式保存。 | |||
===== 在 Capture Studio, 能够同时监控多少个演员呢? ===== | |||
在 Capture Studio 可监控的数量没有特定的限制。不过,由于渲染需要占用本地的计算资源,所以你可能需要 CPU 的使用情况来进行相应调整。建议不要同时查看超过 6 个画面。 | |||
===== | ===== Capture Studio 最多支持同时录制多少个硬件设备呢? ===== | ||
根据用户购买的订阅数量,将会提供特定数量的同步录制功能。 | |||
===== P2 录制的图像偏暗? ===== | |||
在 Capture Studio 中调整亮度和对比度设置,遵循在让脸部保持明亮的同时使周围环境暗一些的原则。 | |||
===== 在使用 Capture Studio 时, CPU 的使用率达到了 100% 怎么办? ===== | |||
当在 Capture Studio 中同时连接多个 SmartUnit 并开启摄像头监控时,本地计算资源会被用于渲染图像,从而导致 CPU 使用率升高。为了降低 CPU 使用率,你可以调整头戴设备,然后点击图像中的 “眼睛按钮” 关闭监控。需要着重强调的是,CPU 使用率的上升并不会影响录制视频的质量,因为录制始终在 SmartUnit 内部进行。Capture Studio 主要用于监控和控制。 | |||
===== | ===== 在 Capture Studio 中关闭屏幕监控后还能进行录制吗? ===== | ||
可以。为了减轻计算机的 CPU 负担,你可以在调整好头戴设备后选择关闭屏幕监控。这样一来,当你开始录制时,即便屏幕未被监控,也仍然可以进行录制。 | |||
===== 为什么在 Capture Studio 中会出现延迟或轻微的画面撕裂现象呢? ===== | |||
Capture Studio 与 SmartUnit 之间是通过无线网络(WiFi)连接的。当路由器的资源被过度占用,或者 WiFi 信号质量较差时,就可能会出现严重的延迟和数据包丢失的情况,进而导致一些画面撕裂现象。不过,这并不会影响录制视频的质量,因为录制始终是在 SmartUnit 内部进行的。Capture Studio 主要用于监控和控制。 | |||
=== 实时驱动 === | |||
===== 同时可以支持多少位演员进行实时驱动呢? ===== | |||
根据用户购买的订阅数量,将会提供特定数量的实时功能。实际上,它支持的数量是没有上限的。 | |||
===== | |||
===== 一个演员的实时数据能够同时发送到多个目标地址吗? ===== | |||
当然,你可以在设置中添加多个目标地址,然后点击开始按钮。 | |||
[[File:Camera Setting.png|center|thumb|1247x1247px]] | [[File:Camera Setting.png|center|thumb|1247x1247px]] | ||
===== | === 动捕触发 === | ||
===== 它支持动作捕捉同步触发吗? ===== | |||
是的。Capture Studio 原生支持对 Xsens、Optitrack 和 Vicon 等的触发,无需购买第三方动作捕捉软件。此外,还与诸如 PeelCapture 等第三方动作捕捉触发软件兼容。 | |||
Latest revision as of 03:44, 27 March 2025
Capture Studio FACEGOOD 推出的一款高精度面部捕捉软件,主要面向企业级、大规模、多演员的面部捕捉场景,为动作捕捉团队提供全天候不间断、稳定、无线、多通道、实时的录制以及由动作捕捉触发的面部捕捉功能。

与 FACEGOOD P2 双目硬件系统搭配使用,该硬件系统采用了 SmartUnit 边缘计算架构,将计算与控制分离,使得 Capture Studio 软件能够安装在任何运行 Windows 系统的台式电脑上,大幅降低了软件的安装门槛。与此同时,基于 SmartUnit 架构,P2 硬件系统与上一代 P1 系统相比,零部件数量减少了 50%,使其更易于维护和使用。P2 的 SmartUnit 边缘计算架构为动作捕捉团队提供了充足的计算能力,支持无限数量的演员同步进行捕捉。 Capture Studio 的实时面部捕捉能力十分出色,其内置了 SeattleAI ,支持对任何种族和年龄群体的演员进行实时面部捕捉,可直接驱动虚拟人的 660 个混合形状和 820 个骨骼点绑定,精度是 ARKit 的 20 倍。此外,动作捕捉团队还可以针对自己的绑定系统进行人工智能训练,以最终实现更高的精度。
快来下载吧 !!!
享受多人同时录制和实时不间断的互动,解锁全新的多人协同创作体验!!
多人同时进行实时录制和直播。
- 支持时间码
- 动捕触发
注意:
① Capture Studio 仅支持 FACEGOOD P2 双目硬件系统。其他 HMC 设备无法使用 Capture Studio 进行控制。
② P2 的相机是 920 纳米的红外相机,它可以屏蔽室内的光源。然而,室外的红外光源可能会干扰相机的运行,在逆光条件下有可能导致过曝的情况。
快速介绍
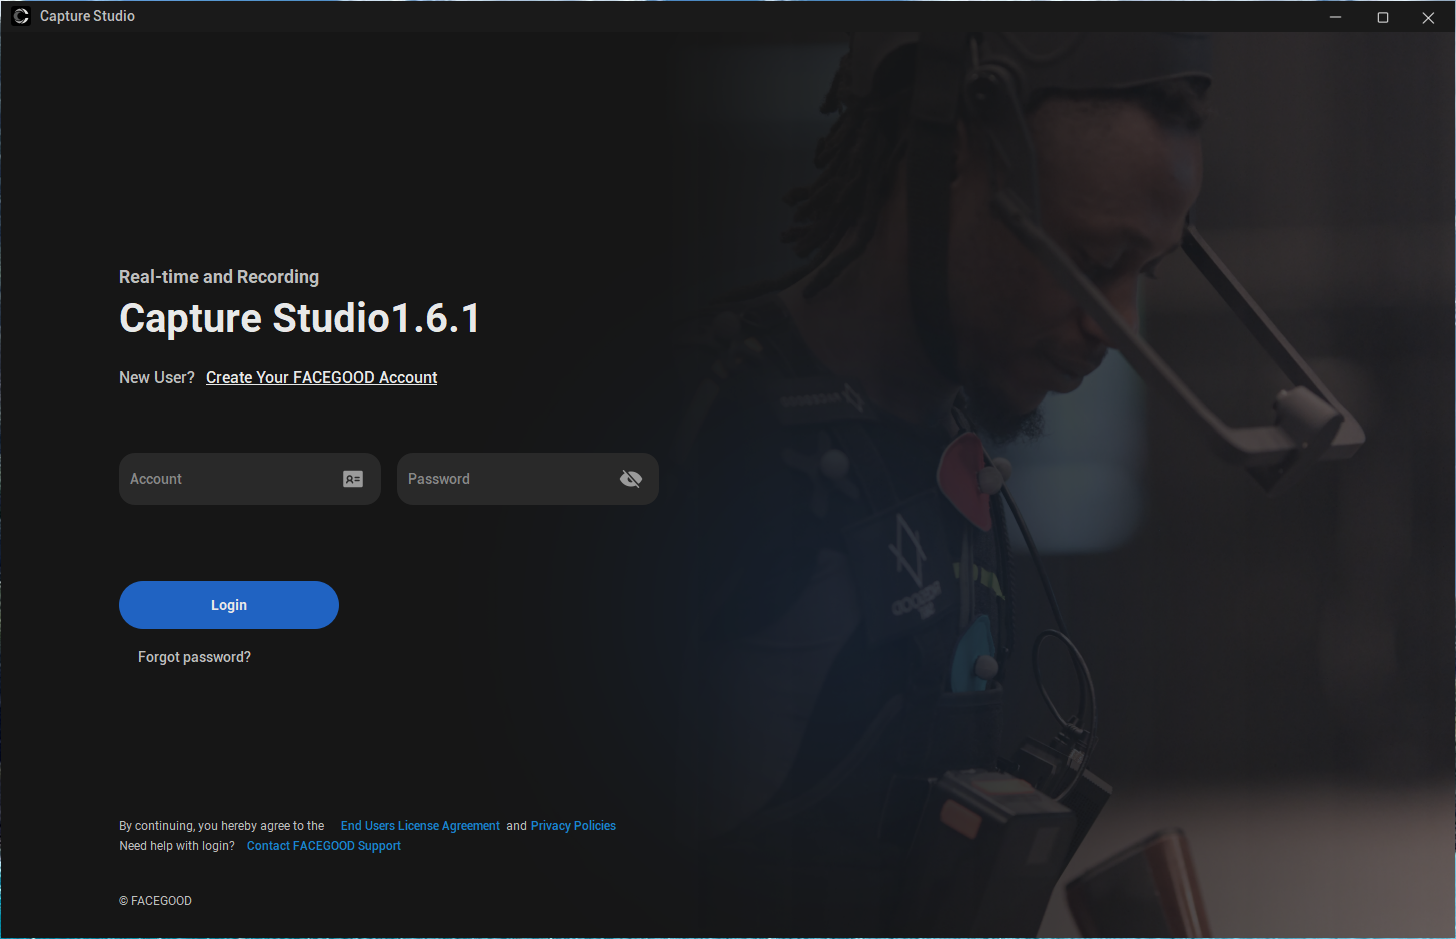
登录 Capture Studio
- 打开Capture Studio 在登录界面输入您的账户凭据进行登录。
搜索 SmartUnit 并加入
当你第一次使用 SmartUnit 时,你需要按照以下步骤操作,以便让 Capture Studio 发现它。
准备
- 显示器
- 键盘和鼠标
连接与启动
- 连接显示器
- 找到包装中提供的 HDMI 线缆,将 SmartUnit 连接到显示器上。
- 连接键盘和鼠标,然后开启设备电源。
- 登录系统
- 输入密码 “facegood”(小写)以进入主界面。

连接 WIFI
- 选择网络
- 点击右上角的按钮,然后选择 "Wi-Fi Not Connected".
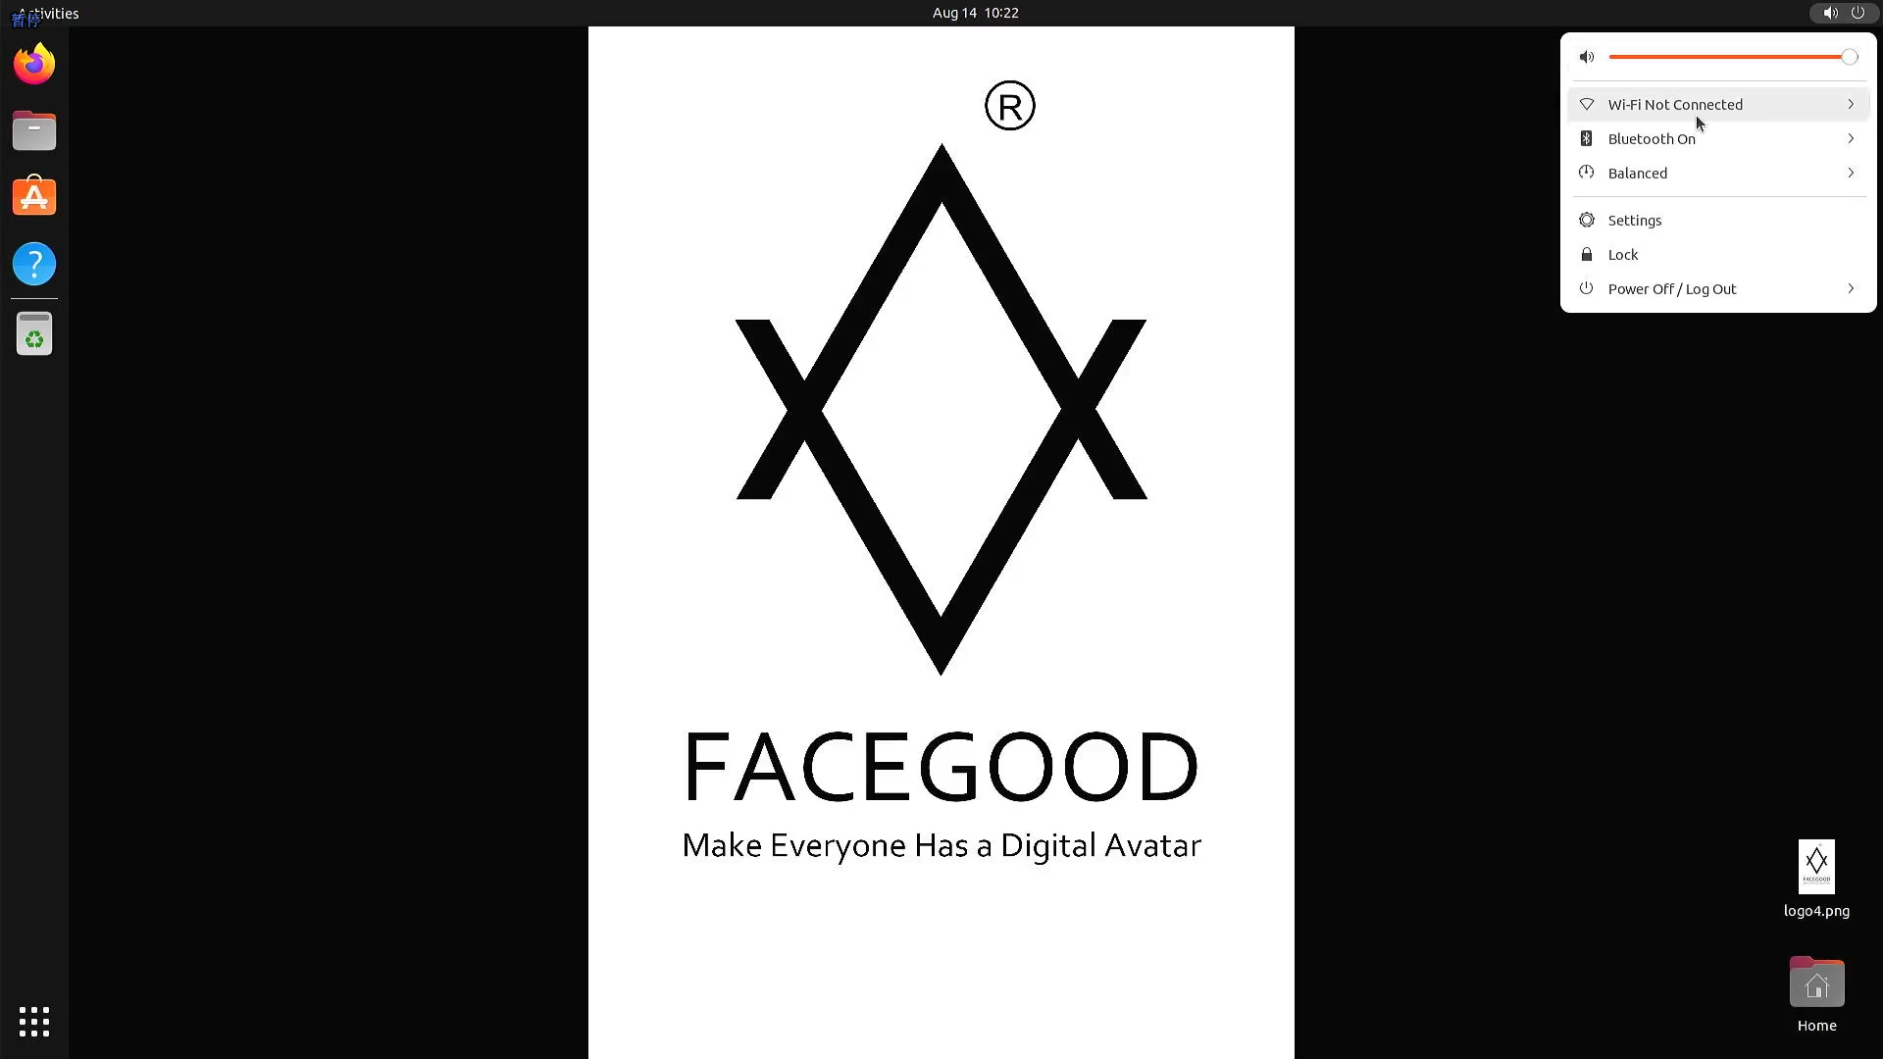
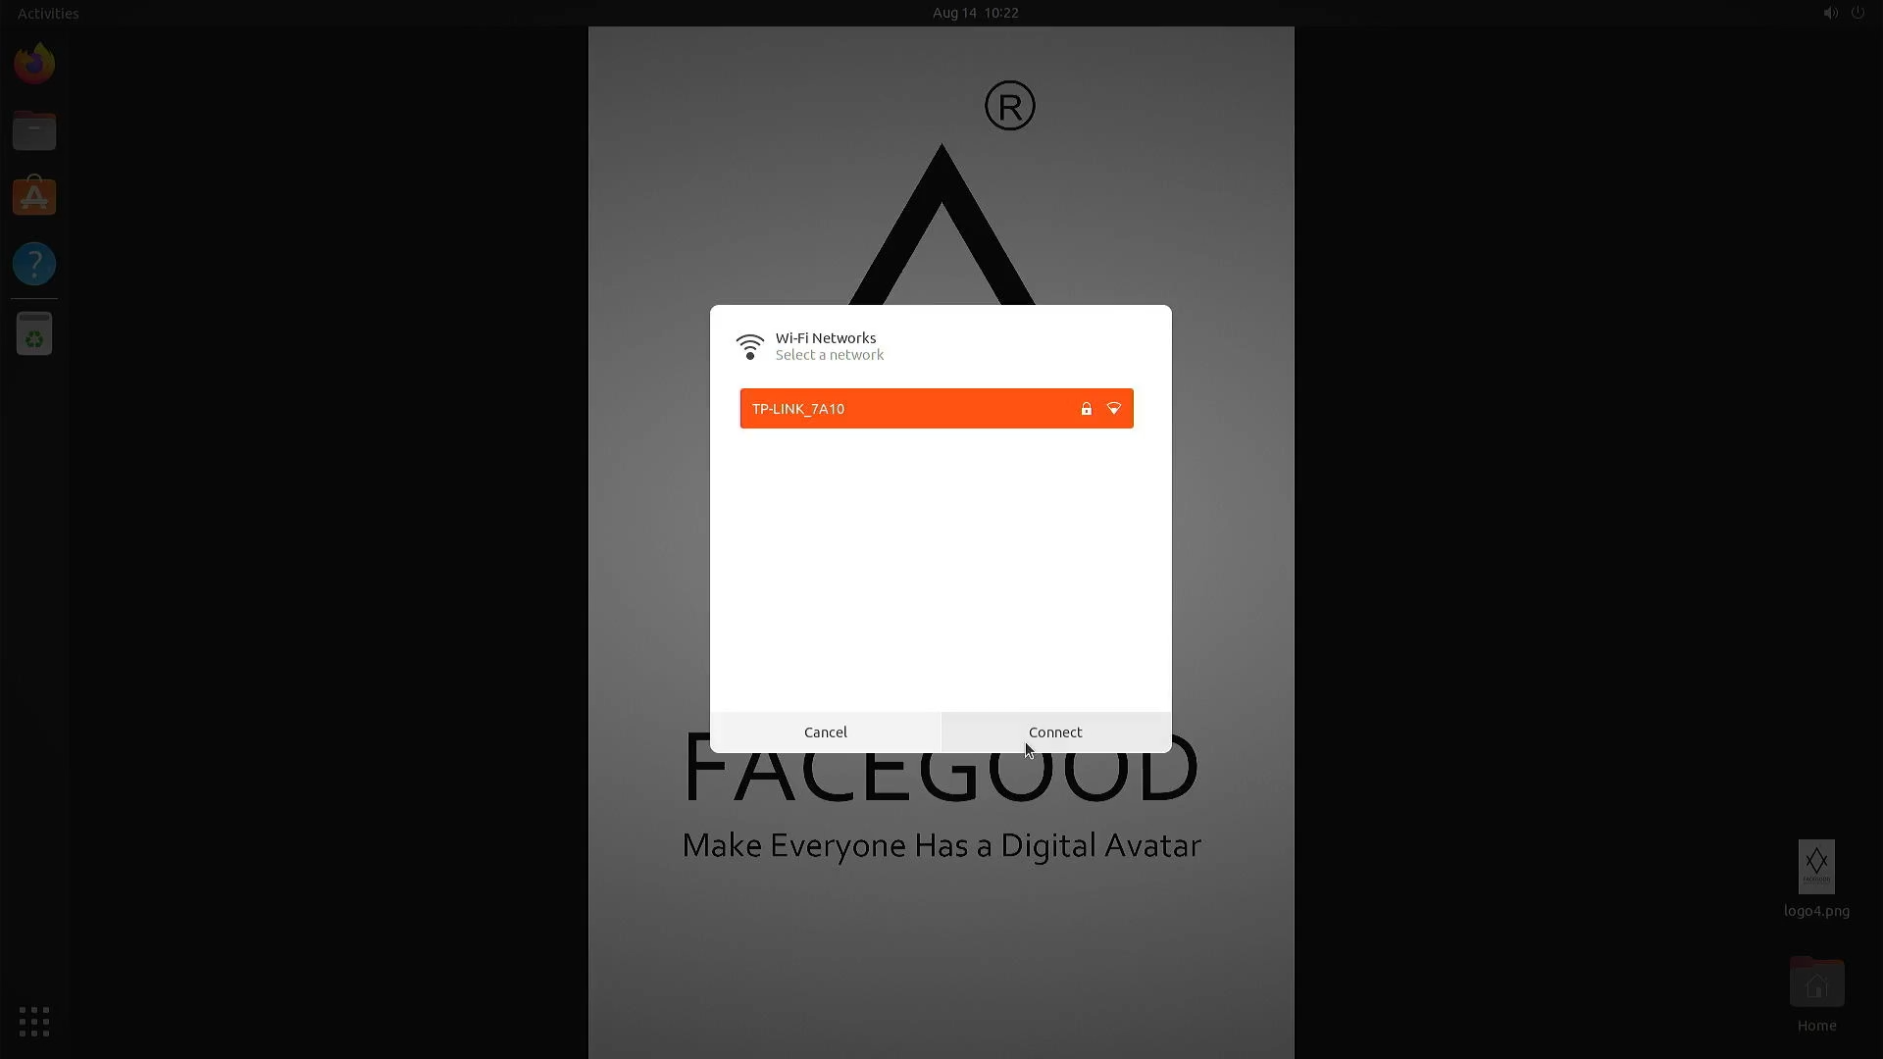
- 连接WIFI
- 在出现的 Wi-Fi 列表中,选择与你的 Windows 主机处于同一局域网的 Wi-Fi 网络。
在 Windows 系统上使用 Capture Studio
- 手动右键刷新 SmartUnit。
- 在 Windows 系统上打开 Capture Studio ,它应该会检测到 SmartUnit。
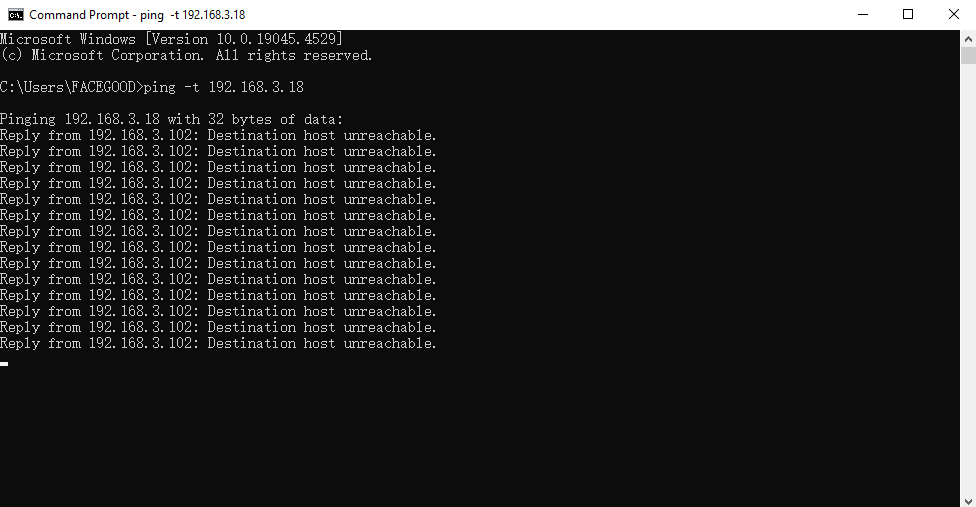
- 如果 SmartUnit 未被检测到的故障排除方法
- 按照以下步骤来诊断问题。
找到 SmartUnit 的 IP 地址
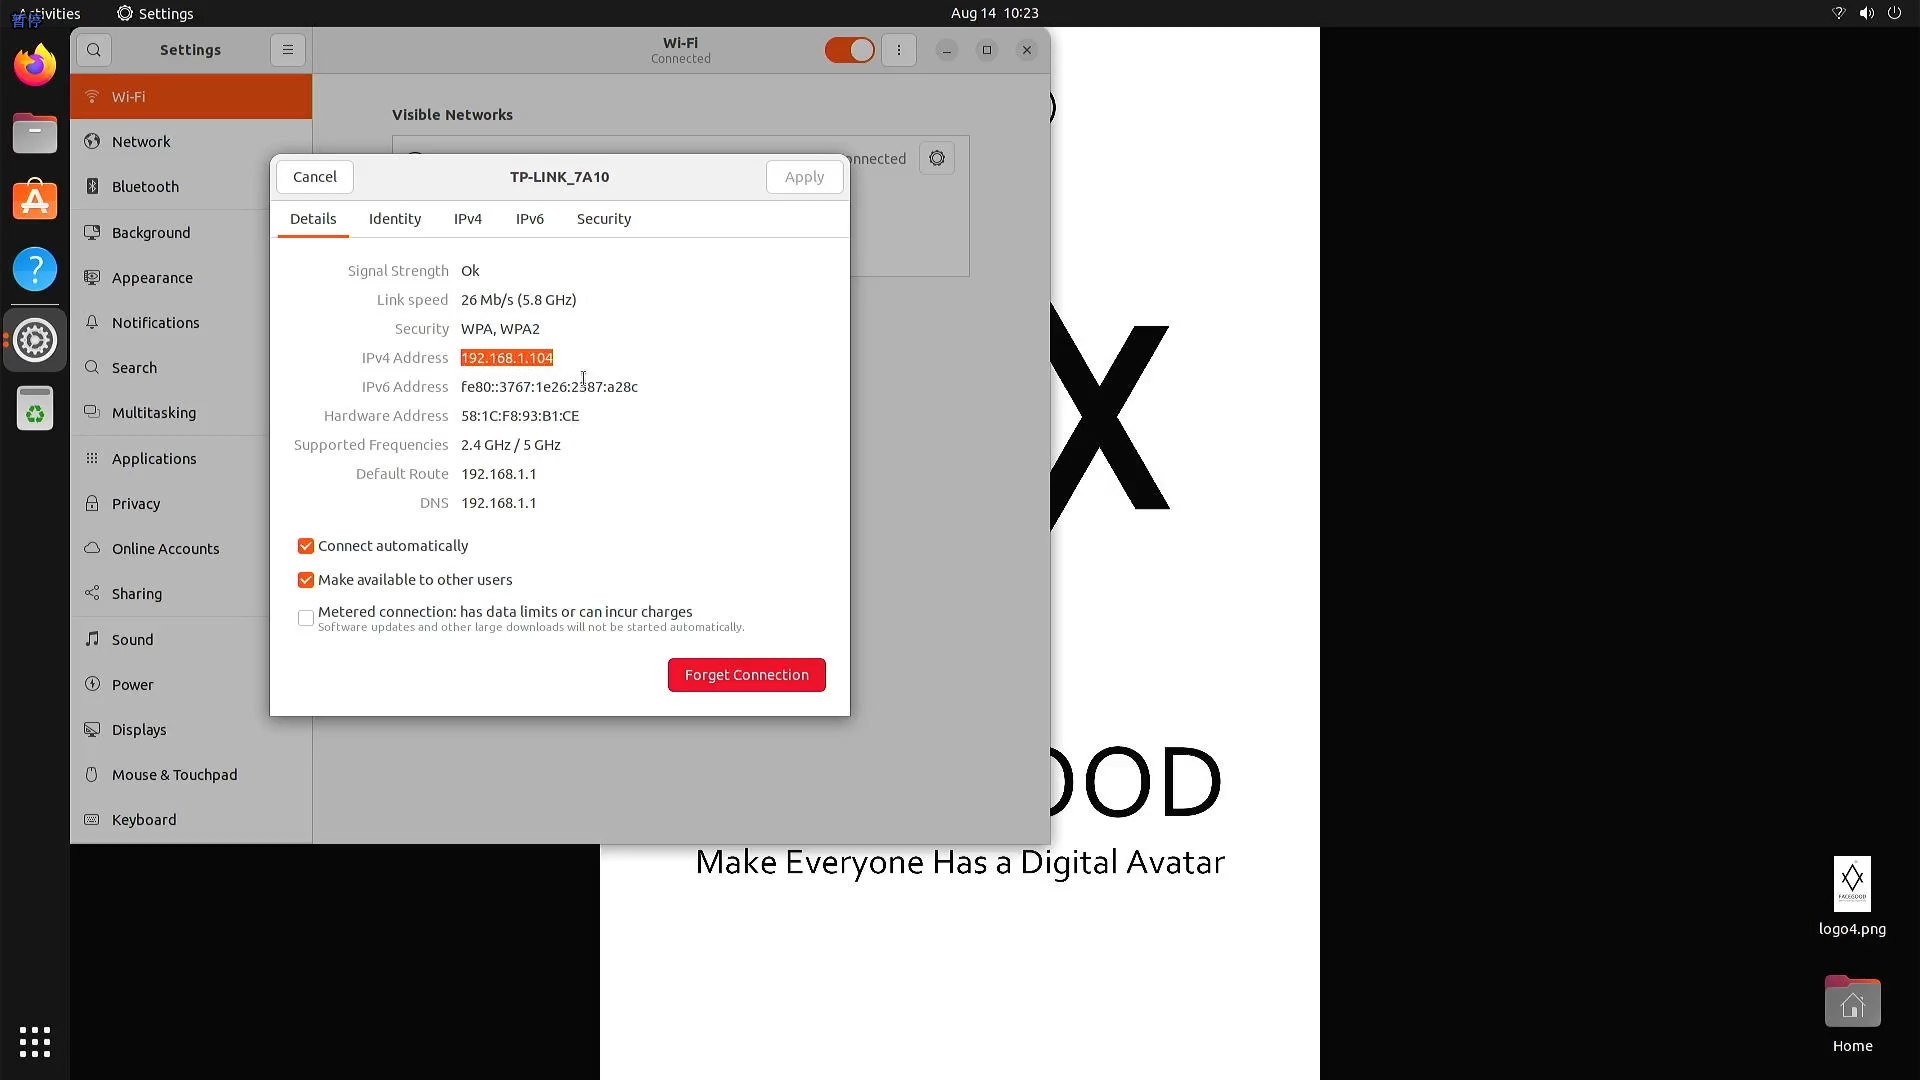
方法 1: 通过设置
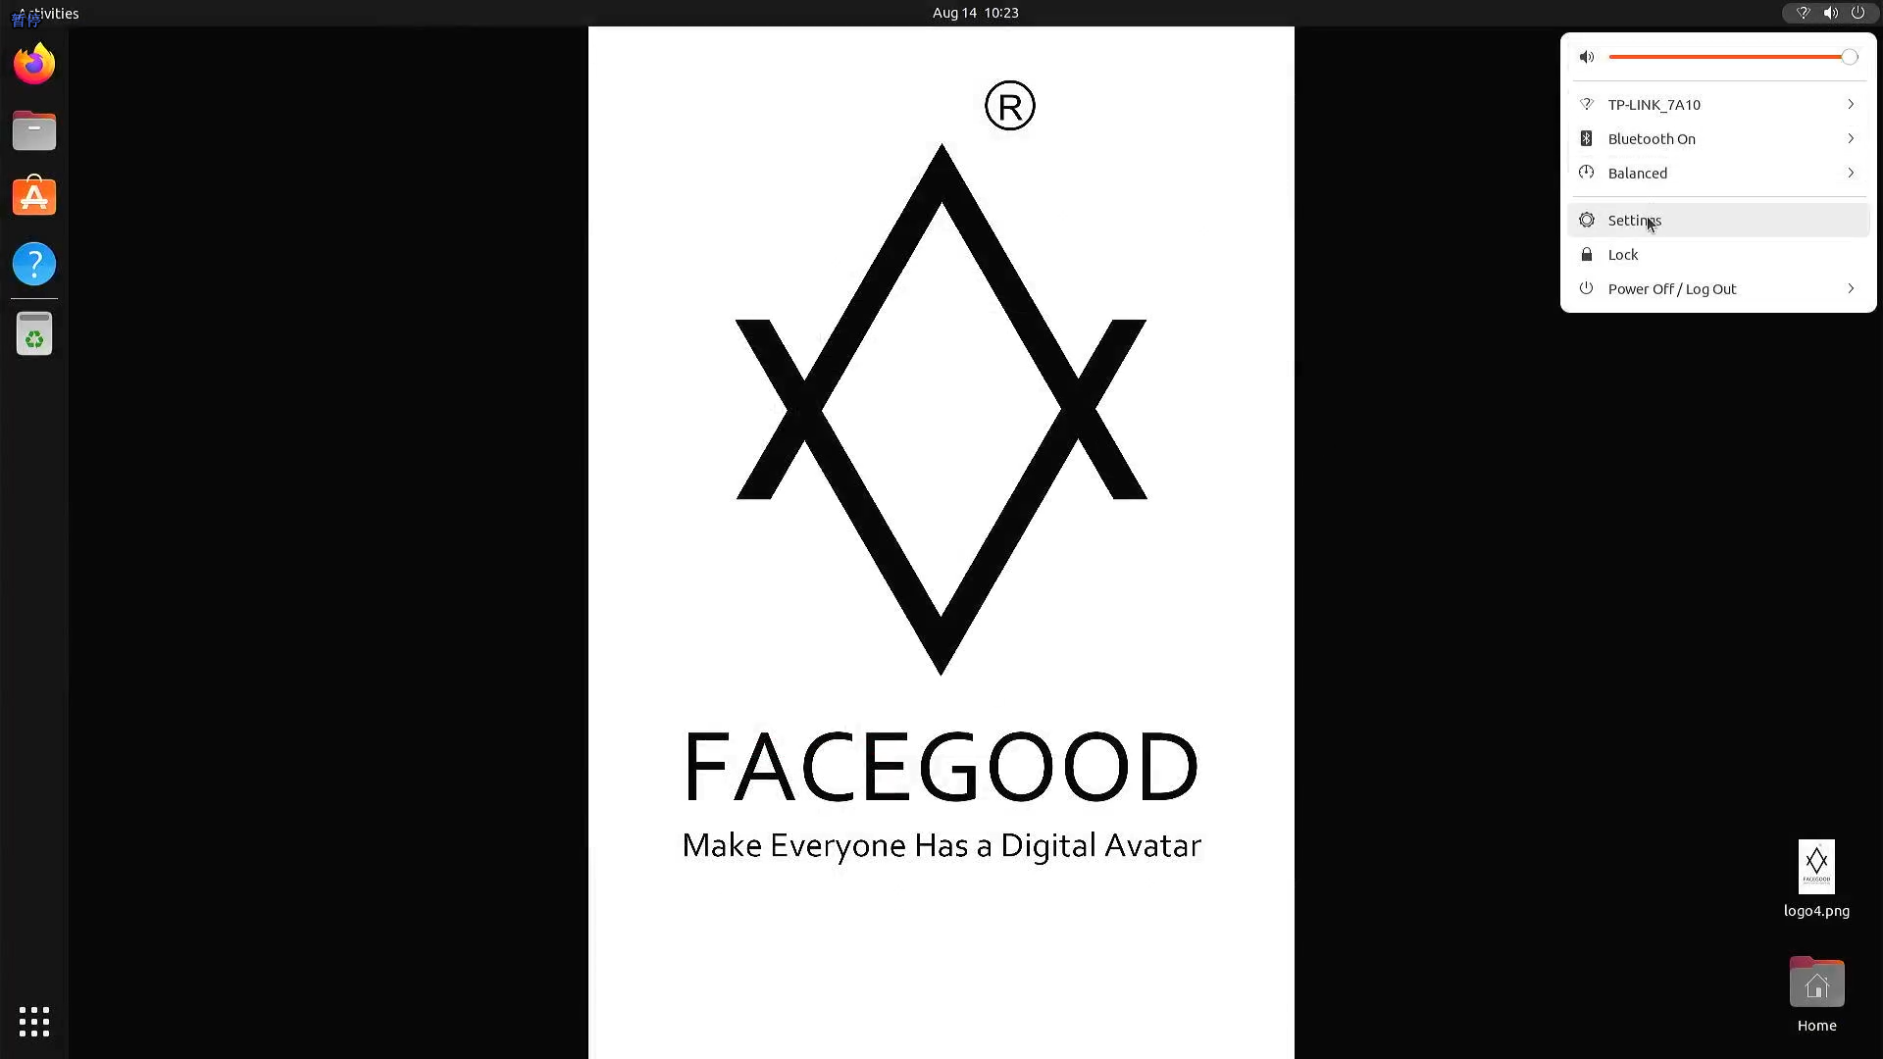
- 打开设置
- 点击屏幕右上角的 "Setting"
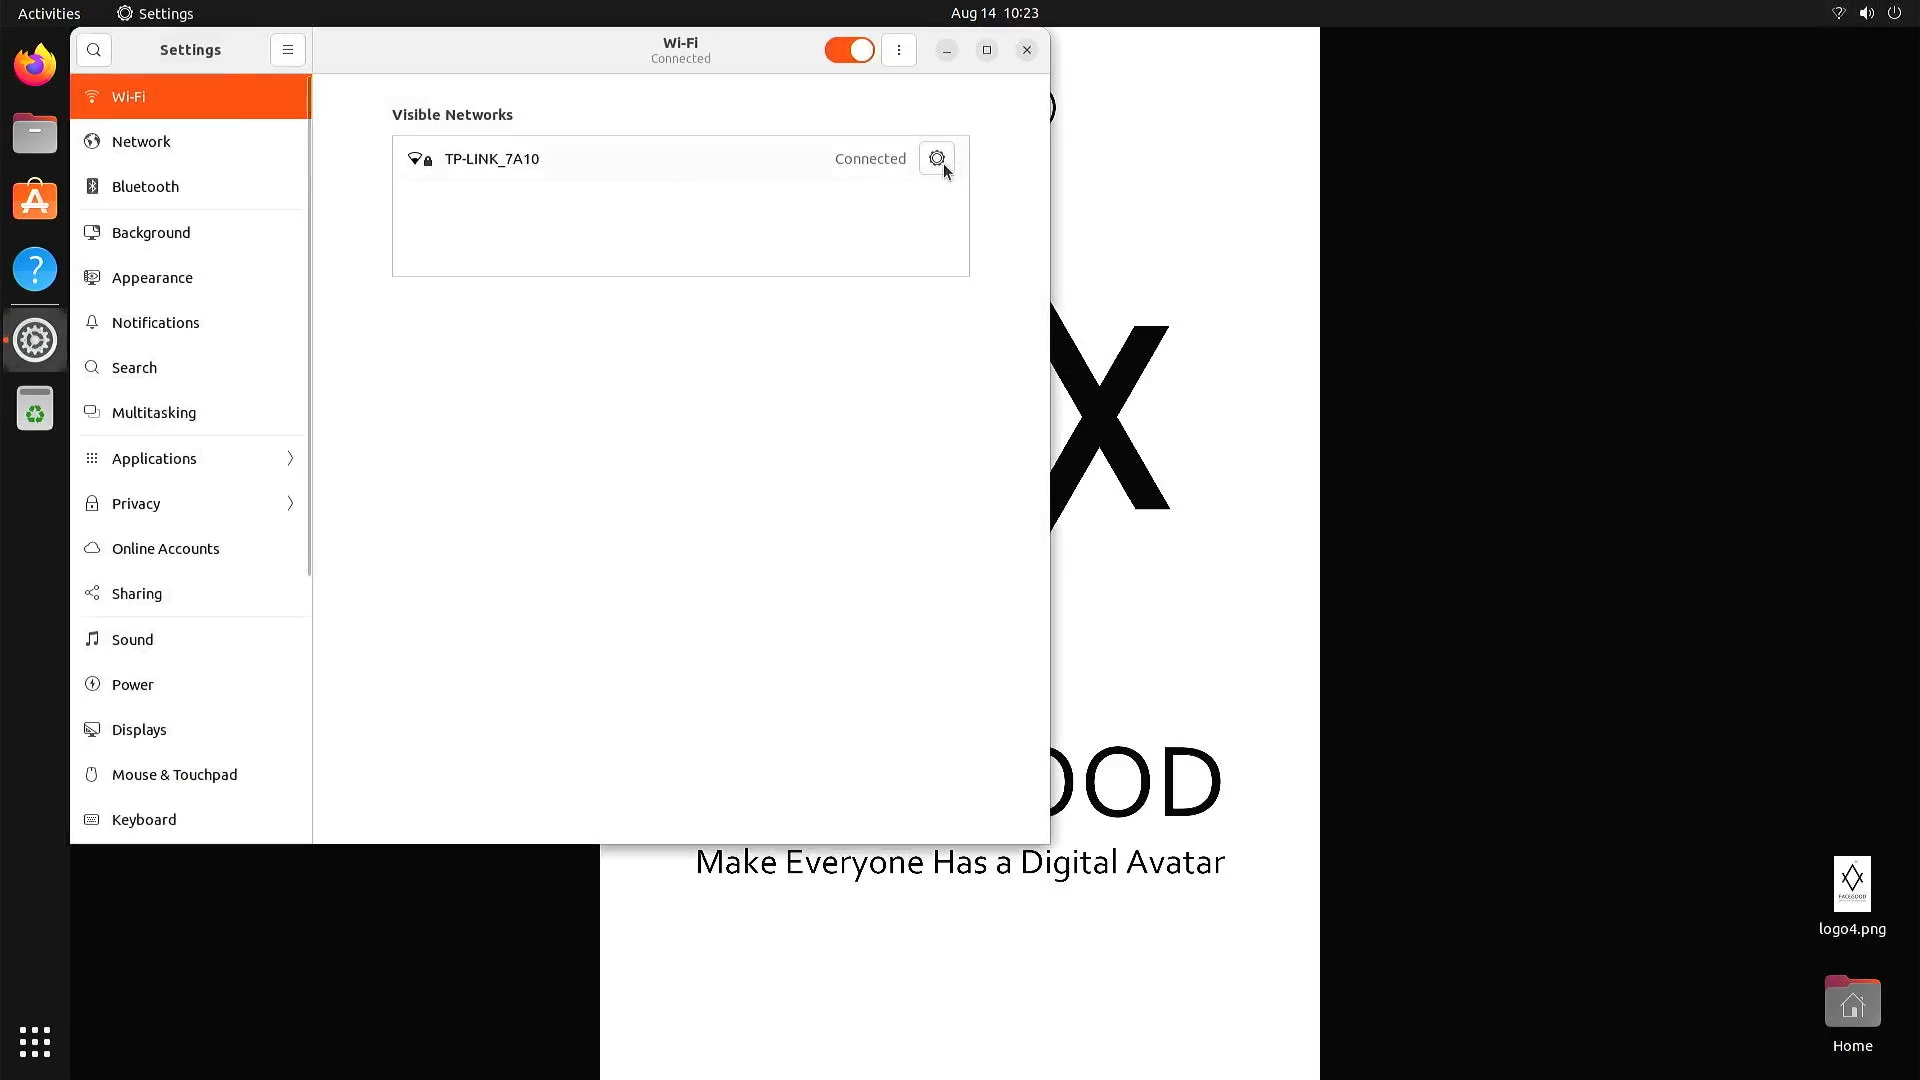
- 找到 WIFI 的 IP 地址
- 在左侧,找到 “Wi-Fi” 选项,然后点击右侧 “Connected” 旁边的齿轮图标。
- 在弹出的窗口中,“IPv4 Address” 就是该 WIFI 的 IP 地址。
- Find Ethernet IP Address
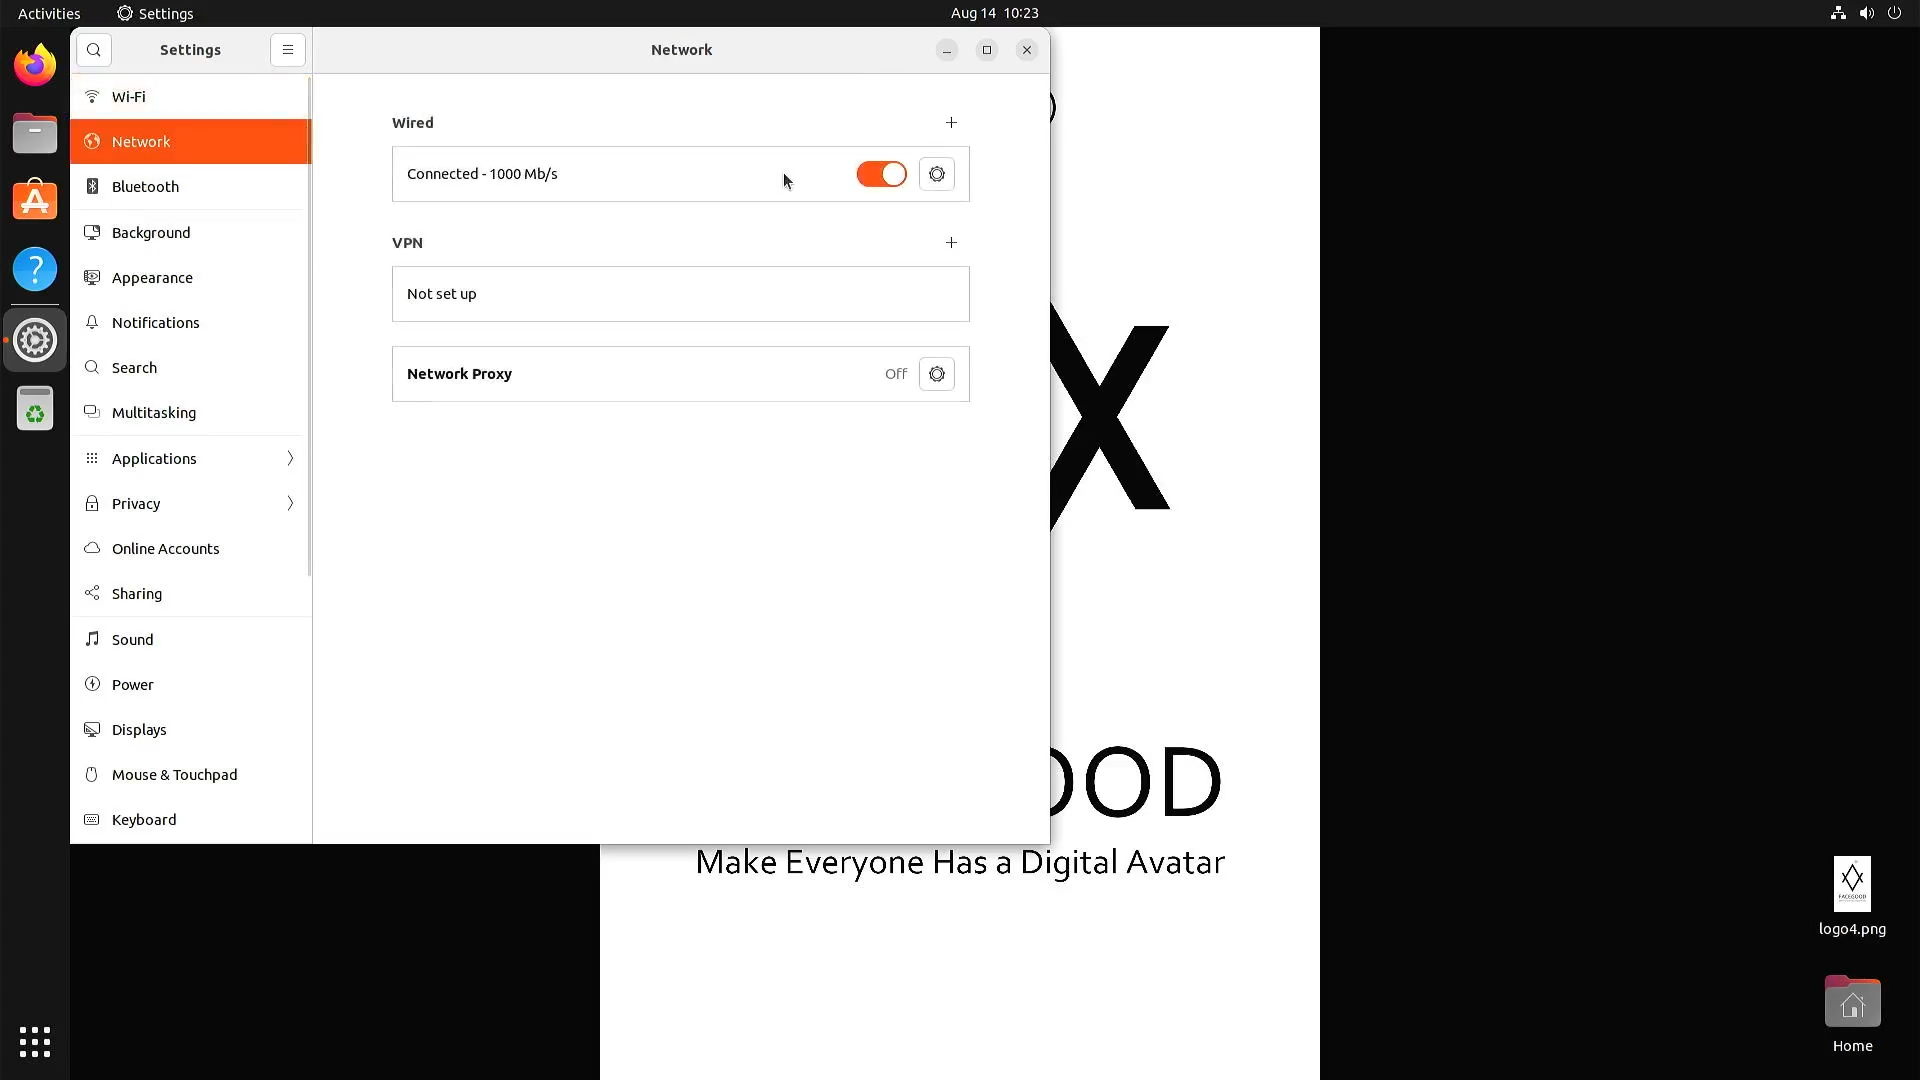
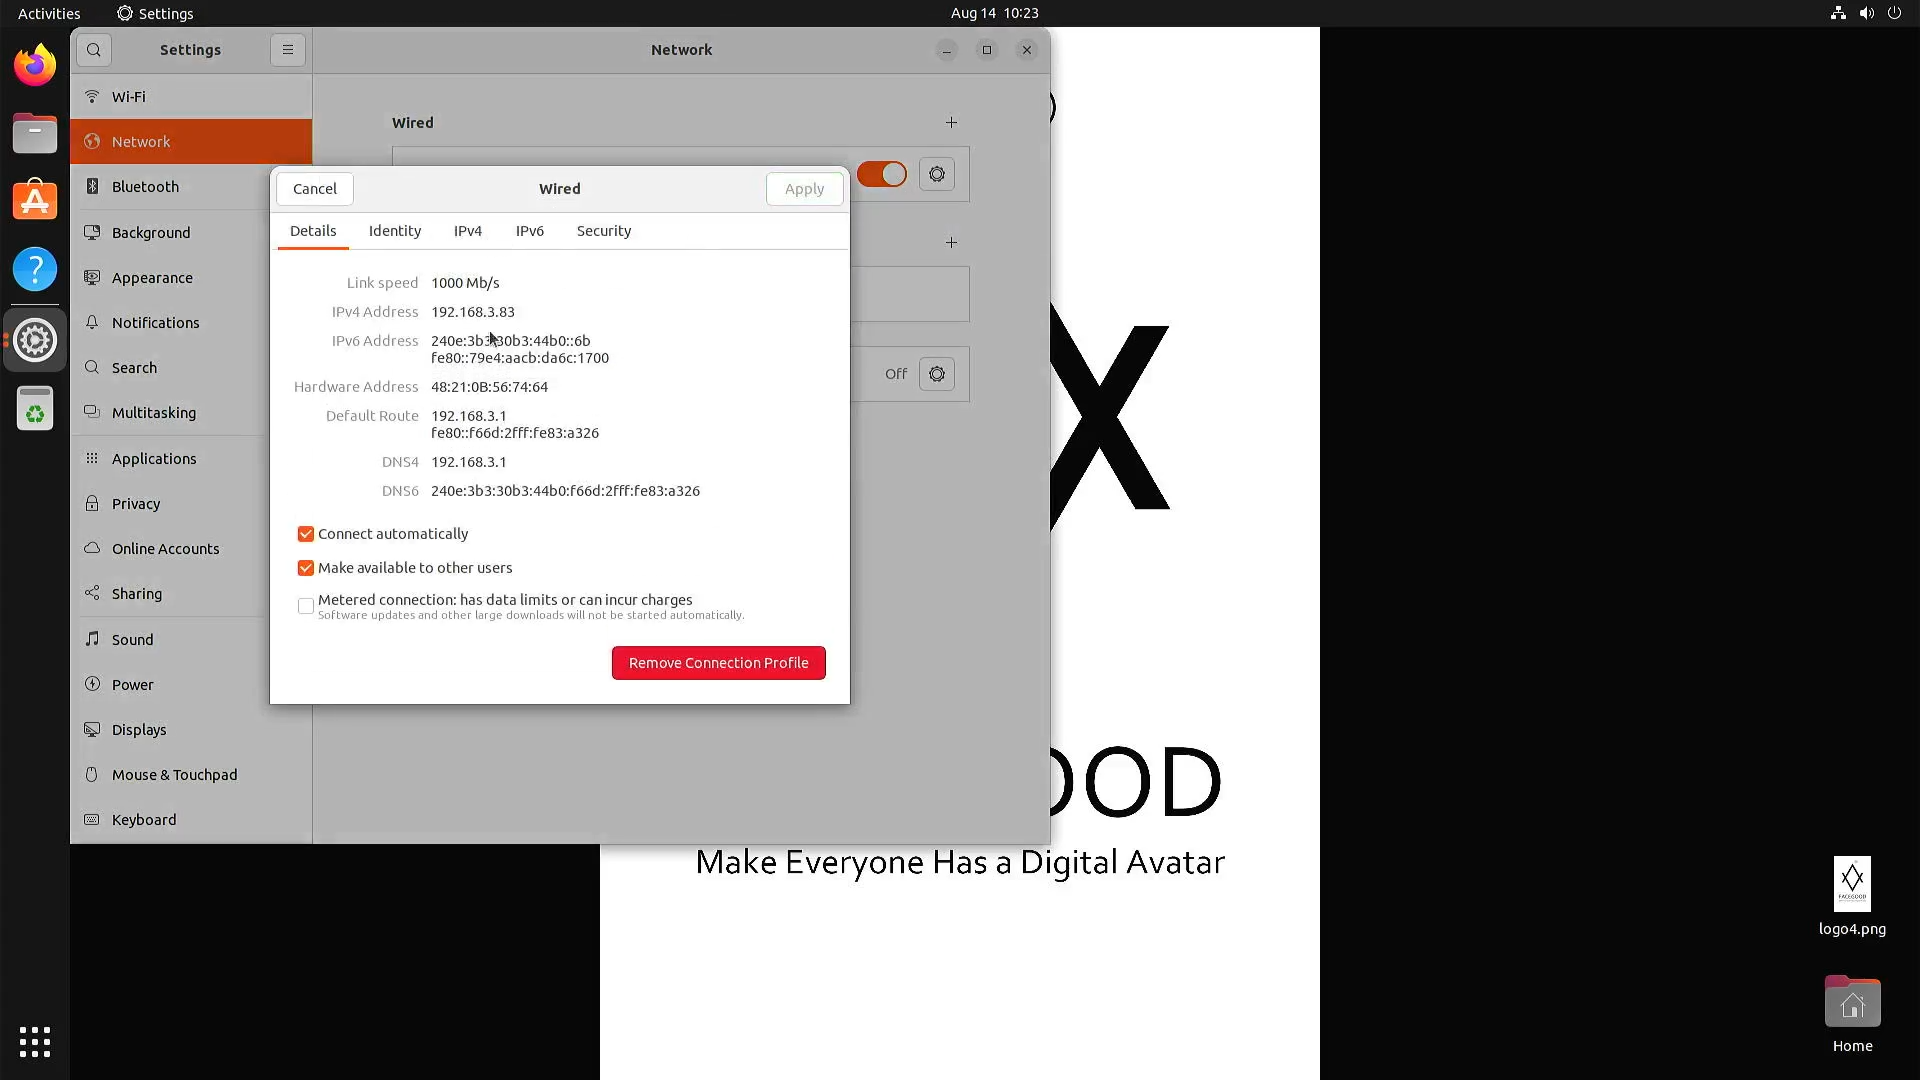
- If an Ethernet cable is connected, go to the `Network` option on the left side and click the gear icon next to `Wired`.
- In the window that appears, the `IPv4 Address` is the Ethernet IP address.
- Note: The two IP addresses are different.
Method 2: Find IP Address via Terminal
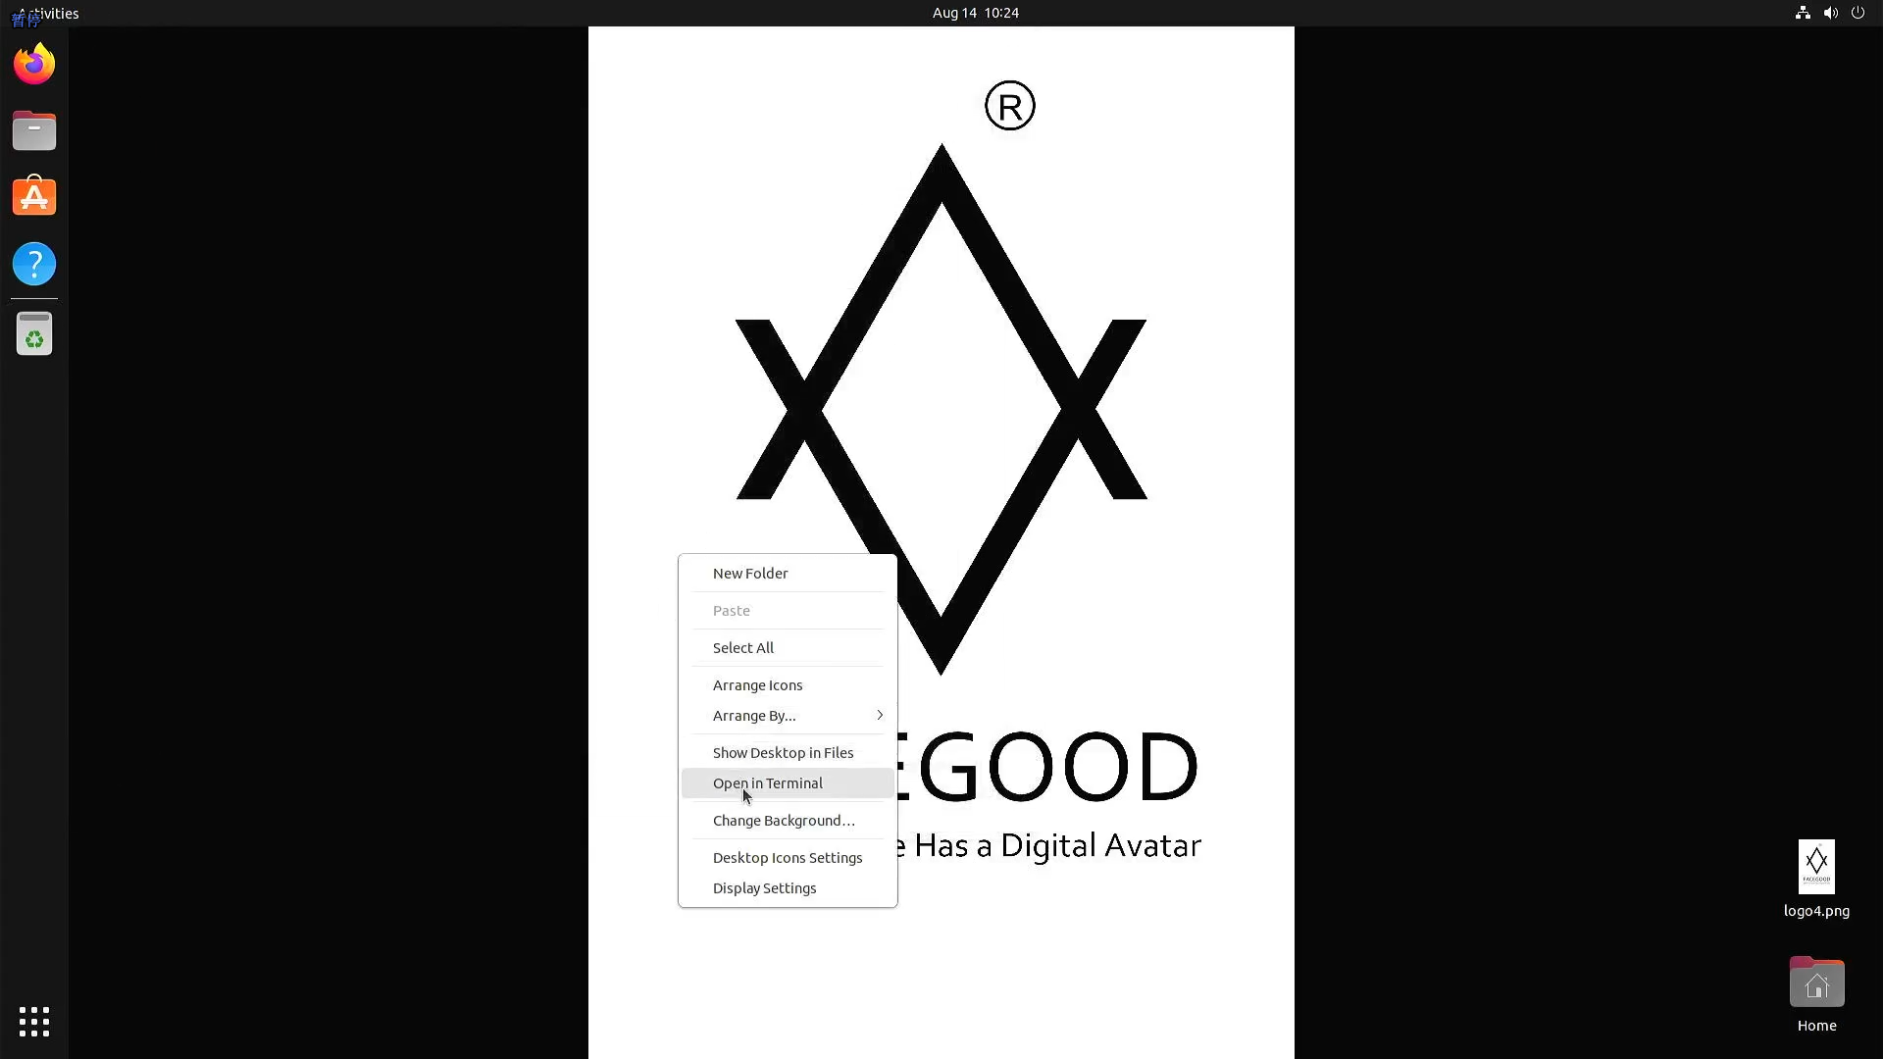
- Open Terminal
- Right-click on the desktop and select `Open in Terminal`.
- Enter Command to View IP Address
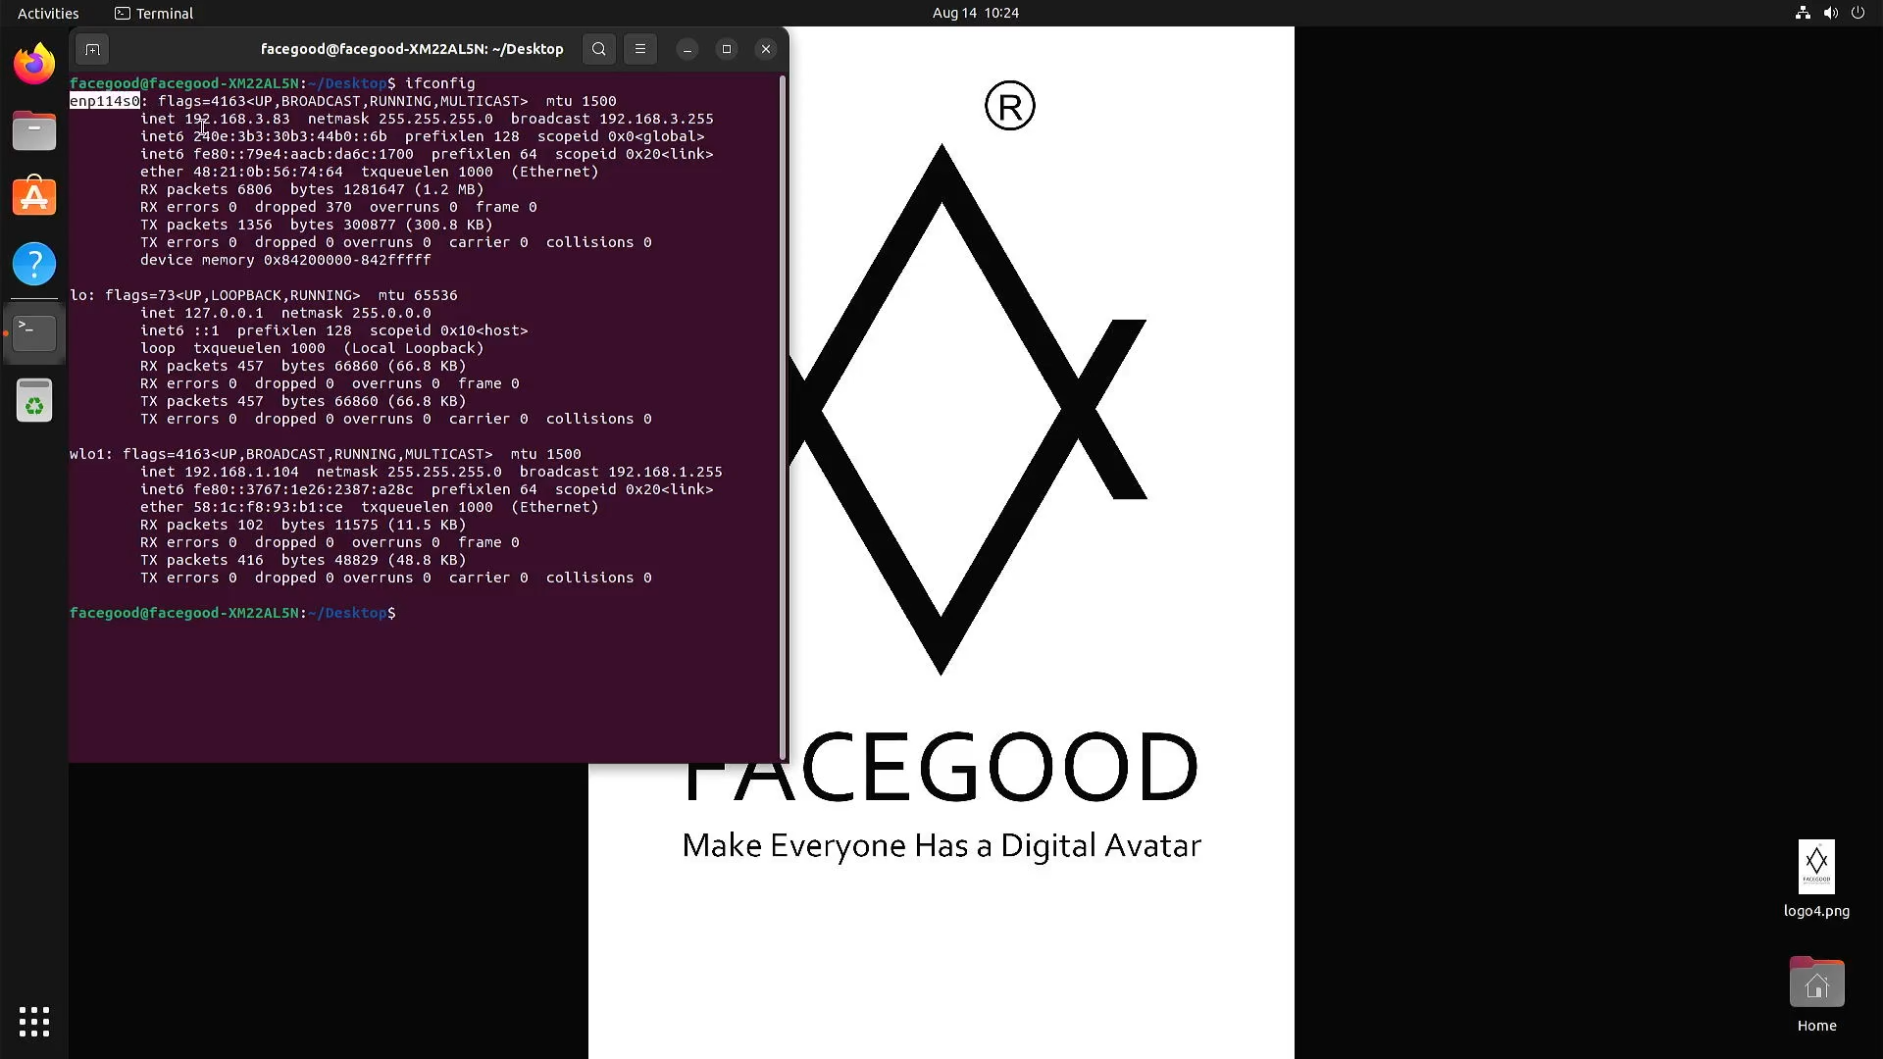
- Enter `ifconfig`: The `inet` under `enpxxx` is the Ethernet IP address, and the `inet` under `wlo1` is the WIFI IP address.
Check Connection on Windows
- Open Command Prompt
- Press `Ctrl+R` on Windows, type `CMD`, and press Enter to open the Command Prompt.
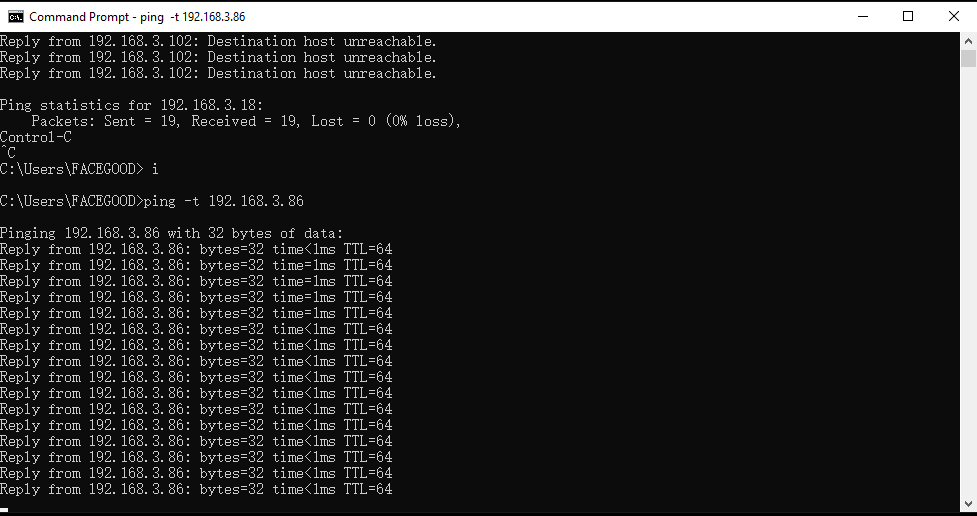
- Enter ping Command
- Type `ping -t xxx.xxx.xxx.xxx` (preferably the Ethernet IP address) and check the result.
- Result 1: If you get "Destination host unreachable"; you are not on the same local network, please contact your IT department.
- Result 2: If you get replies, everything is normal, and you can find the SmartUnit in Capture Studio.
- Type `ping -t xxx.xxx.xxx.xxx` (preferably the Ethernet IP address) and check the result.
By following these steps, you should be able to successfully connect and use the SmartUnit. If you encounter any issues, please contact technical support.
调整相机参数
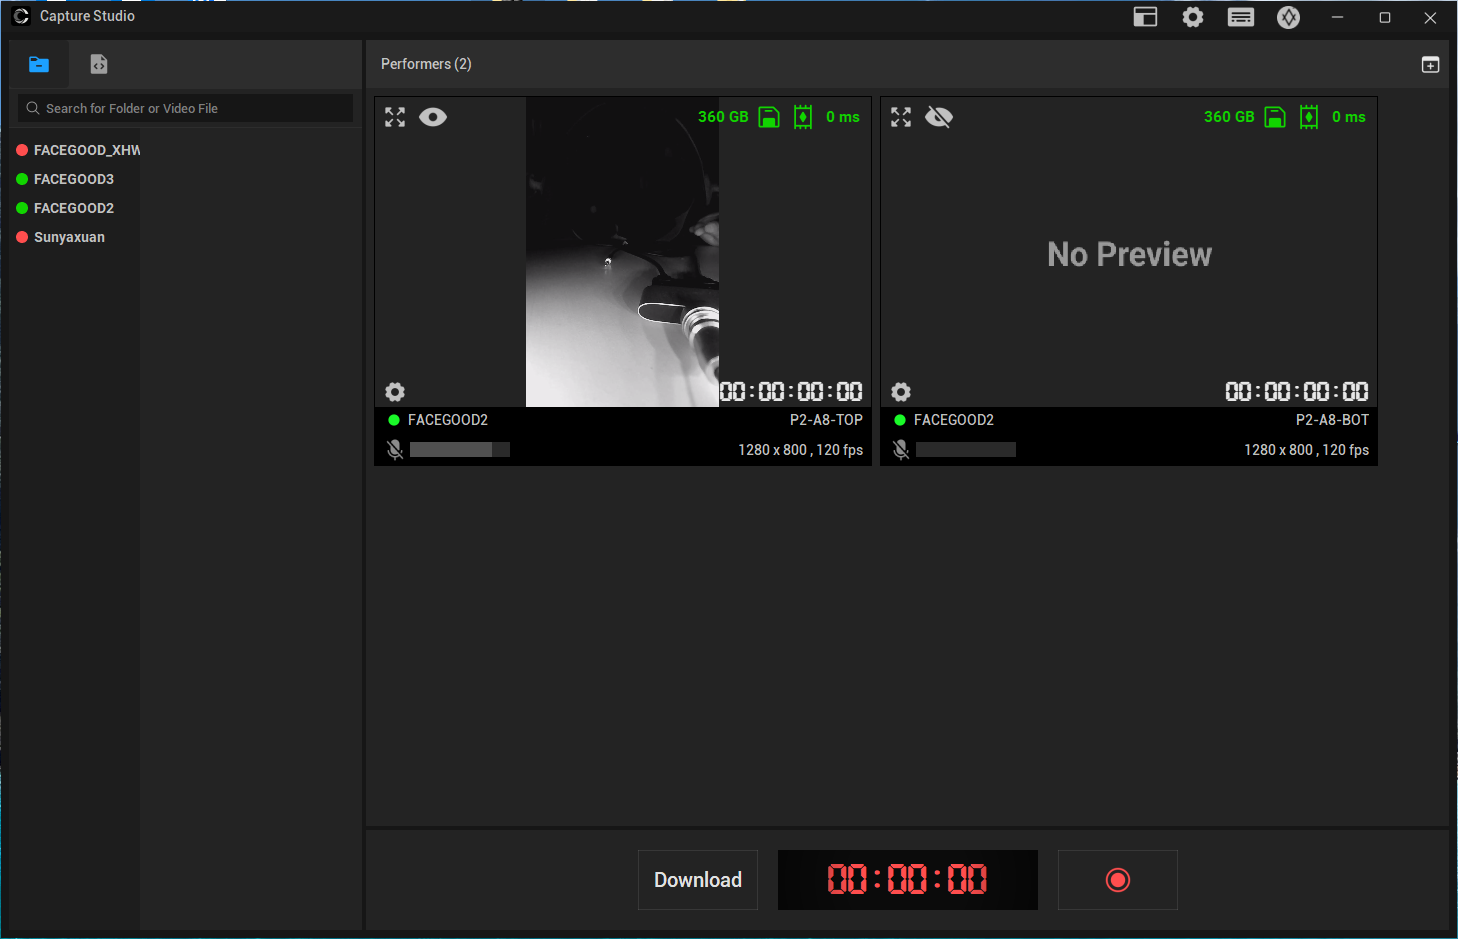
- 点击显示区域中的 “眼睛按钮” 以显示摄像头的实时画面。
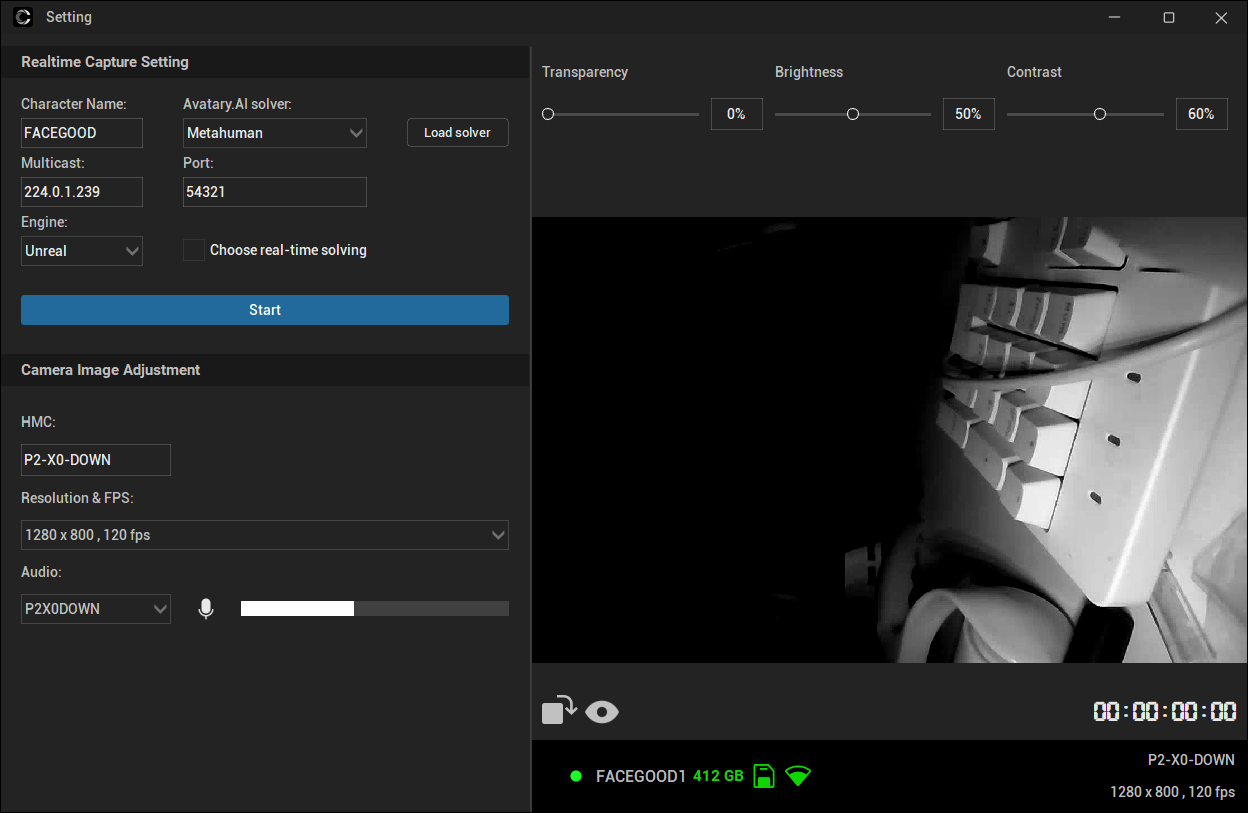
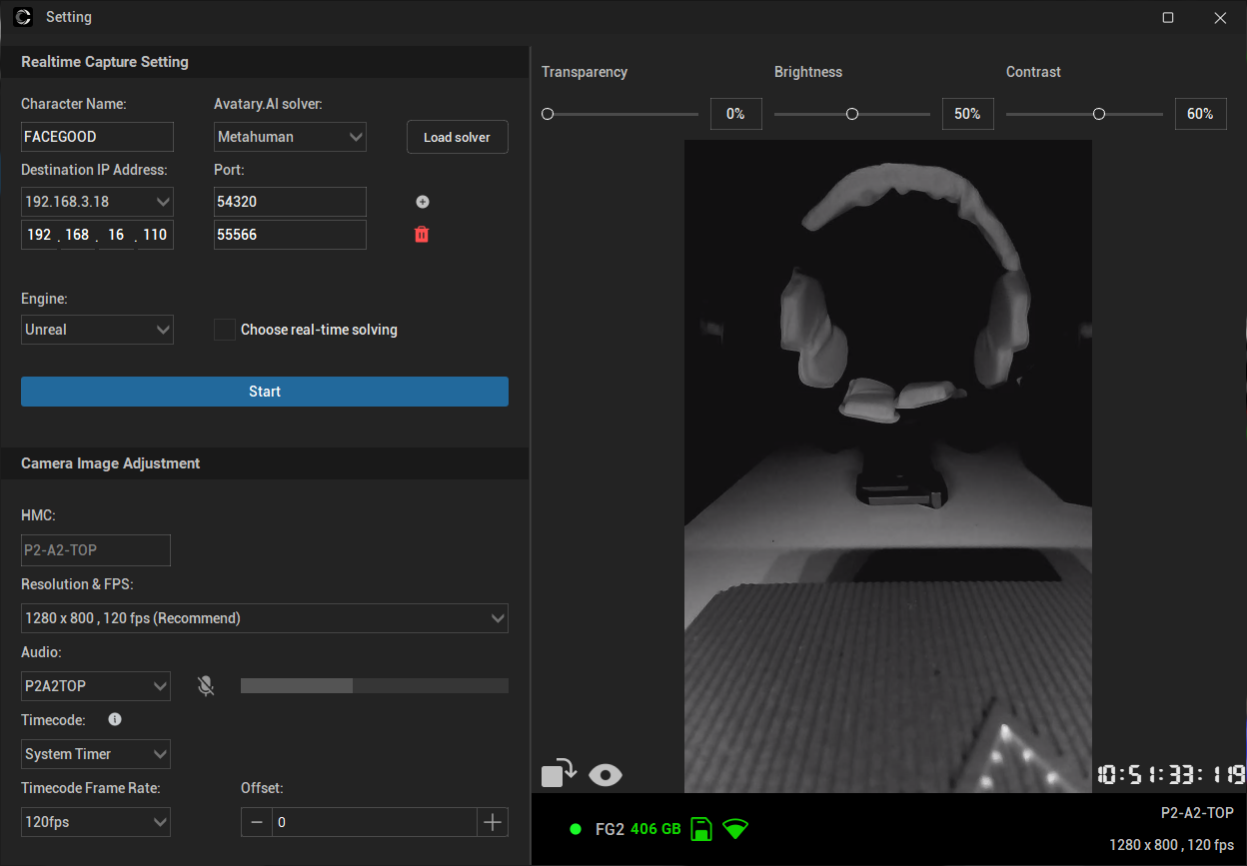
- 点击屏幕左下角的 “设置按钮” 来调整录制信息。
调整头盔的佩戴方式
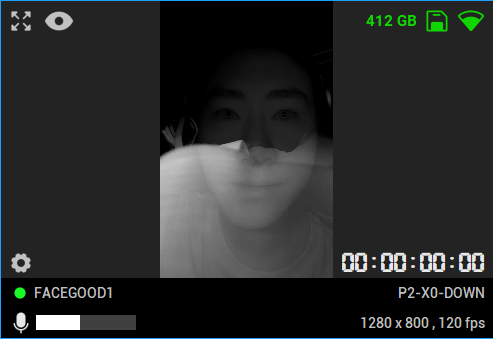
- 佩戴头盔时,请取下眼镜,并确保头发没有遮住眉毛。如果屏幕画面模糊,检查是否有污垢遮挡了镜片。对于 P2 头盔,可通过转动镜片方向来调整焦距。
- 调整标准
- 确保演员的面部特征清晰且没有遮挡。
- 将鼻子的中心与TOP摄像头的中心对齐。
- 保持清晰的对焦,避免出现过度曝光或曝光不足的情况。
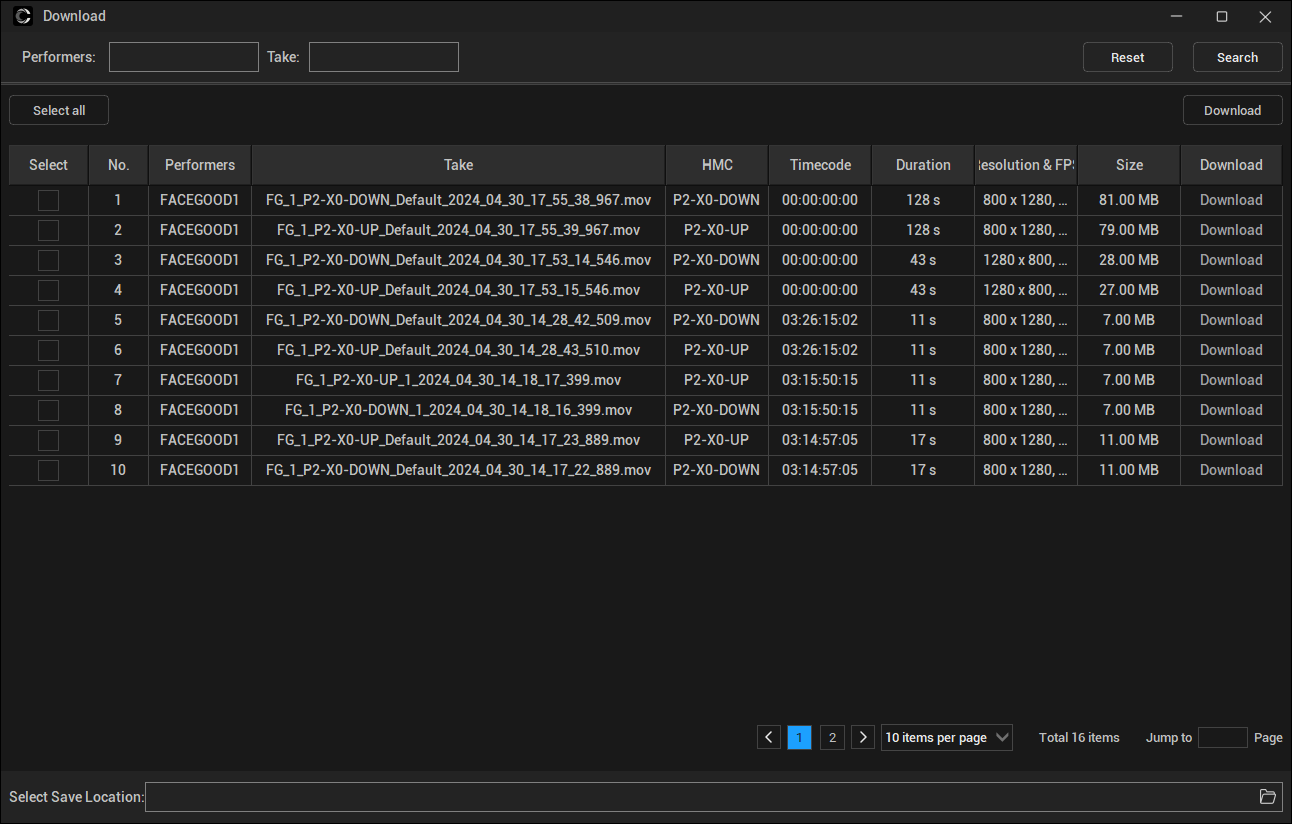
录制和下载
- 设置好下载位置后,点击 “下载”。
实时驱动
在 Capture Studio 中查看
要配置实时捕捉设置,请点击屏幕左下角的 “设置” 按钮。你需要选择 Avatary.AI 的类型(Metahuman \ ARKit )。
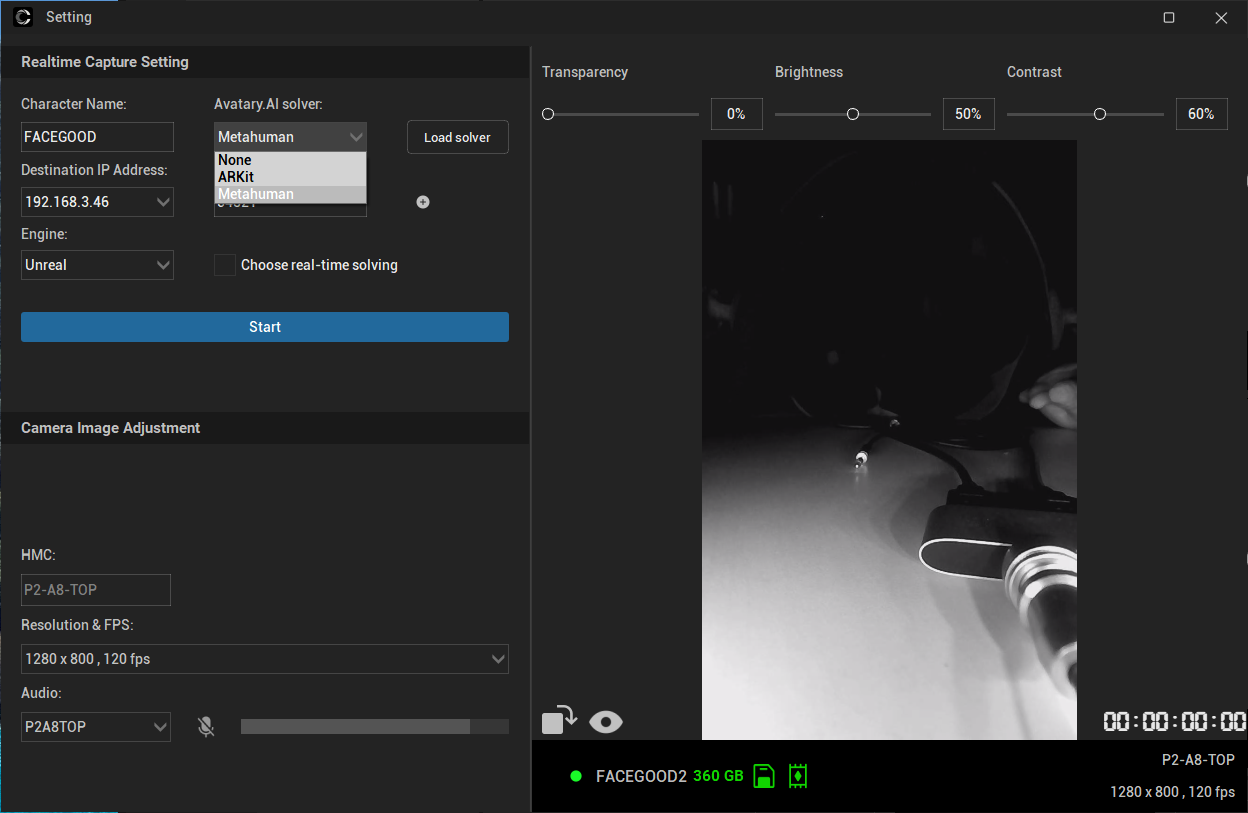
最后,点击 “Start” 按钮。
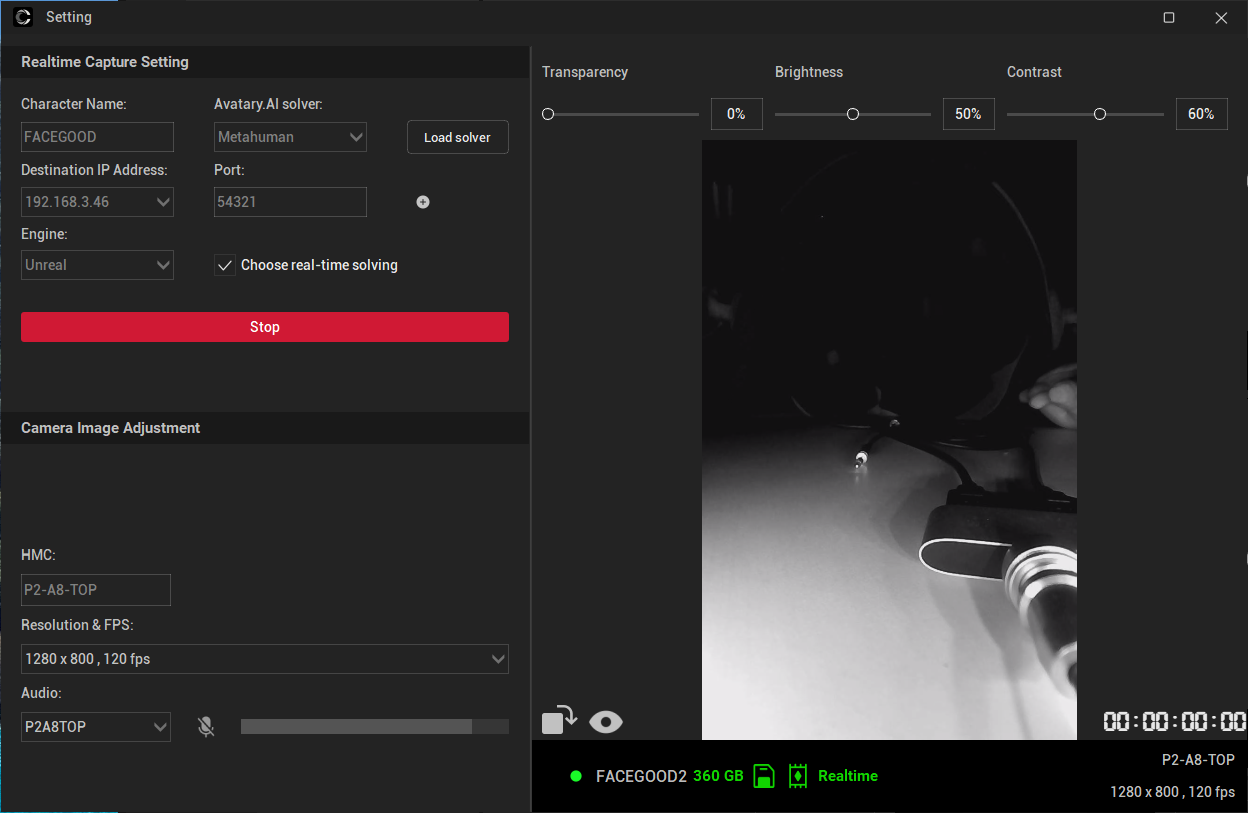
回到主页面,打开标题栏中的 "expression tuning" 子页面。在这里,你将能够看到捕捉工作室中内置模型的实时驱动效果。
NOTICE: 为降低功耗并延长电池续航时间。点击“Start”后,仅当画面中有人脸时才会开始计算。
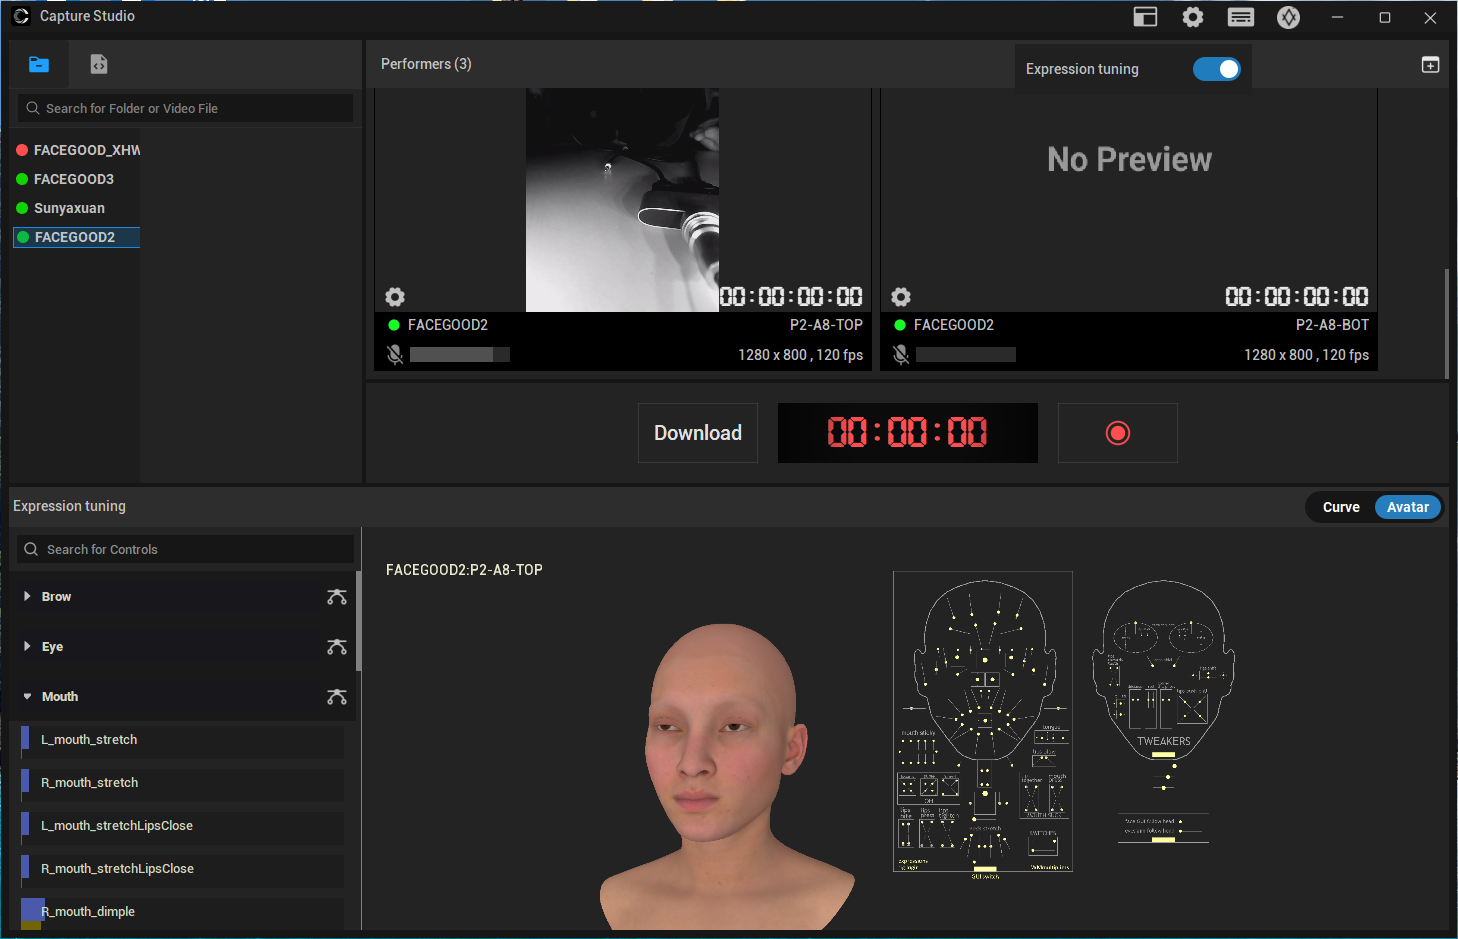
这些步骤将帮助你轻松设置实时捕捉参数,并在捕捉过程中调整表情,从而获得更精确、更逼真的效果。
在 UE 中查看
请使用 UE5.3 或更高版本,相关内容请参考此处的 UE 教程。
Calibrate Headset
Overview
Capture Studio provides two methods, screenshot and ruler, to calibrate the position of the helmet. These methods ensure maximum consistency in the helmet's position during each recording. Typically, helmet calibration is used for facial expression library solving and custom training projects.
Usage instructions
Snapshot
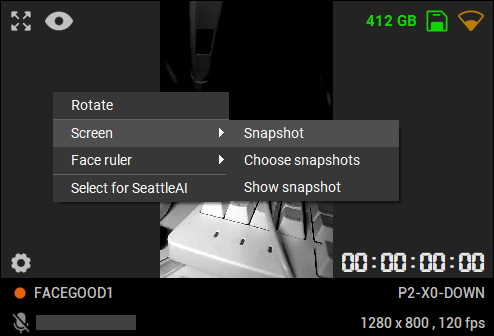
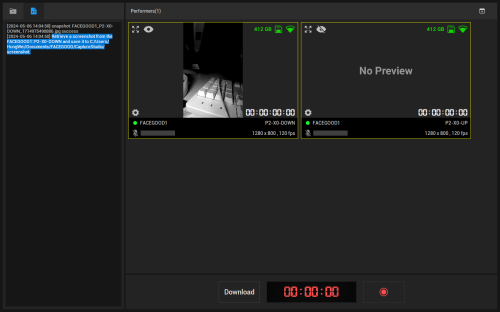
- Please right-click on the screen and select "Snapshot," then click "Console" to view the location where the screenshot is saved.
- When you need to record again, load the previously saved actor's screenshot so the software can quickly and accurately locate the position of the helmet from the previous session, thus improving work efficiency.
- After loading the screenshot, the previous helmet position will be displayed as a ghost image on the screen. At this point, align the positions of the sides of the nose and try to align the corners of the eyes and mouth with the ghost image as much as possible.
- It's important to note that different helmets may have different lens settings. Therefore, after changing the helmet, it may not be possible to adjust to the exact same angle as the previous helmet.
Ruler
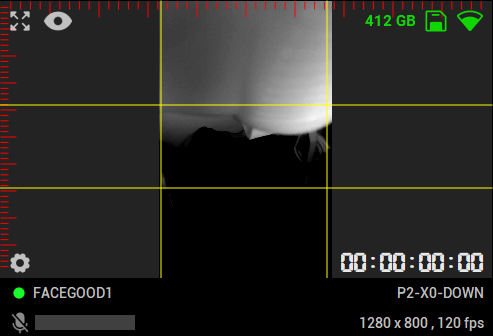
- Our software supports dragging out annotation lines, allowing you to quickly and accurately locate the previous position of the helmet.
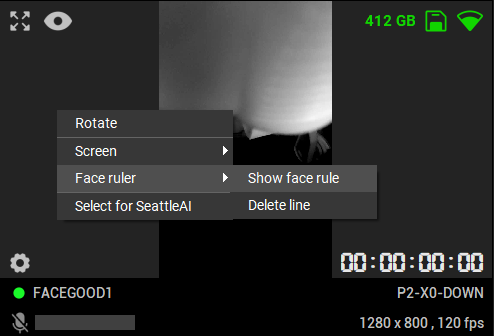
- Right-click on the screen and select "Show face rule" to enable this feature. Once enabled, simply drag out the annotation lines from the left or top of the screen to use them.
Audio & Timecode Device
Audio
- Using the P2 in Capture Studio will automatically use the P2's built-in audio, so you don't have to choose.
Timecode
Timecode devices are typically used to ensure frame alignment between multiple videos during animation pipeline. As different computer systems may have time discrepancies, using timecode ensure that the recording time remains consistent across different machines.
How to connect timecode device
- After connecting SmartUnit and Timecode using Timecode cable, set it in the Timecode option in the camera settings interface.
- How to connect SmartUnit with Timecode, please see here.

Capture Studio setting
Once the timecode hardware is connected
- In the audio settings tab, select the timecode device from the dropdown menu.
- Click the "Open" button next to the TimeCode to establish the timecode connection.
- After click 'Open', the timecode information will be displayed in real-time in the time information section below.
- Offset: to adjust the timecode offset by one unit of time.
Motion Capture Trigger
Overview
- Within the same LAN, the motion capture device triggers the facial capture recording, enabling synchronized recording of motion capture and facial capture. The naming convention for synchronized recording files is as follows:
{motion trigger name}_{performer name}_TOP/BOT.mov
Currently supported motion capture devices
- Optitrack
- Vicon
- Xsense
- Rokoko
- Qualisys
- AxisStudio
- CMAvatar
- XINGYING
- PeelCapture
How to use
- In Capture Studio, check the motion capture trigger option and select the corresponding motion capture device. Set the signal port to match the one on the motion capture.
- On the motion capture software, set the same port number as well.
- Set the file name on the motion capture software.
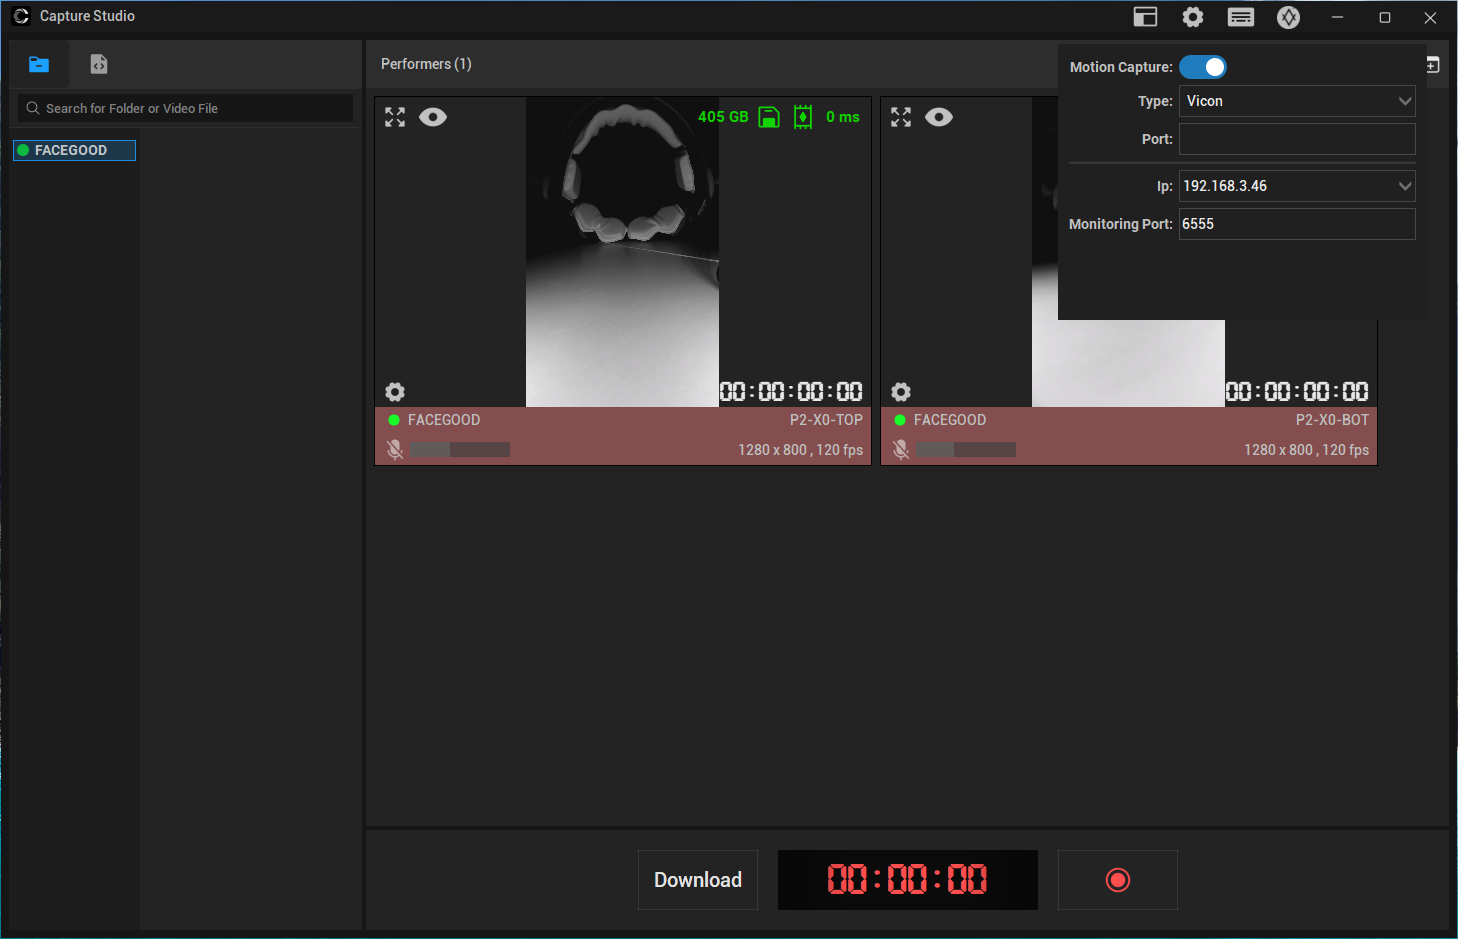
Optitrack
- Enable Remote Trigger.
- Fill in the XML Broadcast Port into Capture Studio.
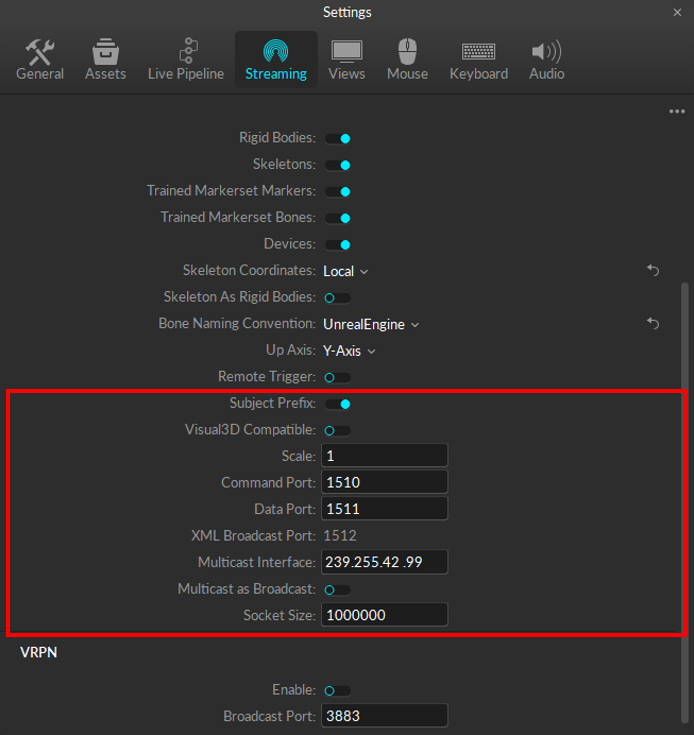
XML Triggering Port: Command Port (Advanced Network Settings) + 2. This defaults to 1512 (1510 + 2).
If you can not find XML Broadcast Port, you can check Optitrack document. V3.1, V3.0
Vicon
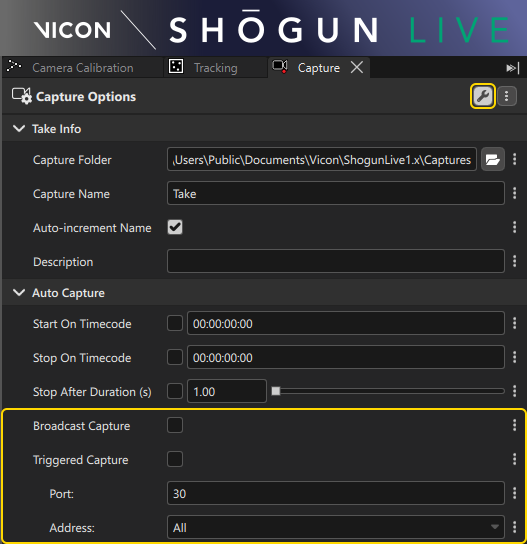
- Enable Triggered Capture.
- Set the same port number.
- Enable recording at the motion capture.
Xsense
Rokoko
Qualisys
Capture Studio Monitor
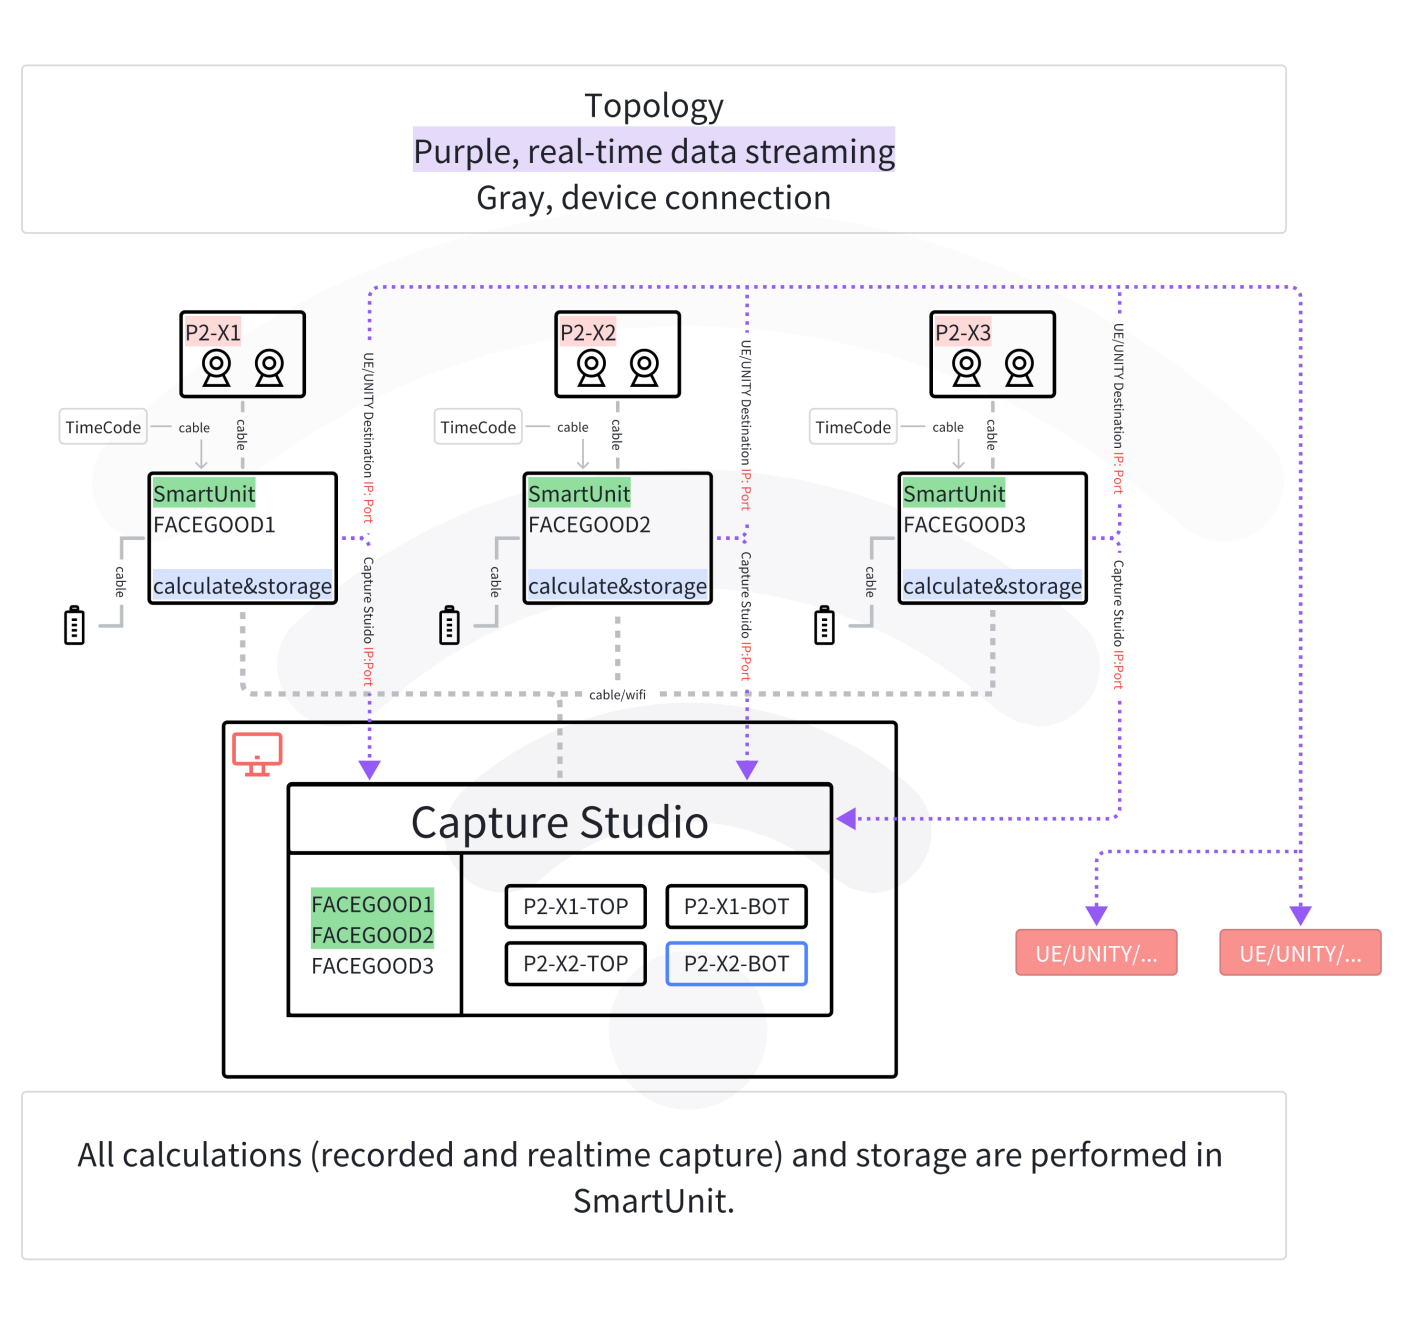
Capture Studio Monitor is software used to monitor the running status of Capture Studio in the local area network.
Download Now!!!
Usage scenario
After configuration, with the motion capture trigger function, one person can control motion capture and facial capture at the same time, and monitor the status of both at the same time.
How to use
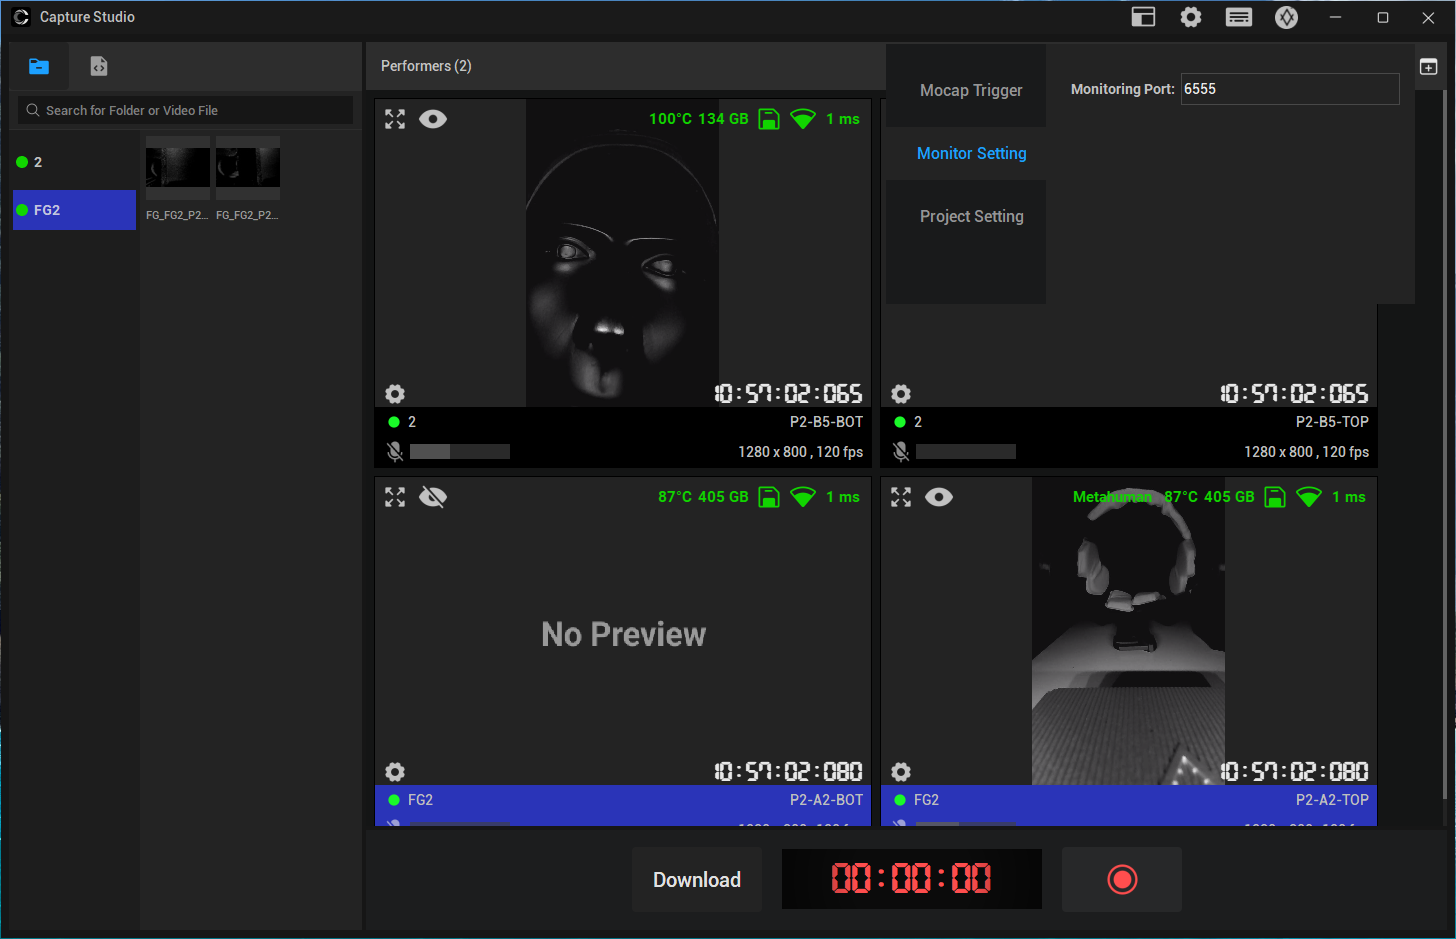
- Set the monitoring port in Capture Studio
- Open Capture Studio Monitor on another computer and set the same port.
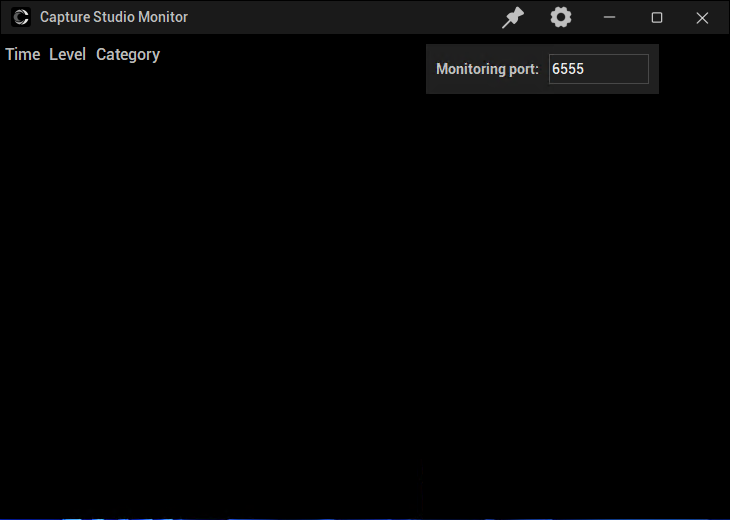
- In this way, the configuration is completed, and the operations in Capture Studio can be monitored in Capture Studio Monitor. If an error occurs, a red reminder will appear.

FAQ
常见问题
Capture Studio 支持使用普通网络摄像头进行录制或者支持其他设备吗?
Capture Studio 仅支持 FACEGOOD P2 系统。
Capture Studio 输出的视频格式有哪些?
录制的视频以 MOV 格式保存。
在 Capture Studio, 能够同时监控多少个演员呢?
在 Capture Studio 可监控的数量没有特定的限制。不过,由于渲染需要占用本地的计算资源,所以你可能需要 CPU 的使用情况来进行相应调整。建议不要同时查看超过 6 个画面。
Capture Studio 最多支持同时录制多少个硬件设备呢?
根据用户购买的订阅数量,将会提供特定数量的同步录制功能。
P2 录制的图像偏暗?
在 Capture Studio 中调整亮度和对比度设置,遵循在让脸部保持明亮的同时使周围环境暗一些的原则。
在使用 Capture Studio 时, CPU 的使用率达到了 100% 怎么办?
当在 Capture Studio 中同时连接多个 SmartUnit 并开启摄像头监控时,本地计算资源会被用于渲染图像,从而导致 CPU 使用率升高。为了降低 CPU 使用率,你可以调整头戴设备,然后点击图像中的 “眼睛按钮” 关闭监控。需要着重强调的是,CPU 使用率的上升并不会影响录制视频的质量,因为录制始终在 SmartUnit 内部进行。Capture Studio 主要用于监控和控制。
在 Capture Studio 中关闭屏幕监控后还能进行录制吗?
可以。为了减轻计算机的 CPU 负担,你可以在调整好头戴设备后选择关闭屏幕监控。这样一来,当你开始录制时,即便屏幕未被监控,也仍然可以进行录制。
为什么在 Capture Studio 中会出现延迟或轻微的画面撕裂现象呢?
Capture Studio 与 SmartUnit 之间是通过无线网络(WiFi)连接的。当路由器的资源被过度占用,或者 WiFi 信号质量较差时,就可能会出现严重的延迟和数据包丢失的情况,进而导致一些画面撕裂现象。不过,这并不会影响录制视频的质量,因为录制始终是在 SmartUnit 内部进行的。Capture Studio 主要用于监控和控制。
实时驱动
同时可以支持多少位演员进行实时驱动呢?
根据用户购买的订阅数量,将会提供特定数量的实时功能。实际上,它支持的数量是没有上限的。
一个演员的实时数据能够同时发送到多个目标地址吗?
当然,你可以在设置中添加多个目标地址,然后点击开始按钮。
动捕触发
它支持动作捕捉同步触发吗?
是的。Capture Studio 原生支持对 Xsens、Optitrack 和 Vicon 等的触发,无需购买第三方动作捕捉软件。此外,还与诸如 PeelCapture 等第三方动作捕捉触发软件兼容。
