Animator Tutorial: Difference between revisions
(→FAQ) |
|||
| Line 358: | Line 358: | ||
# Check Depth 'Map Influence option' and change the tab to 'None' | # Check Depth 'Map Influence option' and change the tab to 'None' | ||
# Recalculate animator performance animation | # Recalculate animator performance animation | ||
[[File:Animation Jitter1.png|center|frameless|2560x2560px]] | |||
[[File:Animation Jitter2.png|center|frameless|1280x1280px]] | |||
* '''Is it possible to record videos in other software?''' | * '''Is it possible to record videos in other software?''' | ||
Revision as of 08:26, 14 August 2024
Overall Workflow
- Capturing with Capture Studio, make sure you have a calibration video and a performance video(where it should have a natural pose inside it)
- Set up Python and your system environment
- Camera Calibration
- Stereo Camera Video Data Processing
- Import data to Unreal
- Produce Identity Data and solve anim data
EPIC Reference Tutorial
You can also access those tutorials to have better knowledge of the whole pipeline.
- https://www.youtube.com/watch?v=qPhn28Jk3Mo
- https://www.youtube.com/watch?v=d3k9rfA9xjs
- https://www.youtube.com/watch?v=-2DH4nX7wT8
- https://www.youtube.com/watch?v=Nkb4DEoZ_NY
- https://dev.epicgames.com/documentation/en-us/metahuman/metahuman-for-unreal-engine/capture-guidelines#usingastereoheadmount
- https://dev.epicgames.com/documentation/en-us/metahuman/metahuman-for-unreal-engine/stereo-camera-calibration-and-tools
Video Tutorial
Set up Python and your system environment
Before get started, please read the Preparation Guidelines: Stereo Camera Calibration and Tools
NOTES:
- Require proficiency in using Python, ffmpeg, and Windows system environment settings
- Install ffmpeg (optional,It depends on whether your video has timecode.)
- Click this link to download the Stereo Capture Tools to your computer. Unzip the file and open the folder.
Install FFmpeg
The bundled Python scripts require FFmpeg to be installed and available on the system path. You can download FFmpeg from ffmpeg.org.
Once installed make sure to add the folder where the ffmpeg.exe binary resides to the system path. You can do this via Windows Settings > Environment Variables, and then adding it as a new entry to your path.
Install Python
To run the bundled Python scripts, install Python 3.9.7 or above. Once installed, add Python to your user's path via the checkbox in the installer. You can download Python from python.org.In order to better control different versions of python, it is recommended to use anaconda.
Install Python Dependencies
- Locate the requirements.txt file within the stereo_capture_tools-0.1.9 folder.
- Using "conda activate base" in your cmd to activate the python environment, you can also type "conda env list" to check the python environment that you already installed. And then change path to requirements.txt in cmd.
- And then type "pip install -r requirements.txt" to install the python environment.

Capturing
Capture Guidelines
Capture Guidelines include details on camera settings, lighting conditions, framing, and other technical aspects necessary to achieve the desired quality and consistency in the captured footage. Following capture guidelines ensures that the footage meets the required standards for further processing and production.
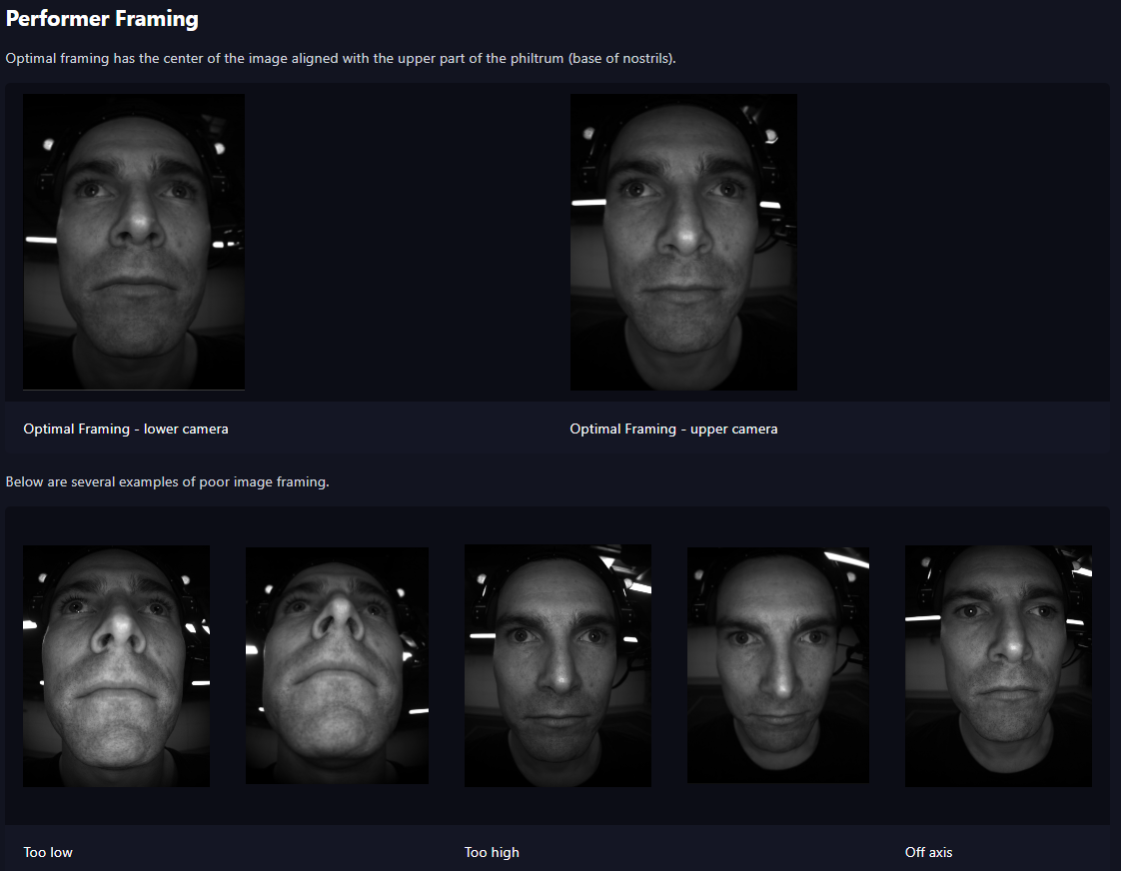
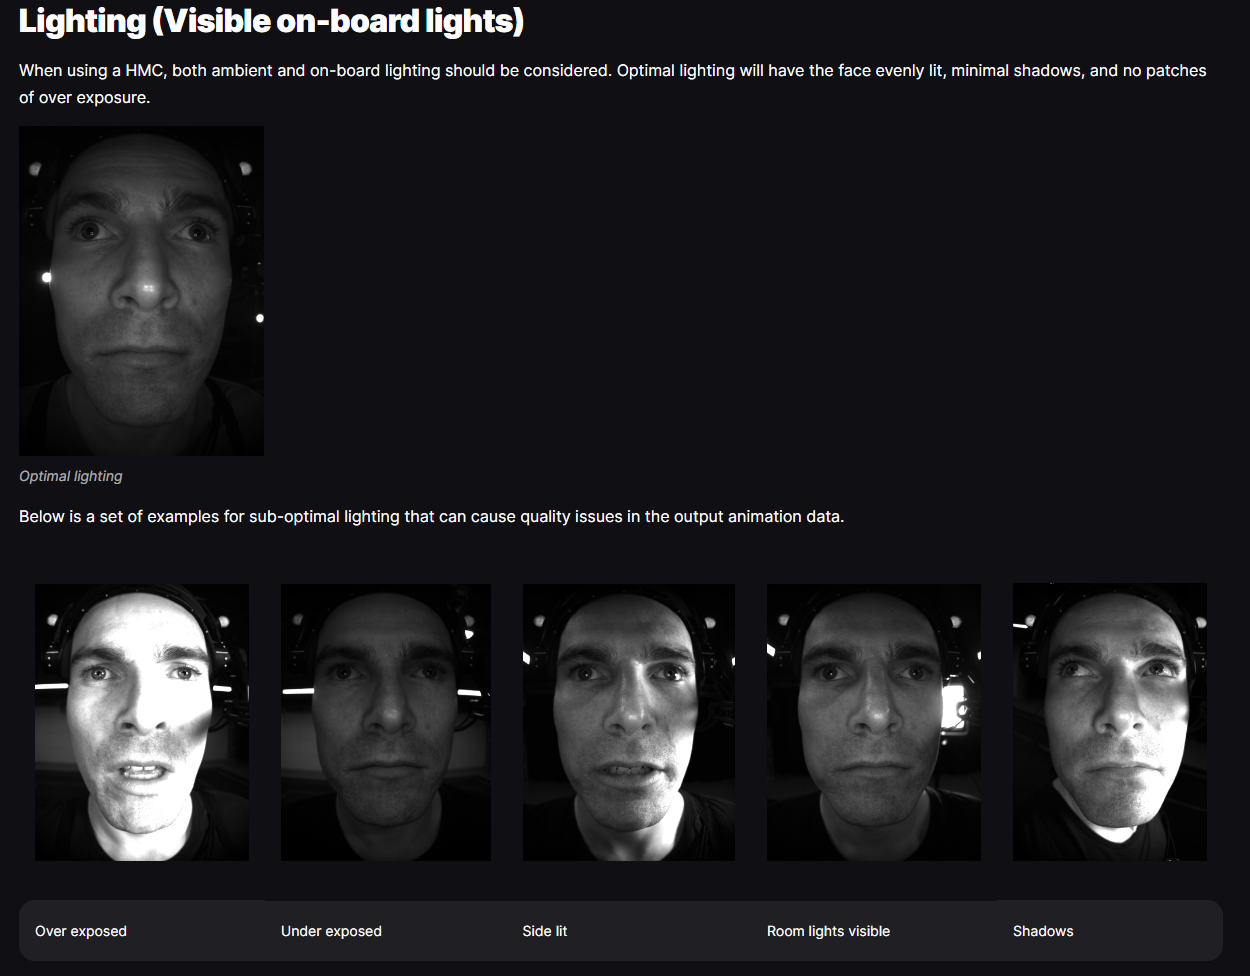
- Specific calibration footage should be taken at the start and the end of a capture session to bookend the shoot.
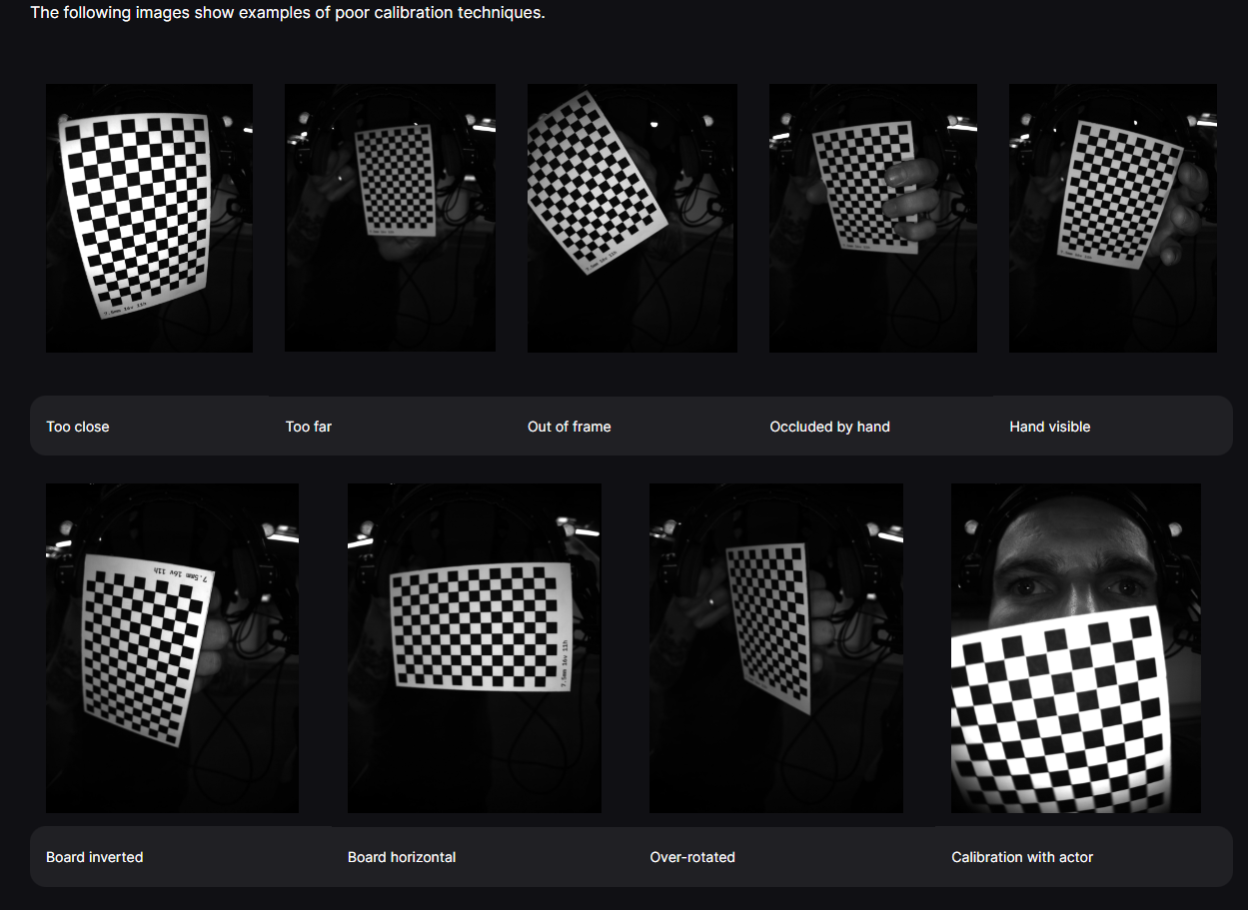
- During calibration capture, you are attempting to paint the space with the calibration board. For each capture, the board should be moved across the field of view, including movements of up, down, left, right, roll, and pitch, in the plane where the performer’s face will be or was positioned. The video should be approximately 20 seconds long.
- The following images show examples of poor calibration techniques.
Hold the head of the helmet with your left hand, hold the calibration plate on your forehead, and move within the performer's face area.
Data Processing
Environment Confirm
Type "conda env list" in your CMD to check the python environment. Type "conda activate base" in your CMD to activate the python environment.
Please ensure that all data is accompanied by timecode information.
- If the recorded video does not contain timecode information, you can manually add timecode to the video using the following command.
ffmpeg -i performance\bot.mp4 -c copy -y -timecode 00:00:00:00 botT.mp4
Data Structure
To demonstrate how to prepare sample footage, you will run through a quick example. Here we assume that you have some calibration footage and two actor performances. One actor performance will be used for identity creation and the other as an actual performance.
In each of these cases, there are two video files (bot and top) with an additional audio file (audio.wav) for the performances. Or, more visually:
+---example_data
| +---identity
| | audio.wav(optional)
| | bot.mov
| | top.mov
| |
| ---performance
| audio.wav(optional)
| bot.mov
| top.mov
|
+---calibration
| bot.mov
| top.mov
Process the Calibration data (converting the footage to image sequences)
This command will convert video into image frames for import into Unreal for use
python mh_ingest_convert.py
bot c:\MyData\example_data\calibration\bot.mov
top c:\MyData\example_data\calibration\top.mov
c:\MyData\example_data_prepared\calibration
Enter the command in your cmd without line breaks.
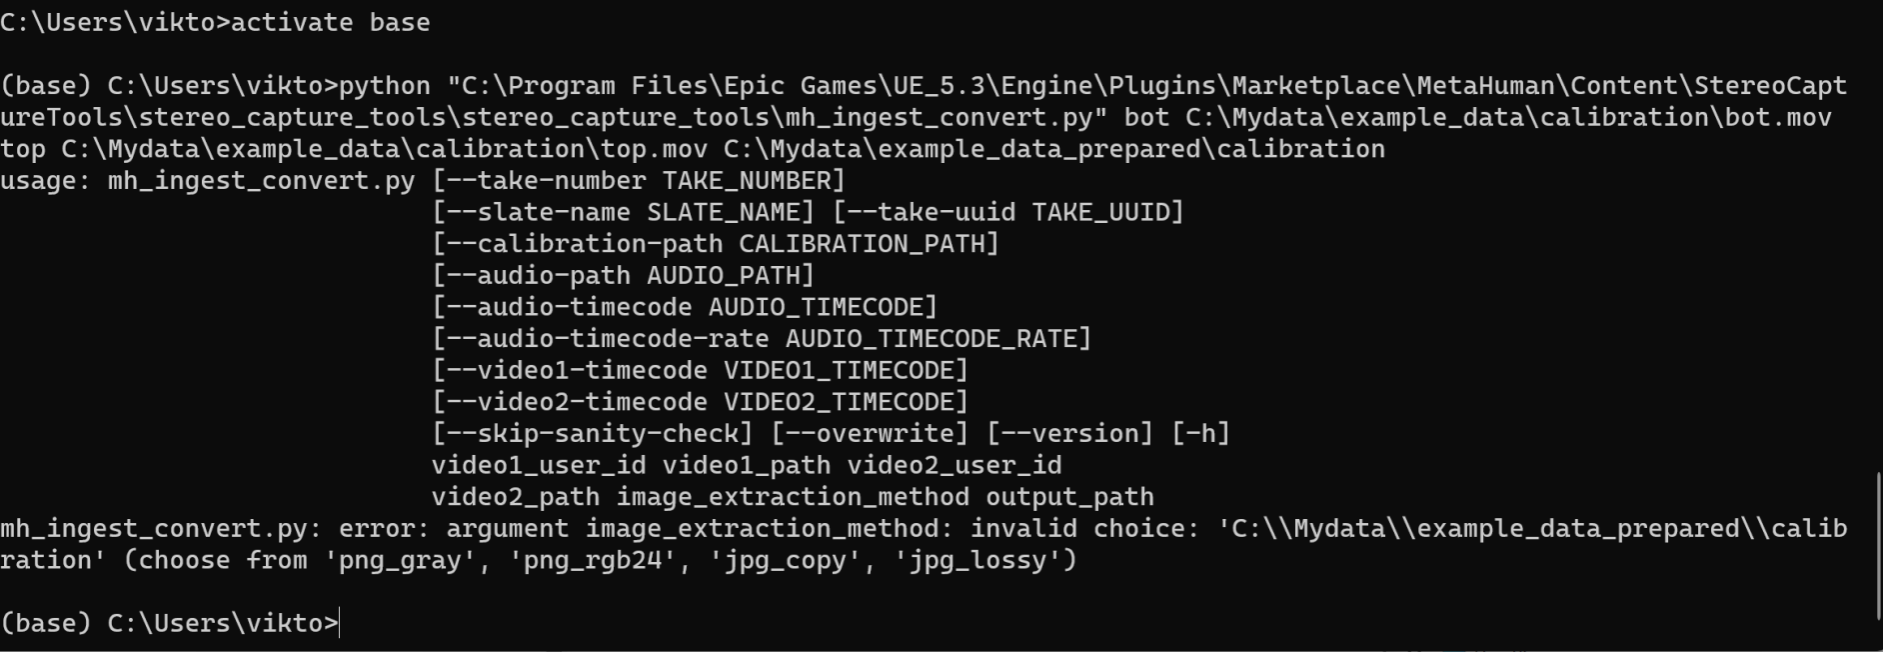
If you are using Unreal 5.3 or newer version, you need to identify the output image format
python "C:\Program Files\Epic Games\UE_5.3\Engine\Plugins\Marketplace\MetaHumanTest\Content\StereoCaptureTools\stereo_capture_tools\stereo_capture_tools\mh_ingest_convert.py"
bot c:\MyData\example_data\calibration\bot.mov
top c:\MyData\example_data\calibration\top.mov
png_rgb24
c:\MyData\example_data_prepared\calibration
Otherwise, you will get this error. Pick any format from 'png_gray', 'png_rgb24', 'jpg_copy', 'jpg_lossy'
Process the Identity data (converting the footage to image sequences)
Same operation as above.
If you need audio, you can use
python "C:\Program Files\Epic Games\UE_5.3\Engine\Plugins\Marketplace\MetaHumanTest\Content\StereoCaptureTools\stereo_capture_tools\stereo_capture_tools\mh_ingest_convert.py"
--audio-path C:\MyData\example_data\performance\audio.wav
bot c:\MyData\example_data\identity\bot.mov
top c:\MyData\example_data\identity\top.mov
png_rgb24
c:\MyData\example_data_prepared\identity
Process the Performance data (converting the footage to image sequences)
Same operation as above.
Camera Calibration
overview
Install the CalibrationApp, and then find the path of CalibrationApp.exe
To see all of the available options, run the following command:
CalibrationApp.exe --help
Defining the Calibration Board
The parameters of the calibration board used to capture the calibration footage need to be defined and specified as input to the calibration app.
Open the file and update the following parameters to match the characteristics of your calibration board:
ptternHeight
- The number of internal corners on the height of the board.
- This is the number of squares minus one.
patternWidth
- The number of internal corners on the width of the board.
- This is the number of squares minus one.
squareSize
- The edge size of each square in cm.
The system does not support grids composed of shapes other than squares.
If you are using the calibration board we provide,
Then the configuration file should look something like this:
{
"cameras": [
[
"top",
"bot"
]
],
"defaultBlurThreshold": 7.5,
"patternHeight": 15,
"patternWidth": 10,
"squareSize": 0.75,
"validFramesCountThreshold": 15
}
To use your new configuration, pass it to the calibration app using the -c parameter as such:
"path\CalibrationApp.exe"
-f c:\MyData\example_data_prepared\calibration
-e c:\MyData\example_data_prepared\calibration\calib.json
-n 30
Alternatively, these parameters can be overridden on the command line using the --sq (--squareSizeOverride), --ph (--patternHeightOverride) or --pw (--patternWidthOverride). For example:
"path\CalibrationApp.exe"
-f c:\MyData\example_data_prepared\calibration
-e c:\MyData\example_data_prepared\calibration\calib.json
-n 30
--sq 0.75 --ph 15 --pw 10
Examine the calibration quality
During the calibration process, check the output command line. If the mse value exceeds 1, it indicates that the calibration quality is low.

Ingest Structure
Copy the "calib.json" file to the "identity" and "performance" folders, or to all video folders that require Animator solving. The final folder structure will look like this:
+---example_data_prepared
| +---identity
| | +---bot
| | 001.png
| | 002.png
| | ...
| | +---top
| | 001.png
| | 002.png
| | ...
| | audio.wav
| | calib.json
| | take.json
| | thumbnail.jpg
| |
| +---performance
| | +---bot
| | 001.png
| | 002.png
| | ...
| | +---top
| | 001.png
| | 002.png
| | ...
| | audio.wav
| | calib.json
| | take.json
| | thumbnail.jpg
| |
| +---calibration
| | +---bot
| | 001.png
| | 002.png
| | ...
| | +---top
| | 001.png
| | 002.png
| | ...
| | calib.json
| | take.json
| | thumbnail.jpg
The bot and top directories contain image sequences created from the input video files. These will be in .png or .jpeg format depending on the command line arguments supplied to the mh_ingest_convert.py script.
The take.json is a metadata file which contains all the necessary information about a take in order for it to be ingested into Unreal Engine. This includes details about the Slate and Take number, timecode information, and frame ranges alongside paths to the associated take files. These files include image sequences, thumbnail, and calibration.
Depending on the arguments supplied to the mh_ingest_convert.py script, there may be additional files copied into the output directory structure. For example, using the --audio-path argument will additionally copy the supplied audio file into the output folder.
Import Data to Unreal
Using capture source to import Data. Set the path to example_data_prepared
- Load the metahuman plugin and restart the project
- Right click the Content Browser to new a capture source
- Change the source type to Stereo HMC mode in the capture source
- Set the capture source
- Click on: Select Project - Add to Queue - Import, and wait for all imports to succeed.
Animator solving
- New a Metahuman Identity component, double click to Edit
- Add the Identity by the footage
- In the metahuman identity window, you can select B ->depth mesh, and then switch to the B viewport in A | B to observe the reconstruction of depth data, in order to determine whether the first step of camera calibration meets the standards.
- Building Mesh
FAQ
- Animation Jitter
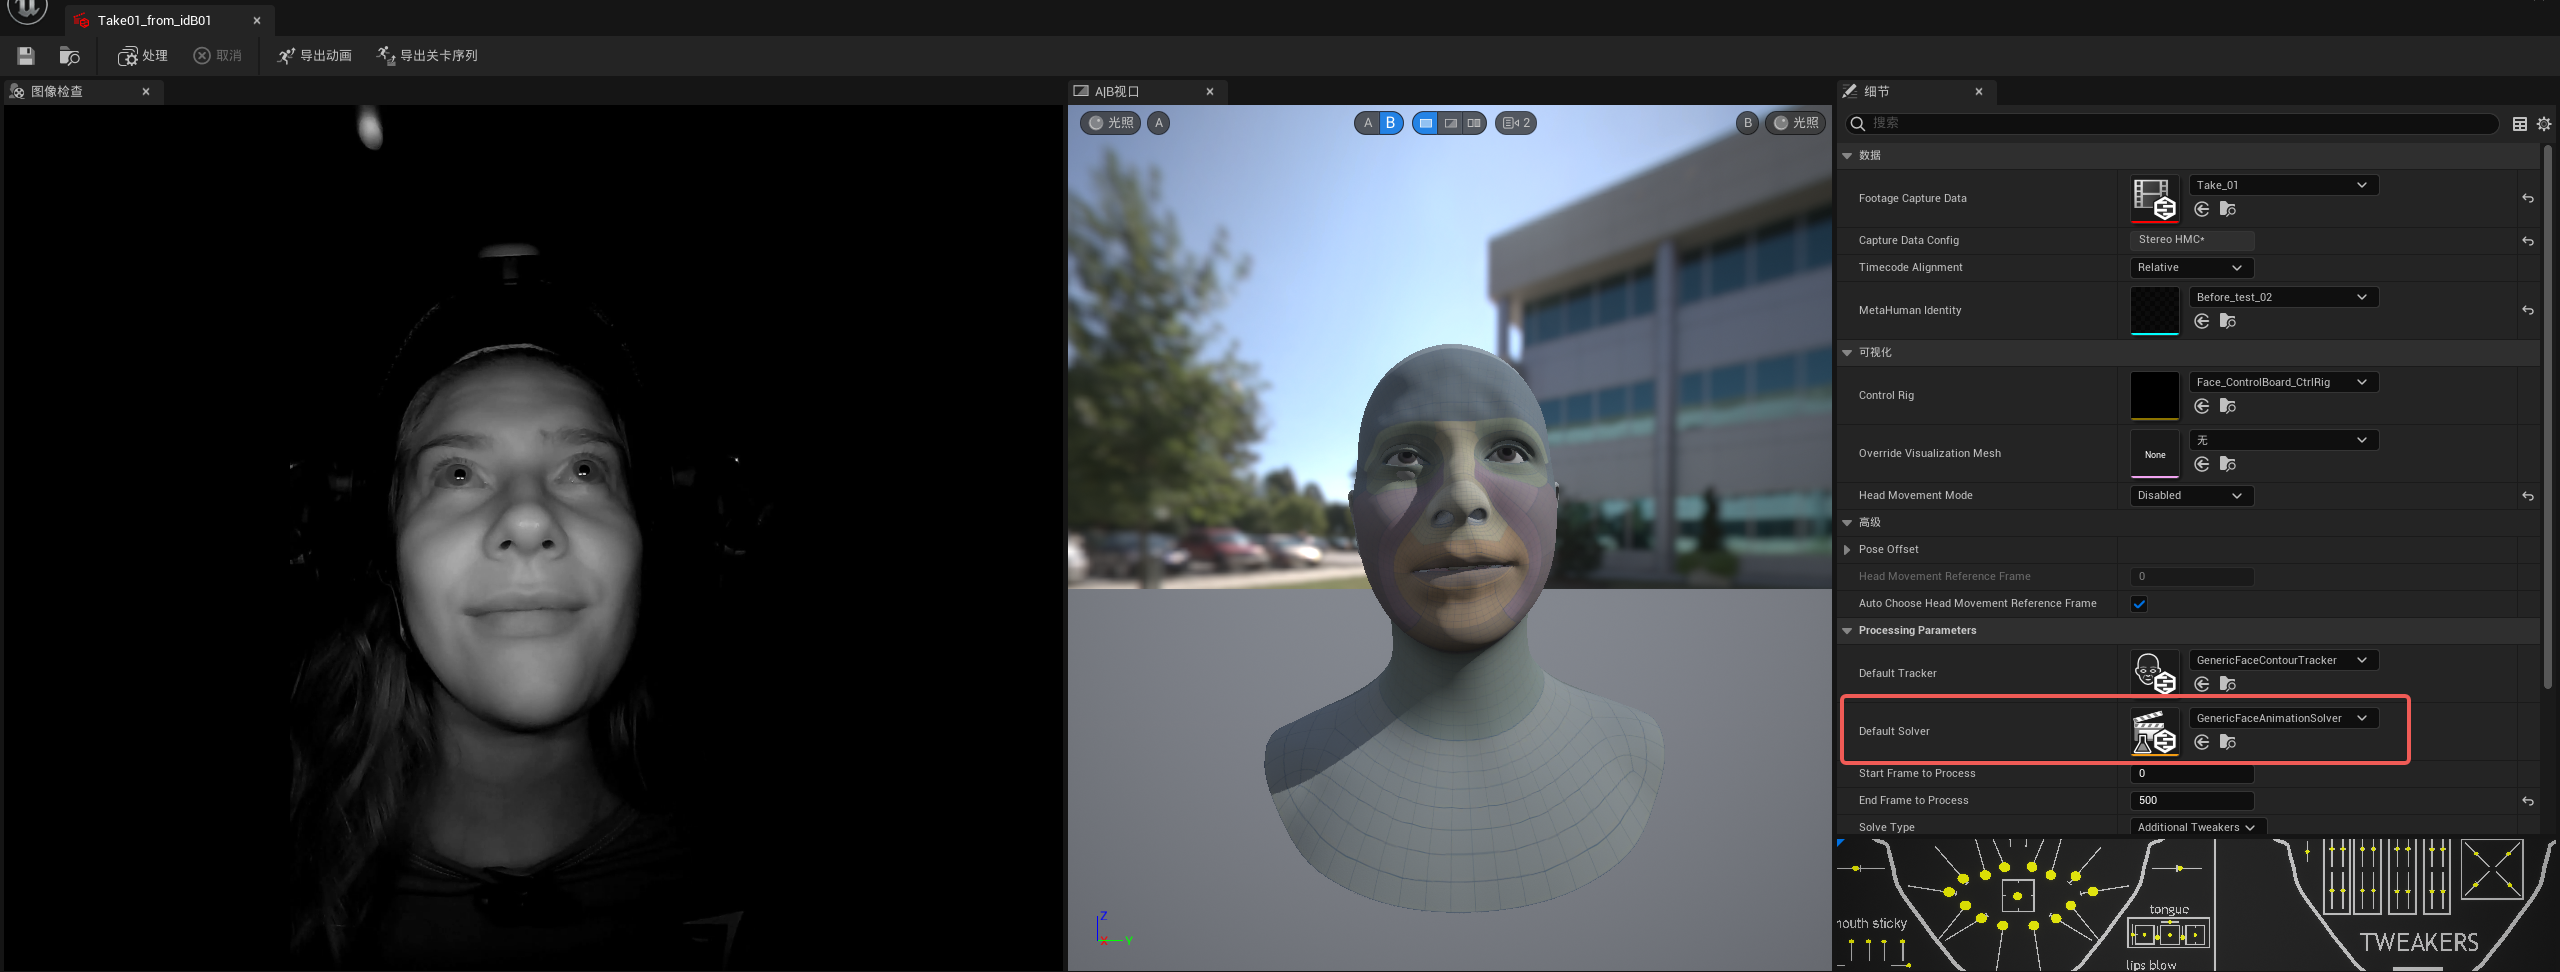
If abnormal mouth jitter occurs in the calculated facial animation, please follow the following settings to reduce the impact of depth information on facial animation.
- Open the Metahuman Performance tag window, double-click Default Solver file to open
- Check Depth 'Map Influence option' and change the tab to 'None'
- Recalculate animator performance animation

- Is it possible to record videos in other software?
Livedrive Android can also perform dual-camera video recording.
- When processing identity data, an error occurred due to inconsistent video frame rates.
The reason is that when using Livedrive Android for recording, there is a slight decimal deviation between two videos, such as one being 60.25fps and the other 60.03fps.
The solution:In the mh_ingest_convert.py script, there is a calibration process for the frame rates of the two videos. You can comment out these two lines to complete the subsequent tasks without any issues.
- If you find that the depth information in Unreal Engine is too poor
It is likely due to the calibration video not being produced properly. I suggest remaking the calibration video.
- During the process of creating a calibration video, it's important to ensure that there isn't too much deviation in the front-to-back position (the distance between the calibration board and the camera). The front-to-back position should align with the horizontal position of the actors' noses.
- During the slow movement of the calibration board, it's essential to cover most of the lens positions (circling around the lens position and simultaneously rotating the calibration board to create circular movements).
- When creating the calibration video, nothing should appear in the lens except for the calibration board. For example, the hand holding the calibration board should be completely hidden behind the board.